![定番小物からはじめる かぎ針編み初心者コース[第7回]](https://ronique.jp/wp-content/uploads/2022/02/bigginer_title07.jpg)
In the sixth session, participants knitted motif-connecting pieces that could be knitted in a short amount of time.
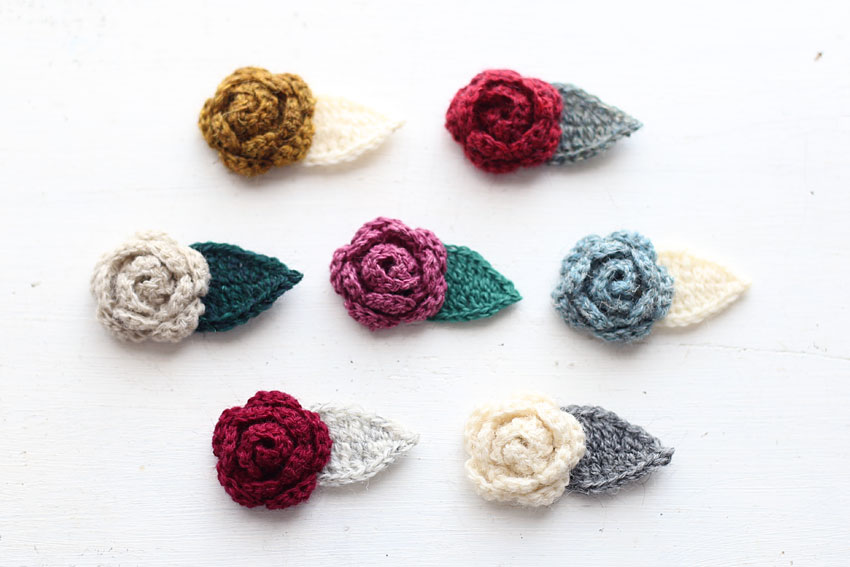
Now that you've gotten used to knitting with thinner yarn, let's knit flowers together in this 7th installment!
There are many different types of crocheted flowers, from flat to three-dimensional, and there are many variations in the crocheting techniques.
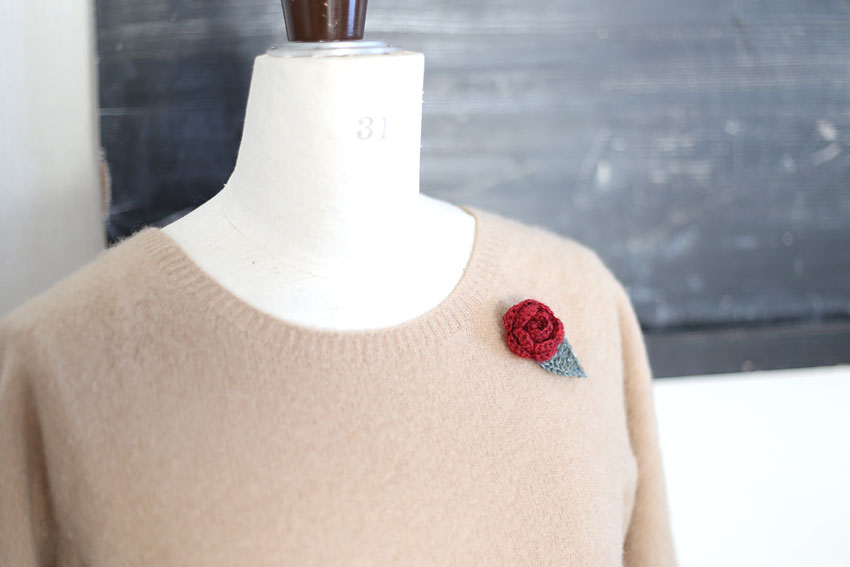
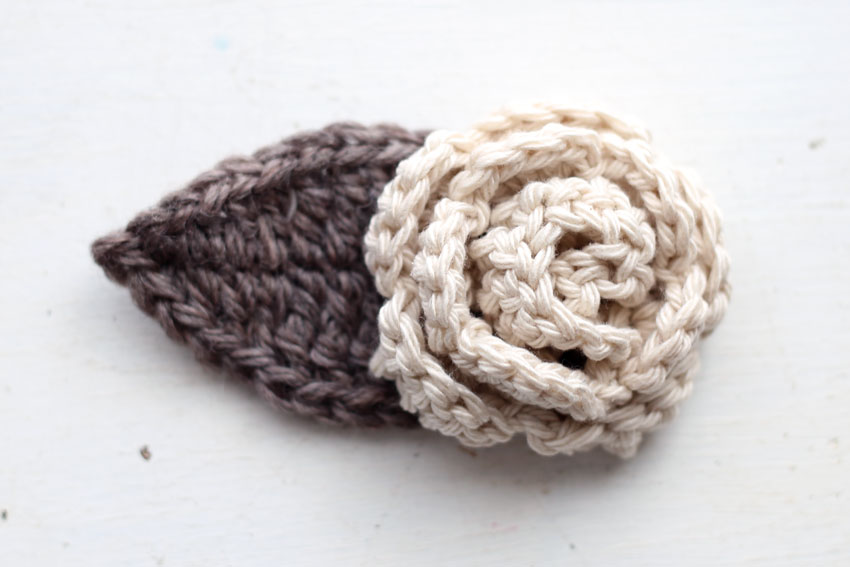
The piece I will be knitting this time is a slightly three-dimensional flower, as you can see in the photo.
There are some parts that are knitted in a similar way to the previous motif, so please give it a try as an application.
The overall knitting pattern may look a little complicated at first glance, but this time we have prepared a knitting pattern that allows you to see how to knit each row.
This page explains each row based on this knitting pattern.
Don't worry, the video shows you how to knit from start to finish.
However, if you are a beginner who has never held a crochet hook before, it may be a little difficult to skip lessons 1 to 6 and try knitting this piece as your first project, so we recommend that you follow the steps in the beginner's course and give it a try (we recommend that you complete lessons 1 and 6 before knitting this one).
In addition to attaching a pin to the back of this flower to turn it into a brooch, you can also use it as a hair tie, use it without the leaf, or add another leaf.We hope you will find it useful in a way that suits your taste.
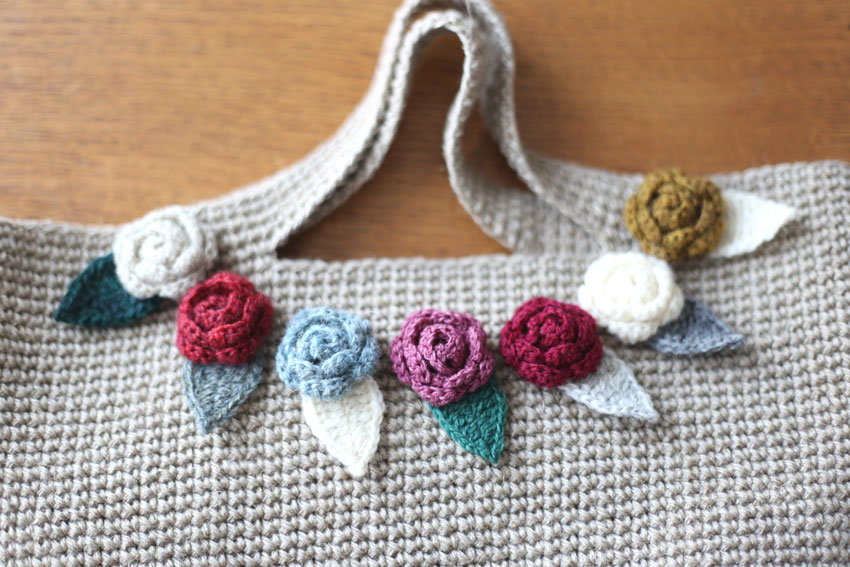
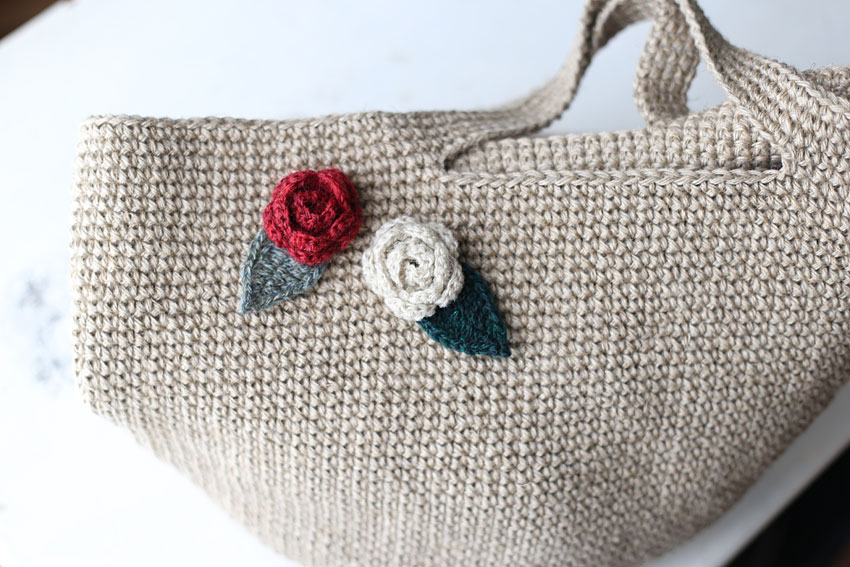
It would also be great as a focal point on a simple bag, like the market bag we knitted in the 5th installment.
If you knit several in different colors, you can have fun coordinating the colors to match your outfit of the day.
This is another project that can be completed in a short amount of time, so you can easily knit it for yourself or as a small gift.
So, let's enjoy crocheting together in the 7th episode!
Index
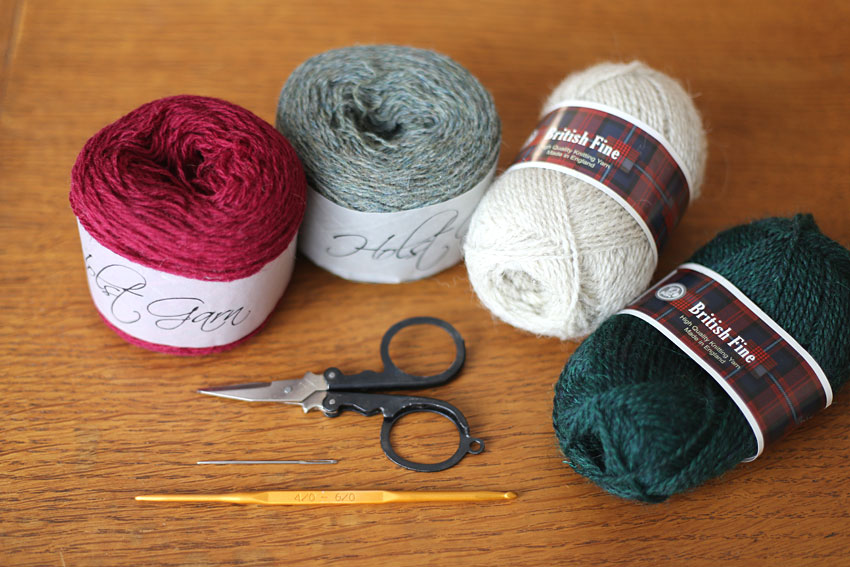
First, prepare your tools and yarn.
What you will need
Here's what I prepared to knit this piece:
・Medium-fine yarn Flower: 2g Leaf: 1g
・Size 4 crochet hook
• Tapestry needle (yarn needle)
• Scissors
・Brooch pin
The thread I used this time is Puppy British Fine, the same thread I used for the bookmark in the previous motif connection.
If you have any leftover yarn, please try using it if the color matches.
It has a soft wool texture and is very cute.
As for other types of yarn, there are many types of medium-fine yarns that are easy to obtain, so try looking for a yarn with a texture and color that you like.
Which crochet hook do you recommend?
This time, as with the last time, the yarn used is medium-fine, so the crochet hook should be around size 3 to 5 (I used a size 4 crochet hook).
If you use thin yarn, your hands won't get too tired, so try using your favorite type of crochet hook.
It would be convenient to have a few different sizes so that you can change to a larger size if your hands get too tight.
What yarn weight do you recommend?
If you find it difficult to knit with thin yarn from the start, we recommend trying it out with a thicker yarn of medium weight.
If you use the medium-fine yarn listed as the yarn to use, the finished product will be small, making it the perfect size for a brooch.
Choose the thickness of the thread according to your needs and preferences.
What yarn material do you recommend?
If the yarn is thin and too soft, it can be a little difficult to knit until you get used to it, so if you are using thin yarn, we recommend using yarn with a moderate amount of tension.
Also, when it comes to winter yarns, mohair yarns have a lovely texture and are very appealing, but they can be difficult to unravel if you make a mistake. It might be best to wait until you get used to knitting with them.
There are a variety of slightly stiffer thin yarns for summer materials, so try having fun with materials that suit the season.
What yarn color do you recommend?
For this project, you may need to find and check the stitch position to determine where to insert the needle and knit.
In such cases, it is easier to see if you use thick yarn in a bright color, so if you have any leftover yarn, it might be a good idea to try knitting it.
And if you are knitting using thin yarn from the start, it is a good idea to choose a lighter color.
Once you knit it once you'll get the hang of it, so once you get used to it, try knitting it in your favorite color.
A Closer Look at the Project and How to Make It
Why did we choose a camellia flower brooch for the 7th edition?
I have never knitted a fashion item as part of a beginner's course before, so this time I decided to make a brooch that would allow me to have fun using different colors.
I hope you can experience the variety of crocheted items, from interior accessories to bags and small wearable items.
This knitting method is an application of the previous motif work, so I think this slightly complicated knitting pattern will be easy to notice.
What is the size of the work?
This piece will be sized as follows:
・Flower: 3.5cm diameter
・Leaf: 2.5cm long x 5.3cm wide
When the leaves are attached to the flower, the size will be approximately 6.5cm across, depending on how you attach them.
How do you knit a camellia flower brooch?
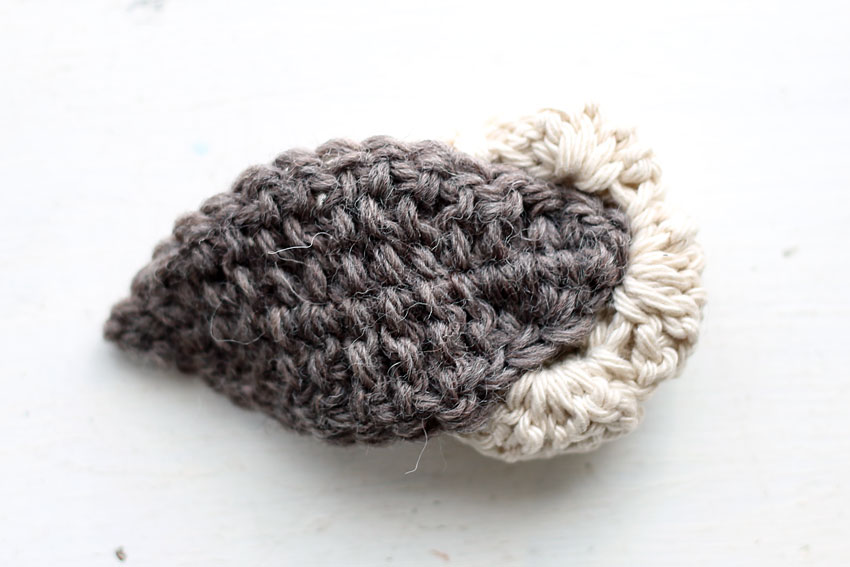
To make the leaf, start by casting on a chain, then continue knitting using stitches of different heights to create a leaf shape.
To make the flower, start by casting on the chain in a loop, and knit in a different way each step.
When you actually try knitting, you may get a sense of how the petals form when knitted.
It's okay if you don't understand the knitting pattern at first!
Let's move our hands together while watching the video.
It's okay to just look over the knitting pattern as a way to review it.
What is the point of this piece?
The main point of this project is that I hope that when you finish knitting, you will feel a sense of joy and accomplishment when you see that it has turned into a flower!
Flowers are so cute, and it's so satisfying when they're finished.
The flowers this time are three-dimensional enough to be easy to use, and I tried to create a design that makes the curls of the petals look beautiful.
I also tried to make sure the knitting method wasn't too complicated.

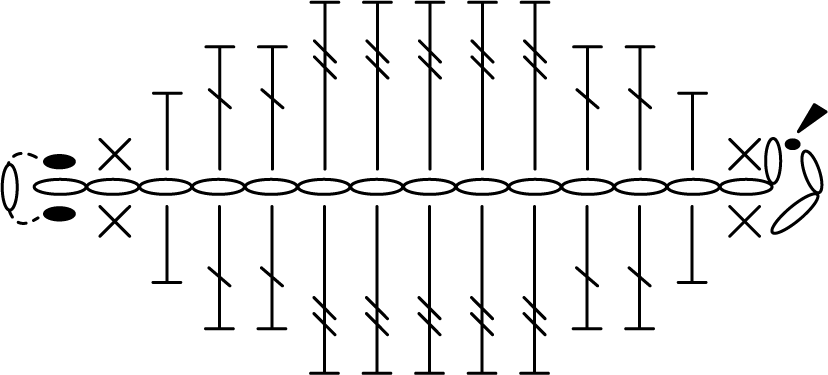
How to Read the Crochet Chart
▶The knitting pattern is available as a PDF file.
Camellia flower brooch knitting pattern
First, here is the knitting pattern for a leaf.
For this project, let's start by knitting the leaves, which are easy to knit.
Next is the knitting pattern for the flower.
When you look at all the rows of a flower knitting pattern at once, it can be difficult to tell which part to knit in which row, so we have prepared a knitting pattern that allows you to see each row individually.
After this, I will explain how to knit by looking at the knitting pattern for each row.

・What do the crochet chart symbols mean?
The following six symbols appear in this knitting pattern:
Chain

Slip Stitch

Single Crochet

Double Crochet

Treble crochet

Cutting the thread

As before, the numbers and arrows indicate the row number and knitting direction.
This time, the knitting pattern is shown in two dimensions, but if you knit exactly as shown in the pattern, the actual knitted fabric will be three-dimensional.
How to knit leaves
To make the leaves, start by chaining 14 stitches and then casting on.
For the first row, start with 1 chain stitch and crochet 1 double crochet, then crochet 1 double crochet, crochet 2 double crochets, crochet 5 double crochets, crochet 2 double crochets, crochet 1 double crochet, crochet 1 double crochet, crochet 1 single crochet, and crochet 1 slip stitch.
This is the first half of the first stage.
For the first half of the first row, pick up the chain on the other side of the cast-on chain and the back knot and knit.
After knitting one chain stitch at the turnaround point, begin the second half of the first row.
In the second half, pick up the remaining chain from the cast-on stitch that you didn't pick up in the first half and knit it.
This knitting pattern is symmetrical to the first half, so start by knitting one slip stitch.
When doing slip stitches, be careful where you place your needle (see the video).
This may be a little difficult to see, but try your best as it will result in beautifully pointed leaf tips.
Next, knit one double crochet stitch, then one double crochet stitch, etc. After you knit the last double crochet, knit two chain stitches, then insert the needle into the first double crochet stitch of the first row and knit a slip stitch.
Now the leaves are finished.
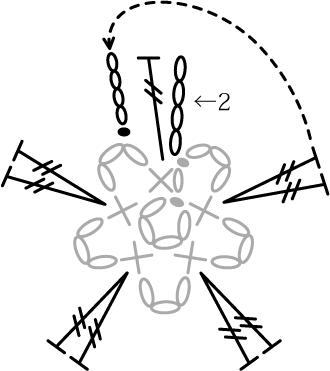
・Flowers: How to cast on
To start knitting, knit four chain stitches and then pull them through the first chain to make a loop.
This is the cast-on stitch.
In the knitting pattern, this is represented by four chain stitches in the center and the symbol for a slip stitch.
This cast-on method is the same as the cast-on used for the coaster we knitted in the first lesson of the beginner's course.
・Flower: How to knit the first row

In the first row, start with one chain stitch and then knit one round stitch.
When knitting the first row of knit stitches, insert the needle into the loop of the cast-on chain (scoop up the cast-on chain into a bundle) and knit.
Repeat this process of knitting 1 small knit stitch, then 3 chain stitches, to complete one round.After knitting the last 3 chain stitches, insert the needle into the first small knit stitch and knit a slip stitch.
・Flower: How to knit the second row
For the second row, start with four chain stitches, then immediately crochet one long stitch at the base (the first knit stitch in the previous row).
Next, insert the needle into the second knit stitch in the previous row and knit two double stitches.
Similarly, work two double crochets into the knit stitches of the previous row.
Once you have crocheted the last two long crochets, crochet four chain stitches, then gather the three loops from the first chain in the previous row together and crochet through them.
This completes the second stage.
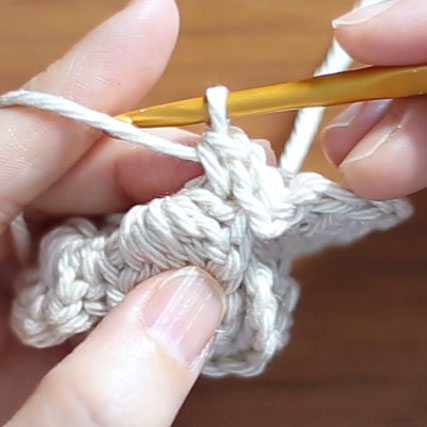
・Flower: How to knit the third row
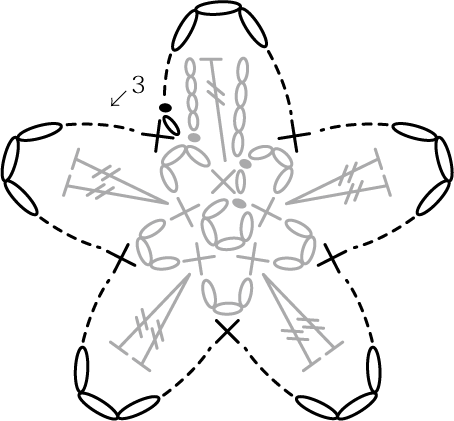
For the third row, start with one chain stitch, gather the loops from the third chain stitch from the row before, and knit one small stitch.
Next, knit three chain stitches, then gather the chain loops from the previous row together and knit a small stitch.
Repeat this process until you have knitted the last three chain stitches, then insert the needle into the first knit stitch of the third row and knit a slip stitch.
・Flower: How to knit the 4th row
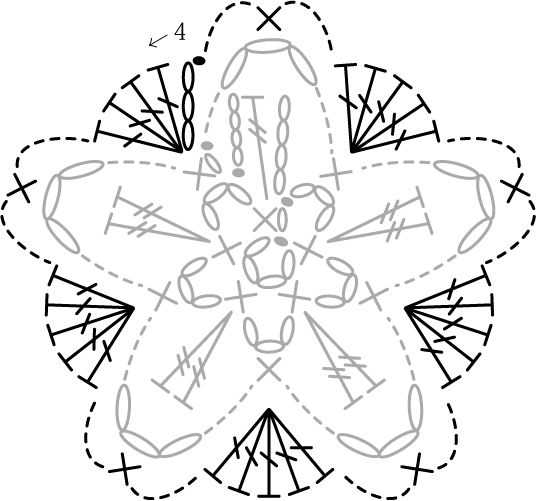
In the fourth row, start with three chain stitches, then immediately work four double crochets into the base (the first knit stitch in the previous row).
Next, gather the three loops from the previous chain into a bundle and knit one small stitch.
Insert the needle into the previous row's knit stitch and knit 5 double crochets.
Repeat this process, and after knitting one quarter stitch in the last chain loop of the previous row, insert the needle into the starting chain of the fourth row and knit a slip stitch.
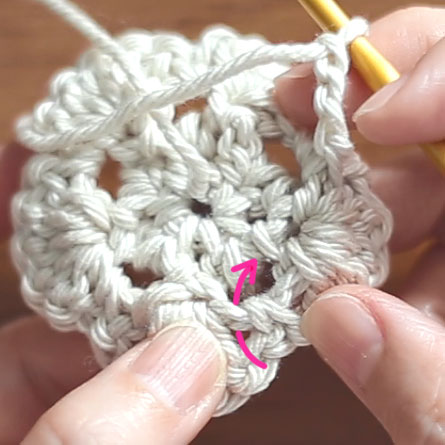
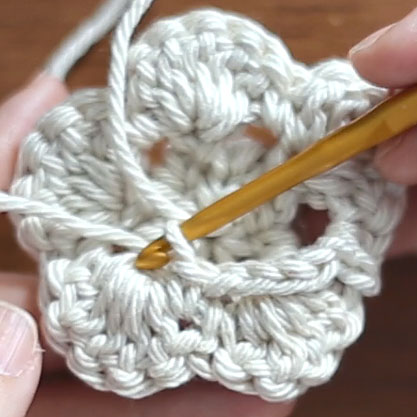
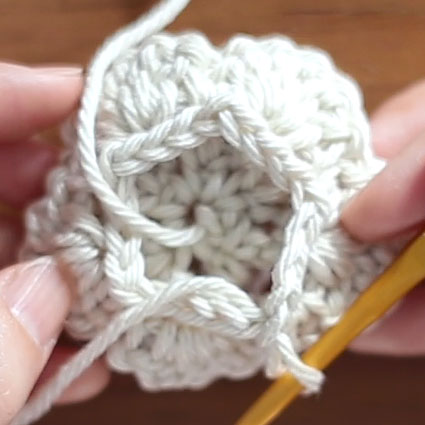
・Flower: 5th row knitting
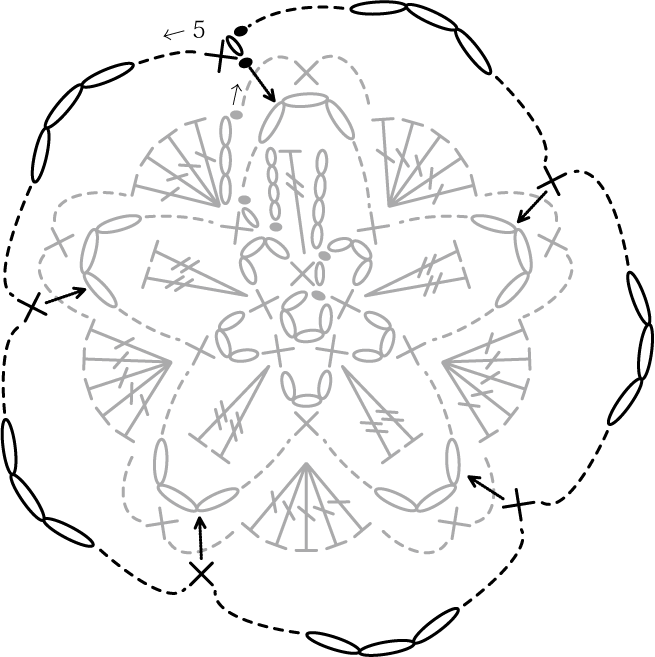
The beginning of the fifth row may be a little difficult to understand from the knitting pattern, so please refer to the video explanation.
At the beginning of the fifth row, gather the chain loops from the third row into a bundle and work a slip stitch.
From there, start up with one chain stitch, gather the same chain loop into a bundle again, and knit one knit stitch.
Next, knit three chain stitches, then gather the chain loops from the previous row (the third row) into a bundle and knit one small stitch.
Repeat this process until you have knitted the last three chain stitches, then insert the needle into the first knit stitch of the fifth row and knit a slip stitch.
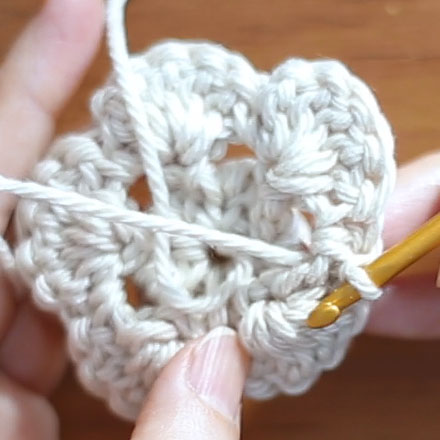
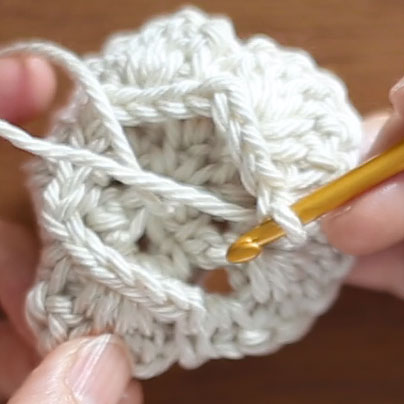
・Flower: How to knit the 6th row
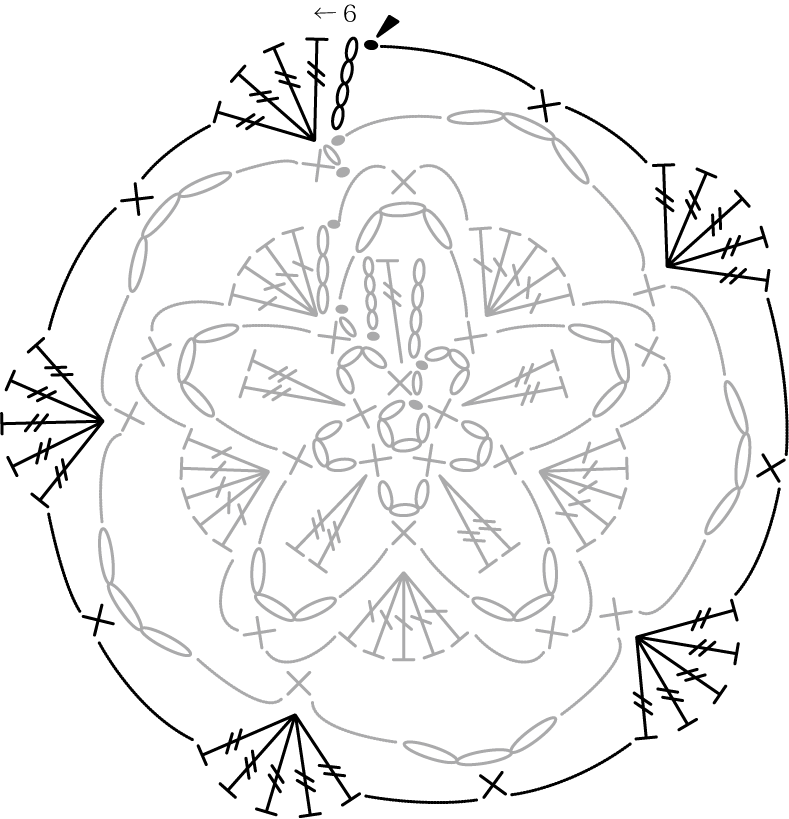
In the sixth row, start with four chain stitches, then immediately crochet four double crochets at the base (the first knit stitch in the previous row).
Next, gather the chain loops from the previous row into a bundle and knit one knit stitch.
Knit five double crochets into the previous row's small crochets, then gather the previous row's chain loops into a bundle and knit one small crochet.
Repeat this process until you have knitted the last knit stitch, then insert the needle into the chain at the start of the sixth row and knit a slip stitch.
This completes the sixth row and the flower part is complete.
- Sew leaves onto the flowers
Once the flower is complete, sew the leaves onto the back of the flower as shown in the image below.
Please attach a brooch pin or something similar depending on the purpose.
Now let's actually get crocheting!
Crochet Video Tutorial
This video explains the steps to complete the leaves and flowers. It is a silent video with subtitles.
Some of the steps explained in the beginner's course videos from episodes 1 to 6 may not be explained in full, so please be sure to check out the other videos as well.
Also, this explanatory video is quite long at 34 minutes, so you may want to watch the video to check only the parts that are difficult to understand!
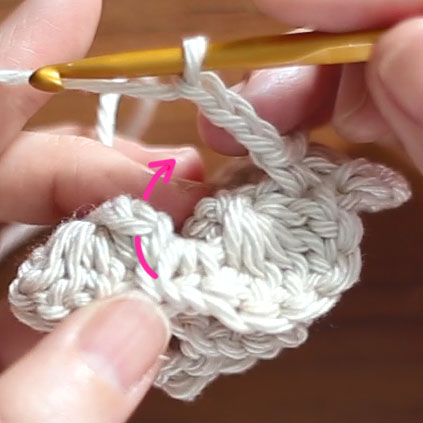
Leaves: Check that the first and second halves of the first row are symmetrical!
The important thing to note about the leaves is that the stitches in the first half and second half of the first row must be symmetrical.
After knitting one chain stitch at the turning point, be careful when you do the second half of the slip stitch, as it can be a little difficult to know where to insert the needle.
If you try knitting the second half and it is not symmetrical, it is likely that the position where you knit the slip stitch is incorrect, so please check.
Flowers: Be careful at the end of the second row!
The second row may be difficult to understand from the knitting pattern, so please refer to the video as well.
The knitting operation itself is not difficult, but the end of the second row is knitted in a way that is unique to this piece and I don't think you'll see it in other pieces.
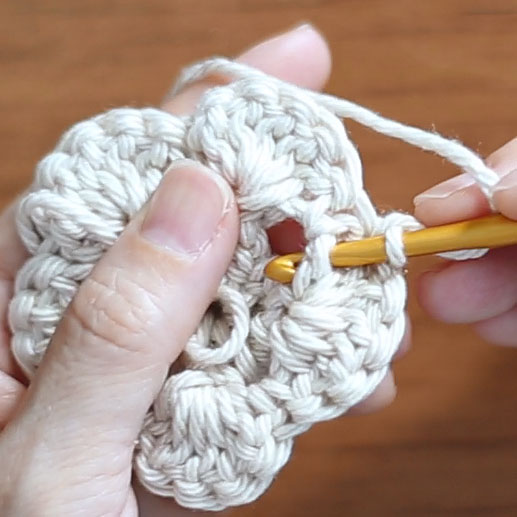
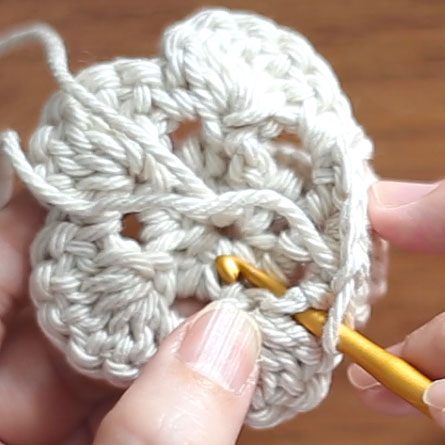
Flowers: Make sure you check where you insert the needle on the 5th row!
The fifth row is also a difficult part of how to knit this piece, so please check it out in the video.
The knitting operations are simple, consisting of knitting stitches and chain stitches, but the way the stitches are picked up is a little unusual.
The video explains the process slowly, so feel free to pause and try knitting along with me.
Here too, we will explain how to knit the fifth row with images.
Can you arrange flower motifs?
In this piece, both the flowers and leaves are completed using this knitting technique.
Therefore, this is not the type of project that requires you to adjust the knitting method, but I hope you will enjoy thinking about various ways to use the finished project!
You can try stringing the flowers together to decorate, or sticking them on like patches instead of polka dots, and they can also be used as a focal point for children's items.
You can also get creative with the yarn you use and knit by combining two different colored yarns to create an interesting texture.
If you use some thicker threads, it may look more impressive, like a corsage.
Please try knitting your own camellia, which you will enjoy using!
Your work

Marotan's "Camellia Flower Brooch"
It took me five tries to finally make a flower. I'm so happy that it turned out so cute. It's not that difficult once you understand the mechanism and the logic behind it. It's so much fun! I tried attaching it to a hat I knitted a while ago. I want to knit more different things.