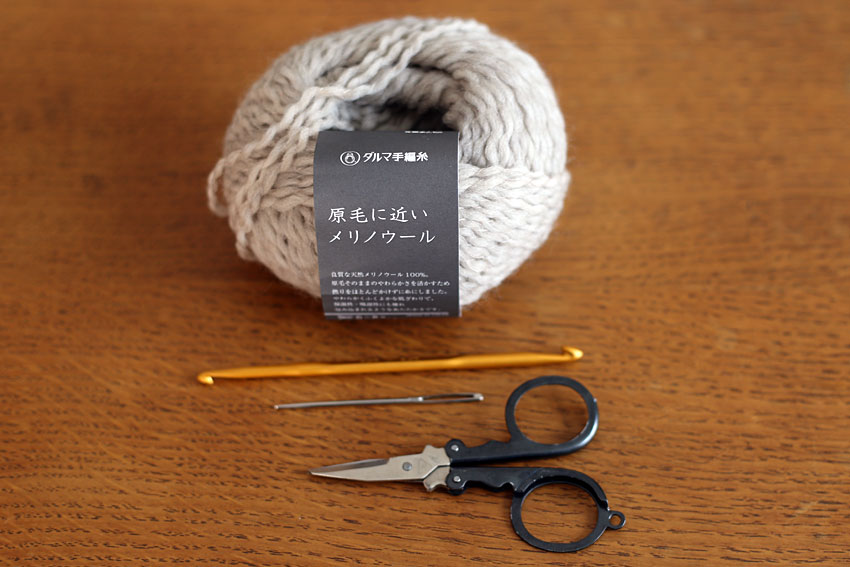
![定番小物からはじめる かぎ針編み初心者コース[第1回]。長編みで編む輪編みコースター。完成作品3色と、必要な材料(毛糸玉、かぎ針、とじ針、ハサミ)が木製のテーブルに並んでいる様子。](https://ronique.jp/wp-content/uploads/2021/03/crochet-coaster-round-double-crochet.jpg)
This project is designed for beginners who want to try crocheting for the first time!
We’ve also prepared video tutorials to make it easy to follow along, so please feel free to give it a try!
For our first project, we’re making a "classic of classics": coasters. They are small, practical, and so much fun to crochet.
They are the perfect items to practice with, and you can enjoy making them in many different colors.
Now, let me share a little bit about the name of this series... I was born and raised in Sapporo, so I grew up skiing with my family. I remembered the "Beginner's Course" at the ski resorts—a path that always felt safe and easy to ski on. That’s the feeling I wanted for this title.
We plan to continue this series at a leisurely pace, so we hope you will join us for the future installments and continue to support us!
Index
First, prepare your tools and yarn.
What you will need
Here is everything you need to crochet this project:
• 1 ball of worsted-weight yarn (medium)
• Size 7 (4.0mm) crochet hook
• Tapestry needle (yarn needle)
• Scissors
The yarn I used for this project is "Daruma Merino Wool."
The recommended hook size for this yarn is 7 to 7.5, so I will be using a size 7 (4.0mm) crochet hook.
You can find yarn and hooks at 100-yen shops, so it’s a great idea to start with affordable materials. If you enjoy it, you can gradually grow your collection!
Which crochet hook do you recommend?
Since we are using worsted-weight yarn, I recommend a size 7 (4.0mm) hook. If you tend to crochet tightly, it’s a good idea to have a size 8 (5.0mm) hook on hand as well. A double-ended crochet hook (a metal hook with a different size on each end, like 7 and 8) is also very convenient to have.
I personally prefer a size 7 (4.0mm) hook for worsted-weight yarn and a size 8 (5.0mm) hook for bulky-weight yarn to keep my stitches even.
A size 7 (4.0mm) hook is incredibly versatile and can be used for everything from bags to hats, so it’s a great size to add to your collection.
What yarn weight do you recommend?
For beginners, it is easier to see your stitches with thicker yarn, so I recommend starting with worsted (medium) or bulky (large) yarn.
For this coaster, I chose a worsted-weight yarn so that you can easily switch to a size 8 (5.0mm) hook if your stitches feel too tight.
What yarn material do you recommend?
There are many types of yarn, such as wool, cotton, acrylic, and linen. Since stiff yarn can be tiring for your hands at first, I recommend using a soft yarn with good elasticity.
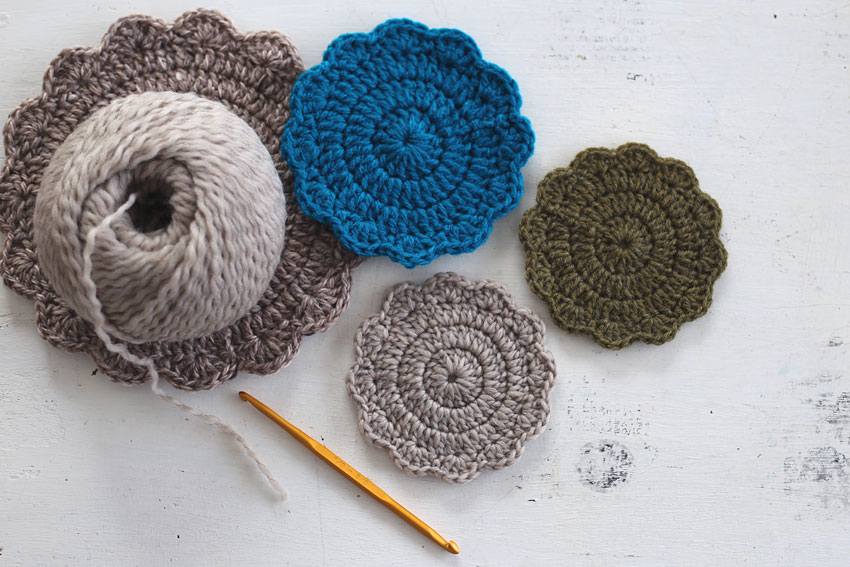
We will be using wool yarn for this project. However, if you'd like to make an "eco-sponge" (dish scrubber), you can use acrylic yarn instead. The blue-green sample in the photo is made with acrylic yarn.
What yarn color do you recommend?
Since you need to count your stitches, lighter colors are highly recommended. Darker yarns can make it very difficult to see where to insert your hook, especially when working under artificial light at night.
A Closer Look at the Project and How to Make It
Why crochet coasters first?
Coasters only require a few rounds and can be finished quickly. That immediate sense of accomplishment is a great way to stay motivated and excited about crocheting!
The very first thing I ever crocheted was a small motif. Even though it was tiny, the joy I felt upon finishing it was immense! I remember getting completely absorbed in making several of them in different colors.
Coasters are also the kind of project where you’ll want a set of them for daily use. Being able to actually use what you've made is one of the true joys of crocheting.
With this in mind, I chose coasters as my first piece.
What is the size of the work?
The finished coaster is 10cm in diameter. The height of each double crochet is approximately 1.3cm. It only uses about 4.5g of yarn, meaning you can crochet about six coasters from a single 30g ball of yarn.
How do you crochet a coaster?
For this project, we are making a circular coaster. We will crochet in rounds, gradually increasing the size of the circle. The main body is worked entirely in double crochet.
All the circular parts are crocheted using double crochets.
Once the circle is complete, we will add the edging. This decorative edging is also based on double crochet stitches.
Finally, you will cut the yarn and weave in the ends to finish.
- Why use Double Crochet?
When people think of crocheting, they often imagine items like bags, hats, or amigurumi, which are frequently made using single crochet. While single crochet is a simple technique once you learn it, it can be a bit difficult to see where to insert your hook at first.
I’m not necessarily saying one is easier than the other, but I chose double crochet for this project because the stitches are taller and much easier to see.
Since you’ll need to count and check your stitches for every round, having clear, visible stitches is very helpful.
As I will explain later, the beginning of each round is worked differently than the rest. Using double crochet makes it easier to see exactly where to place your stitches.
There are so many beautiful patterns based on double crochet, so it’s a wonderful stitch to master!
How to Read the Crochet Chart
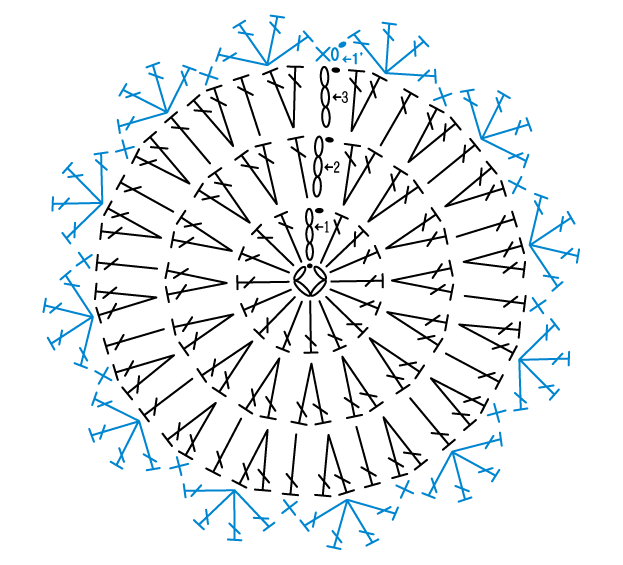
Here is the crochet chart for the coaster we are making today. The edging is shown with blue symbols to make it easier to follow. Before we start crocheting, let me give you a quick walkthrough on how to read the chart.
・What do the crochet chart symbols mean?
There are four types of symbols that appear in this crochet pattern. The numbers in each row indicate which round it is, and the arrows indicate the direction to crochet.
The slip stitch symbols are always placed at the end of a round. This means that after you finish the last stitch of a round, you insert your hook into the first stitch of that round and make a slip stitch.
Chain

Slip Stitch

Double Crochet

Single Crochet

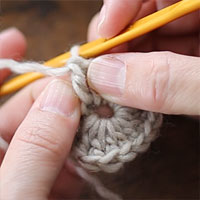
• How to make the foundation ring
The four chain symbols and the black slip stitch symbol at the center of the chart show the foundation.
Crochet 4 chain stitches, then work a slip stitch into the first chain to form a ring.
While a "magic ring" is a common way to start, it can be tricky for beginners to get the tension just right. For this project, we will use a foundation chain ring, which is much easier to manage when you are just starting out.
Since the first round of stitches will wrap around the entire chain, don’t worry if the foundation ring is slightly twisted or if you're not sure exactly where to insert your hook at first.
• How to crochet the main body
All stitches except the edge are crocheted in double crochets.
Insert your hook into the center of the foundation ring and work the first round of stitches directly into the space (this is also known as "working under the chain").
The stitch counts for each round are:
• Round 1: 16 stitches
• Round 2: 32 stitches (adding 16 increases)
• Round 3: 48 stitches (adding another 16 increases)
In Round 2, work 2 stitches into every stitch. In Round 3, work 2 stitches into every other stitch. This is how the circle grows larger.
This is how you crochet, increasing stitches as you go.
• How to crochet the edging
The blue symbols represent the edging. After making a single crochet (sc), skip one stitch, then work 4 double crochets (dc) into the next stitch. All 4 dc should be worked into the same stitch from the previous round to create a shell.
Repeat this pattern—skip one stitch, then sc into the next—all the way around until the edging is complete.
Now let's actually get crocheting!
Crochet Video Tutorial
This video explains all the steps to actually crochet a coaster, from how to hold the yarn and crochet hook to how to dispose of the yarn after crocheting. This is a silent video with subtitles.
It's about 25 minutes long, so please take your time to watch it when you have time.
When did you start using yarn?
I recommend finding the yarn end hidden in the center of the ball. Starting from the center prevents the ball from rolling around while you crochet.
With some yarns, it can be tricky to find the end, and you might accidentally pull out a big lump of yarn... but even then, it's much easier in the long run than starting from the outside of the ball.
Always check your stitch count for each round!
Always count your stitches after finishing each round. If your stitch count doesn't match the pattern, it will cause problems in the next round. It’s very disappointing to reach the edging only to realize the stitches don’t line up, forcing you to undo several rounds. To avoid this, make it a habit to count your stitches at the end of every round.
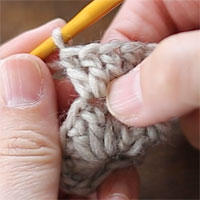
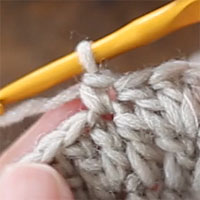
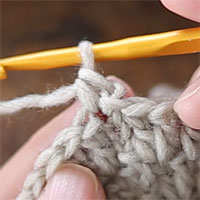
• How to count your stitches
I will use images to show you exactly where to find the first stitch. Please use these as a reference when counting the stitches in each round.

When you finish crocheting
There are several ways to finish off your work, but for this coaster, we pull the yarn tail straight through the loop after the slip stitch. This technique keeps the joining point subtle and neat.
Please refer to the following page for more details.
The Ultimate Guide to Finishing Crochet: 3 Methods & Seamless Weaving in Ends」のページで詳しくご説明していますのでご参考になさってください。
After pulling the yarn through, weave in the ends on the back of the work so they are not visible.
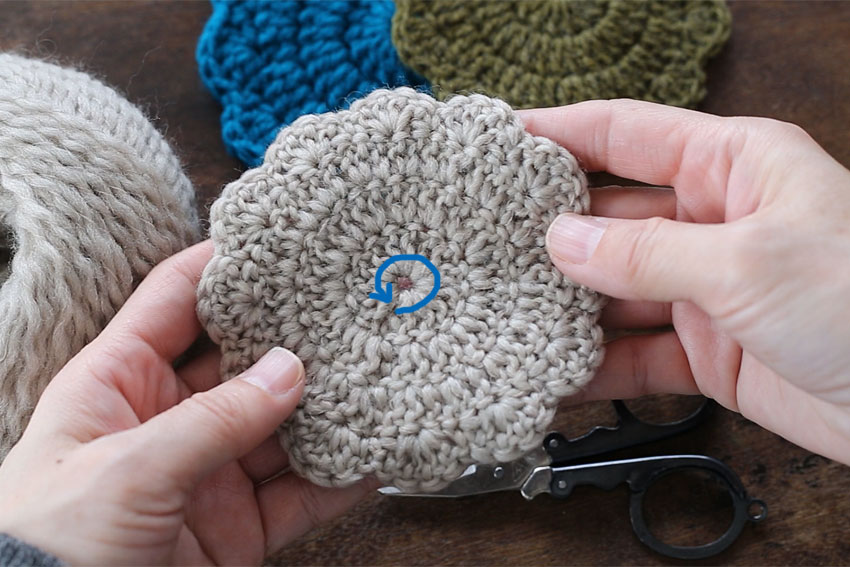
・What if you want to tighten your center?
Since we started with a foundation chain of 4 stitches, there is a small hole in the center. If this bothers you, you can close it while weaving in the ends.
As shown in the image below, weave the yarn tail through the stitches of the first round of double crochets. Once you’ve gone all the way around, pull the yarn to cinch the hole closed. Afterward, weave the yarn through nearby stitches again to secure the end and ensure it doesn't come loose.
Common Crocheting Issues & How to Fix Them
The size is smaller than expected
A1. Your tension might be tight.
If your project ends up smaller than expected, there are a few possible reasons. First, your tension might be a bit tight. This varies from person to person and isn't a bad thing, but as you get more comfortable crocheting, you'll likely relax your shoulders and find a steady, natural rhythm.
The quickest way to adjust the size is to use a larger crochet hook. For example, if you are currently using a size 7 (4.0mm) hook, try switching to a size 8 (5.0mm) to achieve a slightly larger result.
A2. The yarn might be on the thinner side.
Even if the label says "Worsted weight" (Medium), the actual thickness can vary slightly between different brands or materials. If your yarn is a bit on the thinner side, that might be why your project turned out smaller.
The good news is that this pattern is designed so the edging will fit perfectly no matter how many rounds of double crochet you add! Why not try adding a 4th round to increase the size?
While the 3rd round was worked by adding an increase (2 dc in one stitch) every other stitch, for the 4th round, simply work an increase every 2 stitches.
A3. Your double crochets might be a bit short.
Another possible reason is that your double crochets are not tall enough. The height of each stitch can change significantly depending on how much you pull up the loop. If you don’t pull it up quite enough, the stitch remains short, resulting in a smaller overall size.
A good rule of thumb is that one double crochet should be about the same height as 3 chain stitches. Keeping this image in mind as you crochet might help you achieve the correct size!
The size is larger than expected
A1. Your tension might be a bit loose.
If your project is too large, it might be because your tension is a bit loose. If that's the case, you could try crocheting a little more tightly.
Another effective way to adjust the size is to use a smaller crochet hook. For example, if you are using a size 7 (4.0mm) hook, try switching to a size 6 (3.5mm) to achieve a more compact and appropriately sized result.
A2. The yarn might be on the thicker side.
Even within the same "Worsted weight" (Medium) category, the actual thickness can vary from yarn to yarn.
For example, take a look at the blue-green sample in the photo below. Although this yarn is labeled as "Worsted," it is actually closer to a "Bulky weight" in thickness. As a result, the finished piece turned out much larger than the original design.
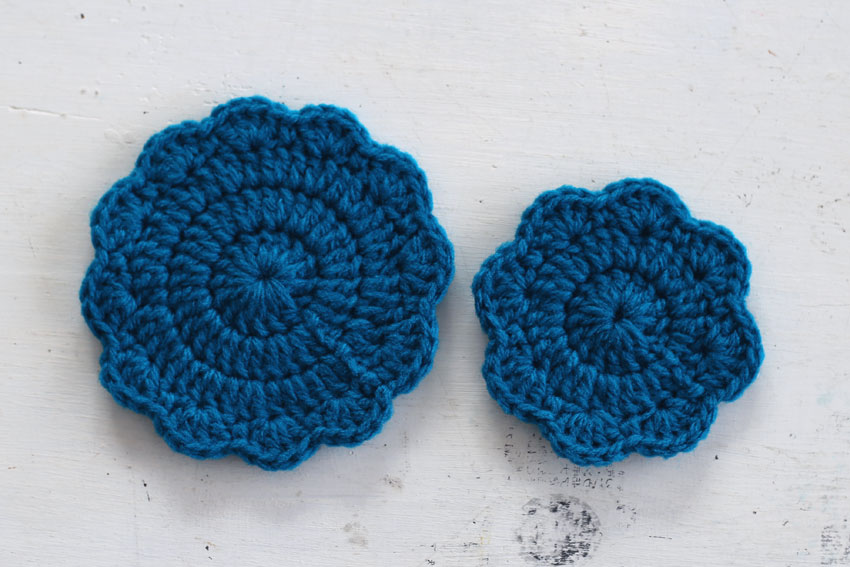
If you want to make the size smaller, you can stop the double crochet rounds after Round 2 (the stitch count for the edging will still work out perfectly). Then, try increasing the number of double crochets in each edging shell from 4 to 5.
The photo on the right shows an example of this arrangement. However, please keep in mind that this version might end up slightly smaller than a standard coaster size.
The fabric is not laying flat
A. Try using a steam iron
Depending on your tension or the nature of the yarn, the fabric may sometimes stretch out or curl up, making it look uneven.
In such cases, pin the edges of your crocheted work in place with dressmaker pins and apply a steam iron while holding it slightly above the surface. Make sure to let only the steam touch the fabric without pressing the iron down.
Please refer to the following page for a more detailed explanation.
What if it bends back or twists?」でも詳しく解説していますのでご参考になさってくださいね。