Index
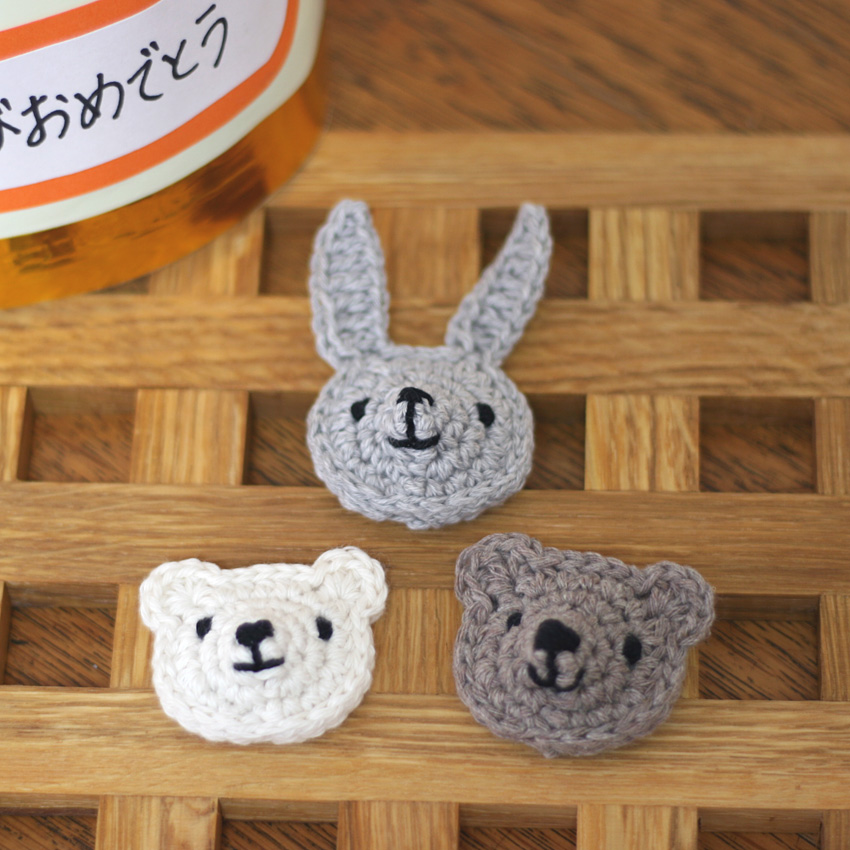
This is a crocheted piece.
I made two slightly three-dimensional crocheted animal motifs.
It's a sturdy motif made by joining two pieces together, one on the front and one on the back, so it could also be used as a brooch or key chain.
It would also be nice to add some thick ribbons in three colors and turn it into a medal.
You can also use just the front sheet as a patch.
This is a simple item that can be made in a short amount of time with almost no thread handling required.
How about using it as a daycare item?
Yarn and Crochet Hook Size
Medium to medium weight cotton thread (gray, white, brown)
Medium-fine cotton thread (black)
3.0 mm (JP 5/0)
Sewing needle
Finished Size
Rabbit: Height 7cm, Width 4.5cm
Bear: Height 3.5cm, width 4.5cm
Crochet Pattern
Rabbit (front) knitting pattern、Bear (front) knitting pattern,
Rabbit and Bear (Back) Knitting Pattern
Face stitching position diagram
Instructions
In addition to the explanation below, please also check the knitting pattern and the explanation with images at the bottom of the page.
The back of both the rabbit and bear are knitted using the same method.
①Knit the back part of the motif.
Start by making a cast-on loop and knit 6 stitches in the first row. All of the back parts of the motif are knit using knit stitch, increasing stitches each row, until you reach the fourth row.
Please pay attention to the position of the increase stitches in the fourth row.
②Next, knit the front part of the motif.
Here too, start by casting on a loop and continue knitting by increasing the number of stitches.
Work all the way up to the fourth row in quarter crochets, and then in the fifth row, increase the stitches using quarter crochets and double crochets. Knit both the rabbit and the bear in the same way up to this point.
③When knitting the 6th row of the front part of the motif, overlap it with the back part knitted in ① so that they are facing outwards, and sew together using a slip stitch.
Please refer to the explanation with images below on how to sew the pieces together.
In all of the places in the knitting pattern where there are slip stitch symbols, insert the needle through both the front and back of the motif and stitch the slip stitch.
To make the rabbit ears, work a slip stitch followed by a chain stitch at the position shown in the knitting pattern, then insert the needle into the back of the chain stitch and crochet one double crochet, six double crochets and one double crochet, then work the slip stitch again from the stitch immediately next to the base.
To make the bear's ears, knit five double crochets in the position shown in the pattern, but insert the needle through the stitches on both the front and back of the motif, and knit the ears with the two pieces together.
Before sewing all the motifs together (stop knitting a little after finishing the ears), embroider the eyes, nose and mouth on the front part.
Stitching position of facial features図Please use this as a reference while comparing it with the position of the stitches in the knitting stitches.
If you cut the leftover thread used for embroidery and the ends of the thread from the back part to an appropriate length and stuff it into the three-dimensional part of the nose on the front part, you will not need to use poly batting.
④ Once you have embroidered the face, sew both pieces together to complete the piece.
Explanation with images
We will start by explaining how to match the motifs on the front and back of the face to the outside and then sew them together.
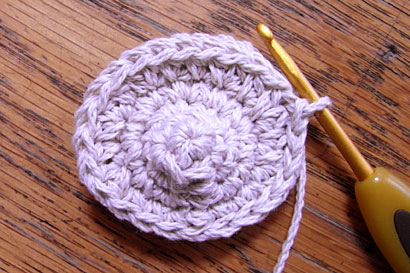
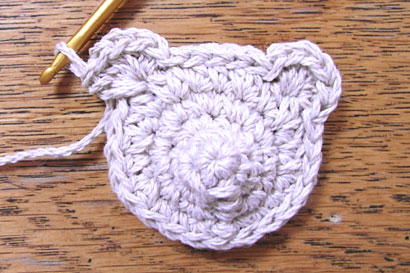
① I have put the two face motifs, front and back, together with the front sides facing out and have just finished the slip stitch just before the position where I will knit the ears (5 medium double crochets).
Next, insert the needle into the adjacent stitch to create the ear.
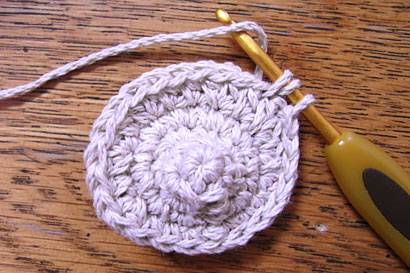
② Insert the needle into the adjacent stitch and knit 5 double crochets.

③ I have knitted 5 double crochets. This means I have knitted the first ear.

④ In the stitches next to where you just knitted the ear (5 double crochets), crochet one slip stitch.
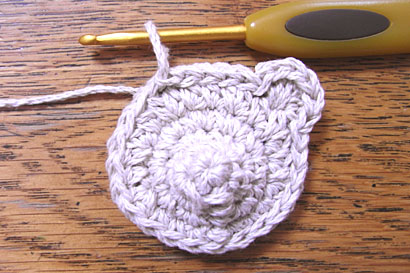
⑤ I worked a slip stitch up to one stitch before the position where I would knit the other ear.
⑥ Insert the needle into the stitch next to ⑤ and knit an ear (5 double crochets).
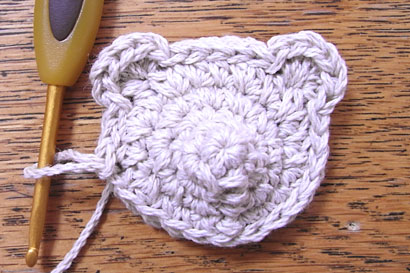
⑦Continue with the ears and work the slip stitches up to the area shown in the photo above, then it's time to embroider the bear's face.
Once the embroidery is finished, stuff any loose threads into the back of the raised nose and finish by stitching everything through.
Your work

"Rabbit and bear motif" by yupi*
I'm still a beginner, so I tried again and again before finally completing it!
I attached the finished motif to a hanger that I use often.
All of Ronique's recipes are wonderful, so I want to work hard to improve and be able to make them!
It makes me motivated (^^)
We will continue to update the recipes
looking forward to it!
http://blog.livedoor.jp/kondate2010/archives/7298733.html