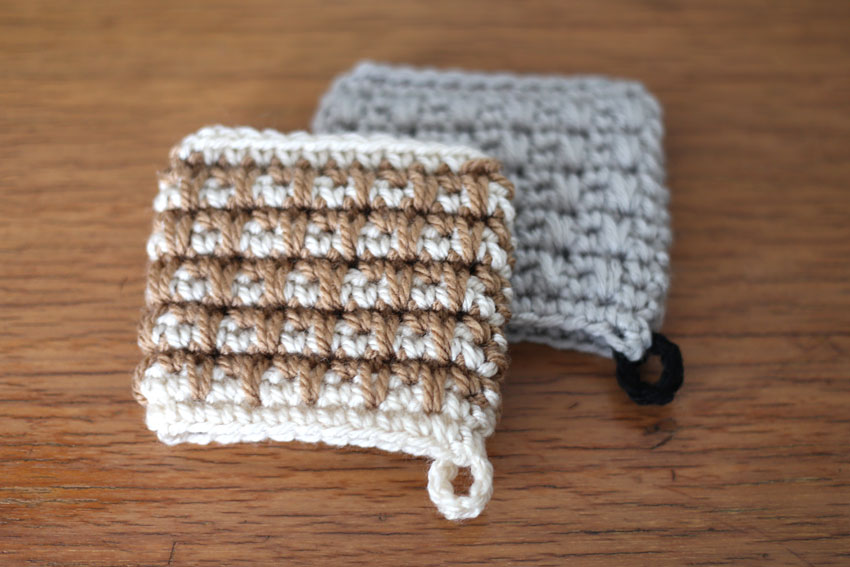
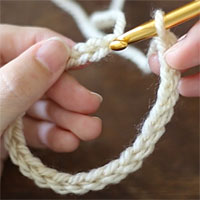
![定番小物からはじめる かぎ針編み初心者コース[第3回]。簡単な模様編みのエコたわし。ベージュとグレーの2色が写っており、ベージュの方を手で持っている様子。](https://ronique.jp/wp-content/uploads/2021/08/crochet-acrylic-scrubber-easy-pattern.jpg)
This is the third lesson in the beginner's course, and this time we will be knitting an eco-friendly scrubbing brush!
Although it is a small piece, it contains some very useful tips for learning crochet, so please give it a try.
The two key points are:
The first is to learn how to find the first stitch (the starting stitch) of a circular knitting stitch.
The second is that when you pick up stitches from the cast-on stitch of the chain and knit, you will learn how to pick up and knit the one stitch on the other side of the chain and the back stitch.
The first point in particular is so important that it can be said that it is a step that anyone who crochet will have to take.
Once you understand this, you should be able to easily cast on a loop, which is a common feature in crochet projects!
This is a piece that I would like you to knit with that next step in mind.
Index
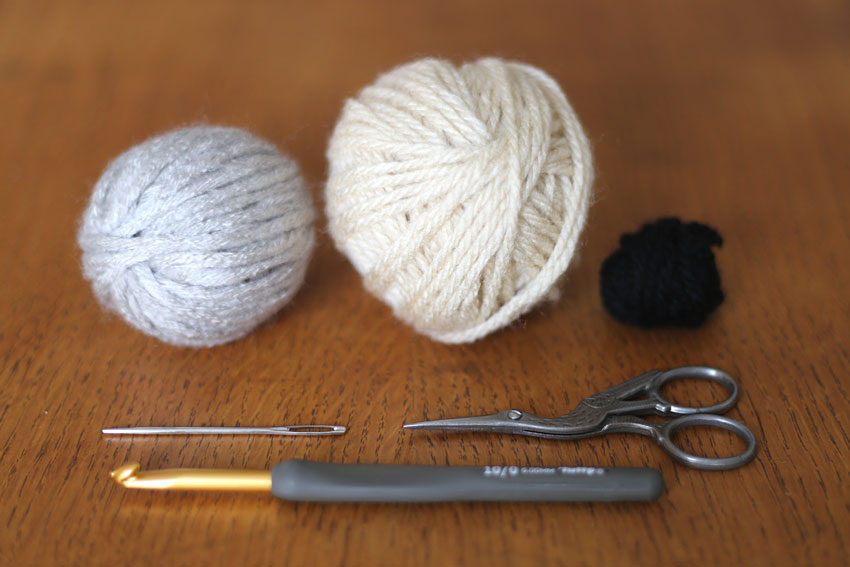
First, prepare your tools and yarn.
What do I need to prepare?
Here's what you need to prepare to knit this piece:
- Approximately 25g of extra-thick acrylic yarn (if you want to change the color of the loops, prepare a small amount of yarn of a different color)
・Size 10 crochet hook
・Binding needle
Scissors
Since we are knitting an eco-scrubber (acrylic scrubber), we will use acrylic yarn.
I used leftover yarn I had on hand.
You can probably find inexpensive acrylic yarn at 100 yen shops, so try to get some yarn that's easy to get your hands on.
One thing to note is that acrylic yarn comes in a variety of thicknesses, so be sure to choose a thicker yarn, such as extra thick. More details about yarn thickness will be provided later.
You can knit using thinner yarn, but the size will be smaller and it's easier to knit with thicker yarn.
This time I used a size 10 crochet hook.
In the first and second installments, we used a No. 7 crochet hook, but this one is designed for thicker yarn.
Depending on the thickness of the yarn and how tight or loose the knitter's hands are, a size 9 or 7mm crochet hook may be better, so I hope you will be flexible and think about it as long as it is easy to knit with.
What kind of crochet hook do you recommend?
The yarn we will be using this time is very thick, so the appropriate size crochet hooks will likely be ones with grips or made of lightweight materials such as plastic or wood.
It's also useful to have a crochet hook for thick yarn, so you might want to try out an inexpensive crochet hook at first, and then eventually find one that is easy for you to use.
What thickness of thread do you recommend?
Acrylic yarns tend to be relatively thick, but some are thinner, so be sure to check the label on the yarn.
Depending on the yarn, it may be described as "extra thick" or "medium thick."
If this is not stated, try looking for items such as "reference needles" or "recommended needles" on the obi.
If this is a crochet hook of around size 8 to 10, I imagine it would be close to extra thick.
A well-known yarn that is often found in craft stores is Hamanaka Bonnie, an extra-thick acrylic yarn.
You may be able to see the actual product in store, so please use this as a reference.
What material of thread do you recommend?
Since this is an eco-friendly scrubber (acrylic scrubber), we recommend 100% acrylic thread.
The material will always be written on the yarn strip, so be sure to check to see if it is acrylic.
Even though they are made of the same acrylic material, the feel and hardness of each yarn is different, so it's fun to actually touch them and choose one.
Tightly twisted yarn is less likely to split and easier to knit with.
What color thread do you recommend?
Lighter colors are recommended as they make it easier to see the stitches, but if you're starting to get used to seeing the stitches, feel free to try knitting in your favorite color.
If you knit the eco-scrubber body and loops in different colors, it can be fun to think about color combinations.
Let's take a look at the work and how it's made
Why did we choose eco-scrubbing brushes for the third time?
As I wrote at the beginning, this time I wanted to create a piece that included important points, with the aim of taking my crocheting to the next level.
This is because I thought it would be good to do some advance preparations that would lead to the ``cast-on of the knitting loop'' soon.
Casting on a round knit stitch is the classic crochet technique, and it's used in so many different projects.
In order to be able to smoothly knit in the round, as well as to make the cast-on stitch, it is important to know how to look at the ``start stitch'' of the round knit.
So this time, I chose a piece that allows you to see the starting stitches of the knitting stitches, and I've explained the key points in detail in the video.
This is how I chose this eco-friendly scrubber.
It can be knitted in a short amount of time, is practical, makes a great gift, and is made with thick yarn that makes the stitches easy to see.
What is the size of the work?
The eco-scrubbing brush I knitted is about 10cm long and 12cm wide.
The height of one knitted pattern is about 1.5cm. The amount of yarn used is about 25g.
Depending on the yarn, you may be able to knit several pieces from one ball.
How do you knit an eco-scrubbing brush?
This time we will be making a circular knitting eco-friendly scrubbing brush.
It is bag-shaped and can be used by putting your hand inside.
Make a cast-on stitch with a chain, then knit around the side without increasing or decreasing the number of stitches, until you have knitted to a height of about 10cm, and then close the opening at the end of the knitting.
Except for the cast-on stitch, the entire body is knit using the knit stitch technique.
The top of the bag is also closed with knitting stitches, and once this "knit stitching" is complete, the yarn is cut and processed to complete the main body.
The loop is made with a chain stitch.
-Isn't pattern knitting difficult?
At first glance, you might wonder how it's knitted, but it's actually quite simple.
Although it is a patterned knitting, the feel of the operation when knitting is that of a knitting stitch.
The only difference is where you insert the needle, so it's best to watch the video!
First, try watching the video!
How do you look at a knitting pattern?
▶ Knitting pattern PDF fileAlso available!
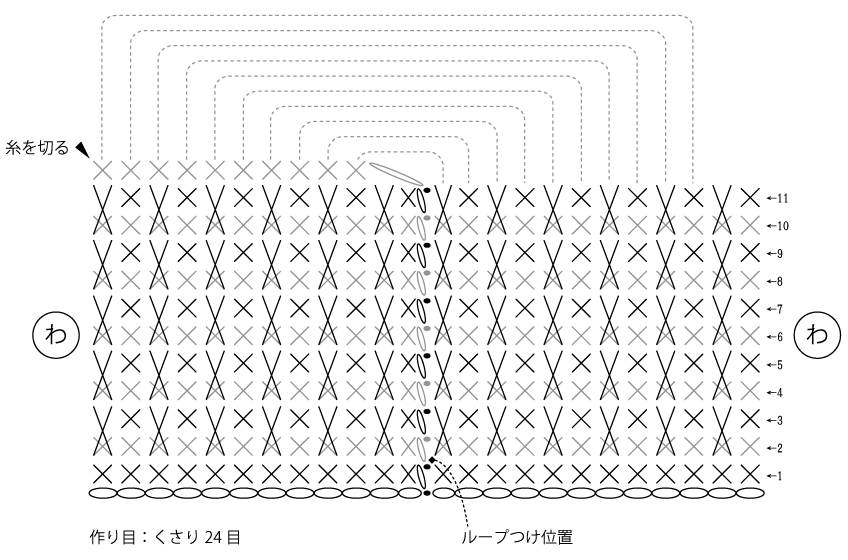
Here is the knitting pattern for this time.
The knitting pattern may seem complicated, but the actual knitting method is simple.
This time, unless you are absolutely adamant that you knit by looking at the knitting pattern, try watching the video first and leaving interpretation of the knitting pattern for later.
After that, when you look at the knitting pattern again, you will be able to easily understand it.
Below I will explain the knitting pattern.
・What do the knitting chart symbols mean?
The three symbols that appear in the knitting pattern above are:
Chain

Pull-out knitting

Single Crochet

The numbers in each row indicate which row it is, and the arrows indicate the direction to knit.
A slip stitch symbol is placed at the end of each row.
This means that after you finish knitting the last stitch in a row, you put the needle into the first stitch of that row and knit a slip stitch.
This time, the word "wa" is written on both the left and right sides of the knitting pattern.
This means that the left and right ends of the knitting pattern are actually connected and form a loop.
Although the knitting pattern shows the fabric as a flat surface, the fabric is knitted in a tubular shape.
・How to cast on
The hollow ovals at the bottom of the knitting pattern represent the chains for the cast-on stitches.
There is a black oval slip stitch symbol in the center, which means that the beginning and end of the chain are joined with a slip stitch, making the cast-on chain into a loop.
So, to cast on, you knit 24 chain stitches, then insert the needle into the first chain stitch and knit a slip stitch.

・How to knit the sides
For the sides, knit 24 stitches in one round in each row, without increasing or decreasing the number of stitches.
For the first row, crochet 24 stitches in a circular stitch, picking up one stitch on the other side of the cast-on chain and the back of the crest.
When picking up stitches from the chain, you can pick up one stitch on the other side of the chain and the back of the chain, as in this case, or you can pick up just one stitch on the back of the chain, and some recipes will explain how to pick up the stitches.
The method we used this time, which involves weaving one chain on the other side and the back of the chain, is easy to weave and is used frequently, so I think it will be useful to remember in the future.
In the second row, knit the entire circle using knit stitches.
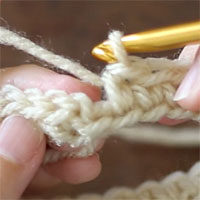
Start knitting the pattern from the third row.
For patterned knitting, after knitting one regular knit stitch, insert the needle into the base of the previous stitch and knit the next knit stitch.
Repeat this process alternately every other stitch to complete one full circle.
The fourth row is all knit stitch, the fifth row is patterned knit, the sixth row is all knit stitch, the seventh row is patterned knit, etc. All even rows are knit stitch once around, and odd rows are patterned knit, repeating this process alternately for each row, until you reach the 11th row, which is the side.
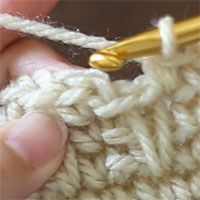
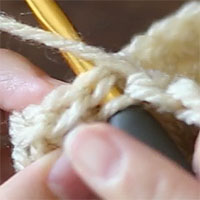
・How to close the bag opening (how to do the "knit stitch" method)
Once you have finished knitting the sides up to row 11, fold the knitted fabric into a bag shape and hold it, then close the opening of the bag with a knit stitch.
After knitting 10 stitches, cut the yarn.
The video makes it easy to understand how to crochet, so please check it out.
How to attach the loop
In the video, loops are knitted using different colors of yarn.
If you only have one color of yarn, try adding loops in the same color.
Insert the needle into the lower part of the side where the main body starts to rise and start knitting a loop.
At this time, it is OK if the position where you insert the needle is slightly off, as long as it is roughly around the armpit.
For reference, the loop attachment positions are indicated in the knitting pattern, so please take a look at this as well.
Once the needle is in place, continue by knitting 7 chain stitches to make a loop.
Again, the video shows you how to put it on, so please check it out.
Now let's actually get knitting!
Knitting video here
This video explains the steps to complete an eco-scrubbing brush, from how to cast on the chain to how to attach the loop. This video has subtitles but no audio.
The knitting method explained in the first and second installments will not be explained here.
If you have any questions, the previous post may be helpful.
This video is about 20 minutes long, so please take your time to watch it when you have time.
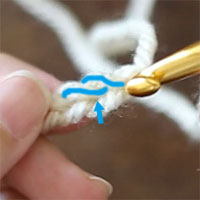
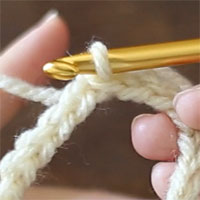
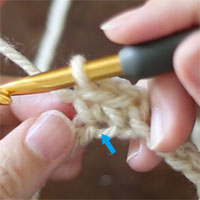
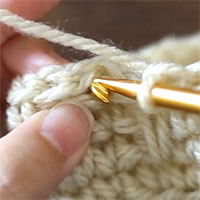
Let's pick up the stitches from the cast-on chain and knit!
This time, we will cast on a chain and then connect it into a loop before starting to knit.
The key point is where you insert the needle when you pick up the stitch from the chain cast-on and knit the first row.
Check out the video to see where you should actually insert the needle to knit the other side of the chain and the back of the chain.
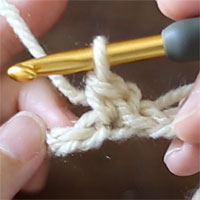
・Scoop up the other side of the chain and the mountain behind itKnit it like this
Whether you're making a loop from a cast-on chain or knitting the first row of knit stitches, you'll need to pick up one strand of yarn on the other side of the chain and the back of the knot. Images will show you where to insert your needle and which yarn to pick up and knit with.
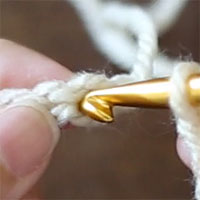
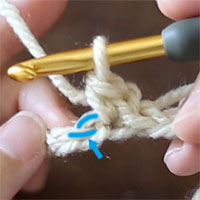
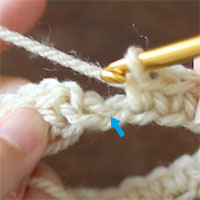
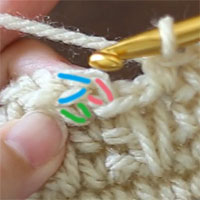
Where is the starting stitch at the beginning of the row?
The standard way to knit in the round is to knit the last stitch of each row, then insert the needle into the first stitch (starting stitch) of that row and knit a slip stitch.
To do this, you need to know where the first stitch is in that row and where to insert the needle.
My goal is to help people understand this through this work.
The video explains this in detail, so please be sure to watch it carefully.
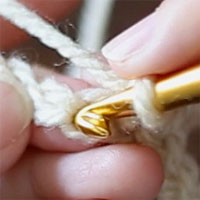
- Work a slip stitch into the first stitch of the row (the starting stitch).
We will use images to explain how to read the knit stitch (starting stitch) that you knit at the beginning of the row.
We will explain step by step how to insert the needle into the starting stitch at the end of a circular knitting row and make a slip stitch.

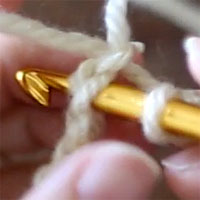
Once you have finished knitting the main body of the eco-scrubbing brush,
The main body is knitted into a cylindrical loop, so there is an opening at both the beginning and end of the knitting.
This time, we will finish by closing the opening at the end of the knitting with a knitting stitch.
This is also explained in detail in the video, so please check it out.
For details on how to process threads, see "The Ultimate Guide to Finishing Crochet: 3 Methods & Seamless Weaving in EndsPlease refer to the page for more detailed information.
After trying it out, don't you want to try making some arrangements like this?
I would like to try knitting different sizes of eco-scrubbing brushes.
A. It is possible to change the size!
If you need to adjust the size slightly, you can do so by changing the size of the crochet hook you use or the thickness of the yarn.
If you want to make it particularly small, the easiest way is to use thinner yarn and a smaller size crochet hook.
On the other hand, if you want to make it larger, try adding more stitches so that the number of cast-on stitches is an even number.
For example, you can increase the size by changing the cast-on stitch number from 24 to a larger even number, such as 30 or 36.
In that case, 11 steps on the side may not be tall enough.
Try increasing the number of rows from 11 to 15 or 19, so that you finish knitting with an odd number of rows.
Another way to adjust the size is to increase the number of rows you knit with the same number of cast-on stitches to create a longer, vertical type.
In this case, if you finish knitting with an odd number of rows, you can knit the last knit stitch in exactly the same way.
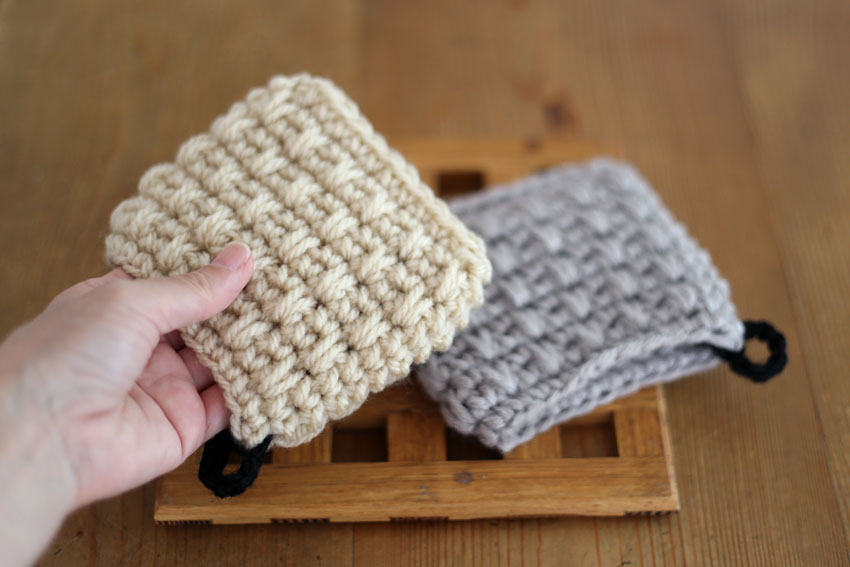
I would like to knit the main body using two colors as well.
A. That's possible too. It's fun to change the color every row and knit in two colors!
The piece in the photo below is an example of a piece knitted using two colors for the main body.
The impression is completely different from knitting in one color.
If you knit rows 3, 5, 7, 9, and 11 with brown yarn, it will look like this.
[Image explanation] How to change the color for each rowPlease refer to the instructions on how to change the color on this page.