
This is a crocheted piece.
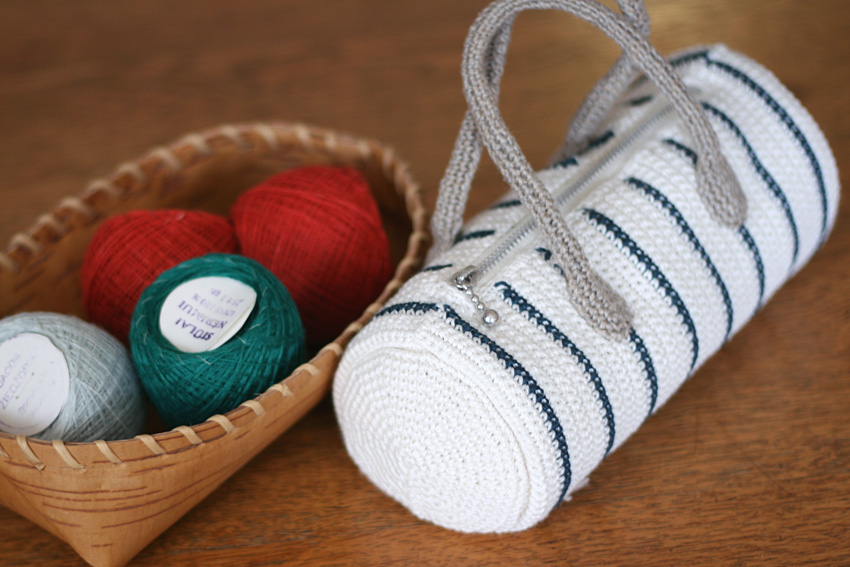
I suddenly became interested in marine-themed items, so I decided to crochet a Boston-style pouch.
This was my first time making a Boston bag, so I wondered how I could make it using crochet, and came up with this shape.
First, as a trial, I tried the pouch size.
It takes a little time to knit several rows of round knit stitches, but once you start putting it together, the excitement grows as it gets closer to the shape of a Boston bag.
I think I might make a bag using a thicker thread.
It might be cute for a child to use with the shoulder strap attached.
Yarn and Crochet Hook Size
Medium-weight ramie thread (white, navy blue)
Medium-thin to medium-weight linen thread (beige)
Zipper (15cm) 1 piece
2.5 mm (JP 4/0)
Finished Size
Width 21cm Height 10cm (excluding handle) Handle 28cm
Total weight 100g
Crochet Pattern
Pouch stitch count diagram、Pouch side knitting pattern、Pouch handle knitting pattern、Patchwork diagram
Instructions
Along with the explanation, please also check the knitting pattern, stitch count diagram, and piecing diagram.
① First, knit the circular parts on both sides of the pouch.
Start by casting on a loop, then work 6 small stitches in the first row. As shown in the chart below, increase a stitch in each row and work all the way up to row 12 in small stitches.
The 12th row has 72 stitches per round.
Knit another piece just like this, for a total of two pieces.
| Number of steps | Increasing or decreasing the number of stitches |
| 2 to 12 | +6 |
| 1 | 6 |
②Next, knit the striped pattern on the side of the Boston bag.
Cast on a chain of 72 stitches and work the entire length in round knit stitches.
As shown in the chart below, change the yarn color as you knit.
| Number of steps | 色 | number of eyes |
| 63 to 67 | 白 | 59-67: 72nd ~58:68 |
| 62 | 紺 | 〃 |
| 55 to 61 | 白 | 〃 |
| 54 | 紺 | 68 eyes |
| 47 to 53 | 白 | 〃 |
| 46 | 紺 | 〃 |
| 39 to 45 | 白 | 〃 |
| 38 | 紺 | 〃 |
| 31 to 37 | 白 | 〃 |
| 30 | 紺 | 〃 |
| 13 to 29 | 白 | 〃 |
| 22 | 紺 | 〃 |
| 15 to 21 | 白 | 〃 |
| 14 | 紺 | 〃 |
| 7 to 13 | 白 | 10~:68 stitches 1-9:72 |
| 6 | 紺 | 〃 |
| 1 to 5 | 白 | 〃 |
After the garment is made, a zipper is attached to the striped knit fabric.Pouch stitch count diagramAs shown, rows 1 to 9 have 72 stitches, rows 10 to 58 have a decrease in stitches to 68 stitches, and rows 59 to 67 have an increase in stitches to 72 again.
At both ends of the knitted piece, two stitches are added or subtracted (Knitting pattern for the side of the pouch(See link) After you finish the 58th row, attach the yarn and prepare two chains (it's only for two stitches, but it makes for a neater finish).
③ Once you have finished knitting the striped fabric, sew it together with the circular part knitted in ①. (Patchwork diagram reference).
With the front sides facing each other, sew together one of the circle pieces and one end of the stripe.
Next, align the other circle part with the other end of the stripe, right sides together, and sew together in the same way.
④Next, the opening of the Boston bag.
Match rows 1-9 of the striped knitting with rows 59-67 and sew together with an overlock stitch (Patchwork diagram reference).
Sew the zipper to rows 10 to 58 of the knitted fabric.
For the pouch in the picture, I used a metal zipper that was the right length, but I think a plastic zipper would be more convenient as you can cut it to the right length.
If you cut off the zipper before using it, be sure to backstitch the cut edge securely to create a zipper fastener.
⑤Next, knit the handle of the pouch (Pouch handle knitting pattern reference).
Cast on a chain of 65 stitches, then increase stitches on both ends and work a loop crochet.
Knit two of the same thing.
Once you have knitted the handle, fold it in half with the knitted fabric facing outwards and secure with an overlock. Leave about 4cm of fabric on both ends that will be sewn to the pouch (adjust the length to suit the balance).
⑥Finally, sew the handle to the pouch body.
On both sides, the handles are attached around the third navy blue line from the edge of the striped knit fabric.
Look at the balance and decide where to place it.