![バッグの基礎を固める かぎ針編み初心者コース[第1回]丸(円と楕円)](https://ronique.jp/wp-content/uploads/2023/06/bigginer_title2.jpg)
I want to learn how to crochet bags!For those of you who are interested, we are starting a sequel to our beginner's crochet course.
The "Beginner's Crochet Course Starting with Classic Accessories" also includes bag-making projects, but for those starting out..."Beginner's Course to Master the Basics of Bag Making"Let's start with the basics to understand how bags are made.
The simplest crochet bag is,"Bottom of the bag" → "Side of the bag" → "Handle"It can be knitted in this three-row structure.
In this course, we will delve deeper into bag knitting techniques based on this foundation.
First of all,"Bag bottom"from.
A classic basic motif often used on the bottom of bags.Round bottom, oval bottom, square bottom, etc.Let's learn how to knit.
In the first lesson, we will cover circles (and ellipses).
The motifs used in the explanation are not the kind of motifs that appear in motif-joining projects, such as those with intricate patterns, openwork designs, or multi-colored designs, but rather basic crochet techniques.Single crochet, double crochet, half double crochetThis motif is made using only (this material).
Along with an explanation of the motif, we also provide a free crochet pattern for a bag that you can actually knit.
Please try to put the skills you've learned in this course into practice through your work.
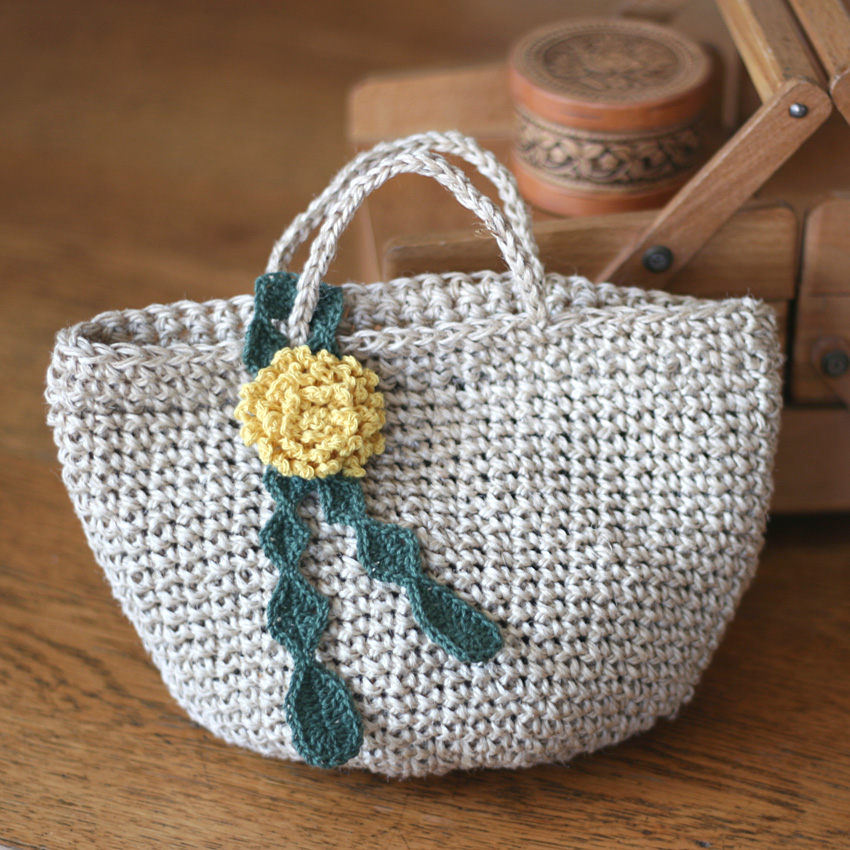
The recipe for the top image is located at the very bottom of the page.
Index
The relationship between bags and motifs
You might be wondering, "Why use motifs when knitting a bag?"
Here, we will refer to a piece of knitted fabric that can be knitted flat and indefinitely large, starting from the center and working outwards, as a "motif."
The motifs are very versatile; they can be used not only in projects like motif-connecting pieces, but also as the base of bags.
The motifs introduced here actually appear in various works as bag bases.
There are many bags out there that are made by knitting a motif to form the base of the bag, and then continuing to knit the patterns for the sides to create a bag shape.
The idea is to start with round motifs to create a round-bottomed bag, or with oval or rectangular motifs to create a horizontally-oriented bag.
As a first step in bag making, let's take a look at the round motif that frequently appears on the bottom of bags.
What is the basic circle motif?
Circle and oval motifs
In this first installment, "Circles (Circles and Ovals)," we will proceed with the explanation under the premise that within the broad category of "circular motifs" there are two types of motifs: "circular motifs" and "oval motifs."
Among the round motifs, the most orthodox one is probably the circular motif that is close to a perfect circle.
The circular motif has many uses and can often be found in crochet projects on the market.
And sometimes the circular knitted fabric is turned into coasters as is.
The knitting pattern below is an example of a circular motif.
Such circular motifs are frequently used as part of the work,Crochet Beginner’s Course: Lesson 4 - Trinket Box with Lid" I also used this circular motif as part of the piece.
Next, there is the oval motif, which is another variation on the round motif.
It's easy to see how to make an oval motif when you look at a knitting pattern, but in fact, you can make it by dividing a circle motif in half and adding a section in between that is knitted without increasing or decreasing the number of stitches.
The knitting pattern below is an example.
When you compare the knitting patterns like this, don't you feel that the circle motif and the oval motif are related?
If you have knitted a circular motif, you will probably find it easy to knit an oval motif.
The main difference between these two is that the circle motif begins with a loop cast-on, while the oval motif begins with a chain cast-on.
This is the first time we've introduced an oval motif in a beginner's course, but in fact, an oval motif that starts with a chain cast-on may be easier for beginners to knit.
Here we will explain the circle motif and oval motif, which are related in this way, as the basic circle motif.
Types of knitting
Knitting
The knitting patterns for the circle motif and oval motif introduced earlier both use round motifs made with knit stitches.
Knit stitches have a tight weave and produce a stiff knitted fabric, making them perfect for stuffing stuffed animals with cotton inside, or for making bags that need to be strong.
A circular motif made of knitted knitting needles may appear as part of the knitting pattern for such projects.
Knitted circle motif
The circular knitting motif has already been explained in the beginner's course, so we will not explain it again here.
The knitting video is "Crochet Beginner’s Course: Lesson 4 - Trinket Box with LidPlease visit the " page.
Knitted circle motifProjects that can be knitted
Oval knitting motif (video included)
I will now explain the knitting pattern for the oval motif in knitting stitches again.
In this example, we start by casting on 6 chain stitches.
From there, knit one chain stitch to start the stitch, then insert the needle into the sixth stitch of the cast-on chain and knit the first round stitch.
What is difficult to understand at this point is where to place the needle and knit the first knit stitch.
In my recipes, in places where there may be confusion about how to weave in the chain, I sometimes include an explanation such as, "Pick up one strand on the other side of the cast-on chain and the back knot and weave it."
This knitting pattern is a similar case, but in order to knit based on the explanation above, you need to know what the "one chain on the other side" and "back mountain" refer to.
This point is "Crochet Beginner’s Course: Lesson 3 - Eco-friendly Scrubber"It may have been mentioned in that article as well.
For those who haven't seen it yet, I'll explain it again with pictures.
Just to let you know, keep in mind that a chain link is made up of three threads.
The image below shows the front of the chain after six cast-on stitches.
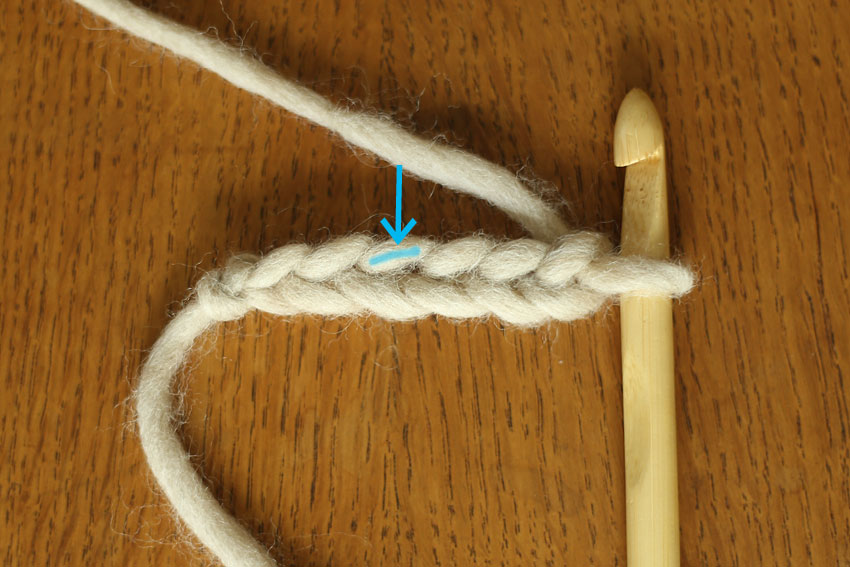
The arrow points to the "one chain on the other side" (for example, it points to the third link, which looks easier to see).
The next image shows the chain tilted towards you, revealing the back of the chain.
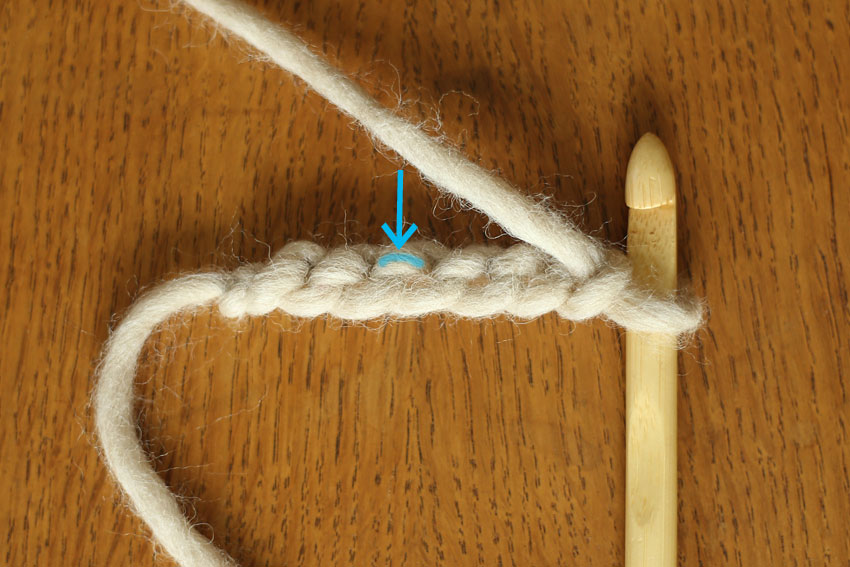
The arrow points to the "mountain behind the chain" (again, as an example, it points to the mountain behind the third chain, which looks easy to see).
When picking up a stitch from the cast-on chain, you insert the needle and knit in a way that picks up these two strands. This is what I meant when I said earlier, "Pick up the stitch on the other side of the cast-on chain and the back stitch."
Now, as it is, you won't be able to insert your needle into the sixth stitch of the cast-on chain to make a round crochet. However, this is OK because you will be knitting the first chain stitch from here.
Knit one chain stitch to start the chain, then insert the needle into the sixth stitch of the cast-on chain to make the first small crochet (so you will pick up the ``one strand on the other side'' and the ``back of the chain'' of the second chain from the needle to make the first small crochet).
When doing this, make sure to insert the needle from the front of the chain.
After you have knitted the first quarter crochet, put the needle in the same place and knit another quarter crochet.
Then move on to the next chain and crochet one stitch, then one stitch in the next chain, and so on until you reach the last chain (the first stitch of the cast-on chain).
In the last chain, work two more quarter stitches (for a total of three). This completes the leftmost turn in the pattern.
The image below shows three quarter stitches crocheted into the last chain.
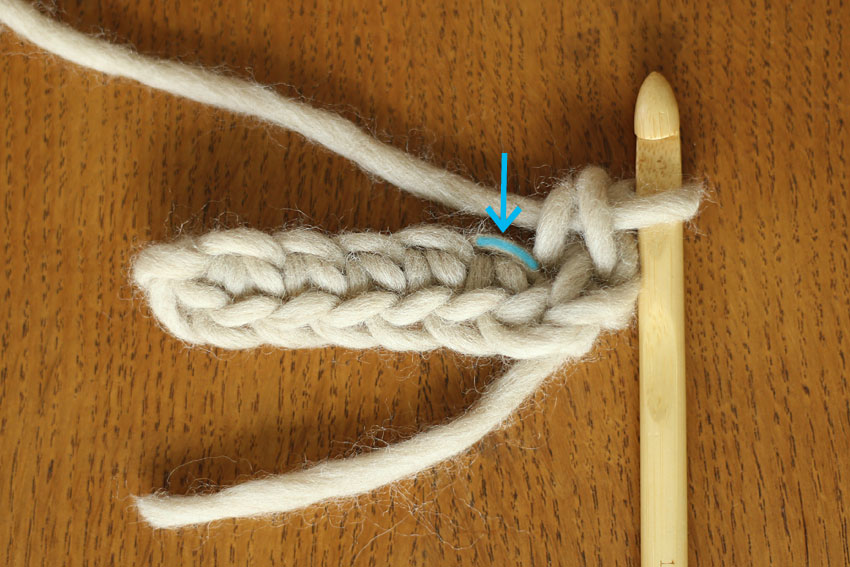
The next number (blue arrow) marks the second half of the game after the turn.
In the first half, we knitted a knitting stitch by ``picking up one chain on the other side of the cast-on chain and the back of the knot.''
Come to think of it, a chain is made up of three strands of thread.
In the first half, I picked up two strands and knitted them, so there is one strand that I didn't pick up. In the second half, I will pick up that strand and knit it.
In practice, you pick up the stitch that the arrow is pointing to and knit the first knit stitch of the second half.
Then on the next strand, make one quarter stitch, then one after that, and so on.
The first and second close knit stitches of this row (total of two close knit stitches) are knitted into the leftmost stitch in the first half of the row. Once you knit one close knit stitch for the second half of the row there, the close knit stitches for this row will be finished.
Insert the needle into the first knit stitch and work a slip stitch to complete the first row.
The image below shows the finished slip stitch.
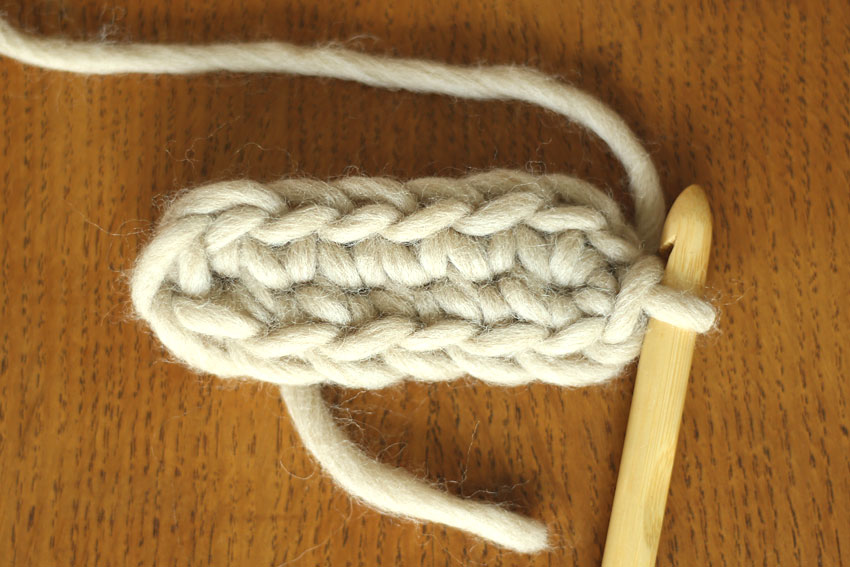
Do you now have an idea of how to knit an oval?
If you know how to pick up the stitches from the chain and knit, you should be able to knit without any problems.
For the oval motifs that follow, the method of picking up stitches from the cast-on chain is the same for both the first and second halves.
The number of stitches you use for the chains on both sides may change, but as long as you follow the method explained so far, you'll be fine!
Please refer to the video explanation provided for how to knit the entire piece.
Single crochet oval motifProjects that can be knitted

Long knit
Next is a long crocheted circle motif.
It is said that the height of a double crochet stitch is approximately three knit stitches, so the circle grows larger faster than with knit crochet.
Additionally, double crochet fabric is thinner than knitted knit, so these differences in properties mean that the situations in which it is used will also change.
Long Crochet Circle Motif (with video)
The circular motif of the long knitting is "Crochet Beginner’s Course: Lesson 1 - Coasters" also explains a similar knitting method, but in this pattern you start by casting on a chain to make a loop.
This time, we will introduce a circular motif made with double crochet, which starts with a cast-on loop.
The difference is that when you start knitting after casting on a loop, the center becomes tight and neat, but on the other hand, if you are a beginner, you may find it a little difficult to knit because you are not used to holding the yarn or applying the appropriate amount of pressure.
While our "Crochet Beginner’s Course: Lesson 4 - Trinket Box with Lid」「Crochet Beginner’s Course: Lesson 5 - Basic Market BagIf you have completed ", you will already have experience creating a loop.
These courses also include videos on how to knit, so we will skip the explanation of how to cast on the loop and move on.
The knitting pattern below is an example of a circular motif in double crochet.
In the knit stitch example, the first row has 6 stitches, but in this case it has 16 stitches, so the double crochet motif has more cast-on stitches.
This is because double crochet has a higher eye level than knit crochet, so the circumference of the first row is also longer.
Because the circumference is long, you need to use a lot of stitches otherwise the knitted fabric will not spread out evenly.
If that's the case, shouldn't it be 18 stitches, which is three times the number of knit stitches? Some of you may feel uncomfortable with the fact that it's 16 stitches.
However, 3 times is just a guideline, so just like 18 points, if you think of it as a guideline, you might be able to overlook it.
I don't really mind this, so I often use around 15 to 16 stitches, which is when the circular knitting lies flat.
So, here we are introducing a knitting pattern based on 16 stitches.
I think double crochet is a very easy knitting technique, and with this circular motif, once you've cast on the loop, it seems like no other explanation is needed.
If I could give you one tip, it would be to put the needle into the third stitch of the starting chain at the end of the row and knit with a slip stitch.
At this time, you insert the needle from the front of the chain, but it is recommended to pick up the needle to the right of the third chain and the back of the chain and make a slip stitch, as this will make the rising chain less noticeable and look neater.
There are also some points that make it easy to knit the entire long crochet circular motif.
That is the position of each increase.
With knit stitches, if you increase the stitch in the same position every row, the more rows you do, the more angular the shape will become, like a hexagon. However, with double crochet, there is less of a need to worry about this.
So it's okay to increase the stitches in the same place every row!
This method makes it easier to count the number of stitches, so when you actually try knitting, you will probably realize how great it is to increase the stitches at a good pace.
We have prepared a video tutorial on how to knit a circular motif using double crochet, so please refer to this as well.
Double crochet circular motifProjects that can be knitted
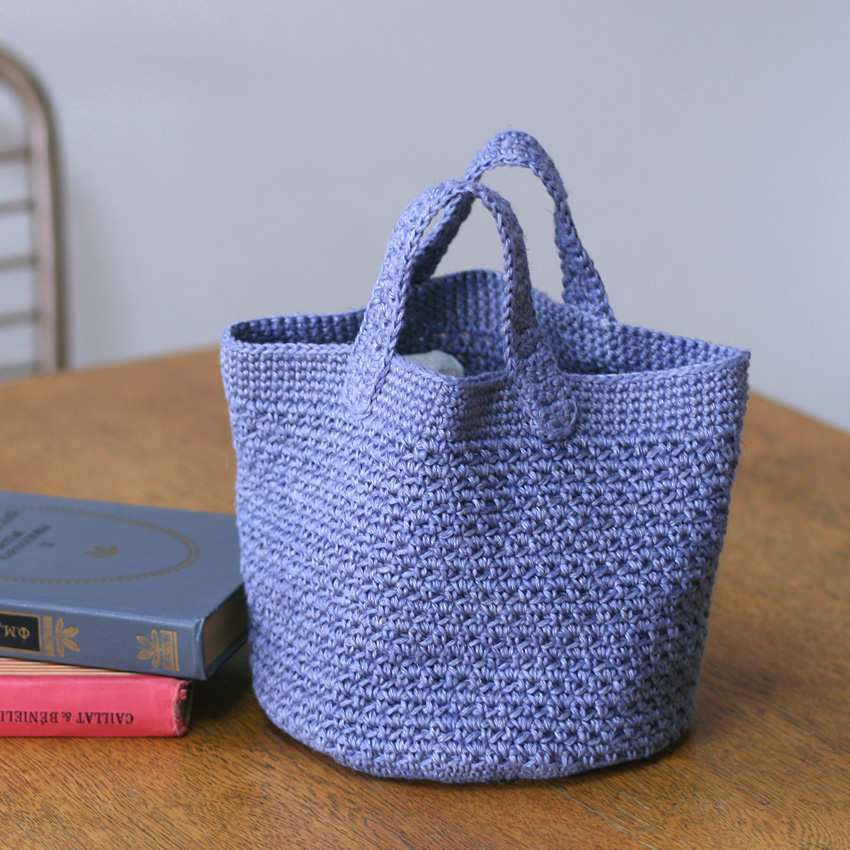
![定番小物からはじめる かぎ針編み初心者コース[第2回]。長編みの丸底巾着。ブルー、ピンク、グレーの3色が明るい白背景で並んでいる様子。](https://ronique.jp/wp-content/uploads/2021/06/crochet-round-bottom-drawstring-bag.jpg)
Long crochet oval motif (video included)
Now let's take a look at the long crochet oval motif.
The mechanism for the double crochet oval motif is easy to understand if you think of it in the same way as knit crochet.
This is also easy to see when looking at the knitting pattern, but if you divide the circular motif in half and add a section in between that is knitted without increasing or decreasing the number of stitches, you can create an oval motif.
The knitting pattern below is an example.
Earlier, the number of double crochets in the first row of the circle motif was 16.
The oval motif based on this has eight double crochets on each end, with no increase or decrease in the number of stitches in between.
The knitting method is the same as explained in the section on knitting the oval motif, so you can just think of knitting as knitting the double crochet instead of knitting the quarter crochet.
At this point, you should have a much better understanding of how circular and elliptical motifs are made.
We have also prepared a video tutorial on how to knit this piece, so please refer to it.
double crochetellipsemotifProjects that can be knitted
Medium long knit
Next is a round motif made with medium-length crochet, which is somewhere between knit crochet and double crochet.
The stitch height for double crochet is three times that of the knit crochet, but it is said that the guideline for double crochet is two times that.
The starting chain is also one stitch for single crochets and three stitches for double crochets, while it is two stitches for double crochets.
This is also somewhere in the middle.
The characteristic of medium length stitch is that the knitted fabric is thicker, and rather than being as stiff and thick as knit stitch, it has a softer, more elastic feel.
Because the head of the double crochet stitch is shifted to the right, when you knit in the round the position of the stitches in the next row will be shifted, and depending on the project, this diagonal movement can be bothersome.However, another feature of double crochet is that you can create horizontal lines when knitting back and forth, which has the advantage of adding an interesting texture to the knitted fabric.
By making use of these hidden habits, you can create wonderful pieces that can only be achieved with double crochet, so I would encourage you to give double crochet a try.
Medium-length crochet circle motif (video included)
The knitting pattern below is an example of a circular motif in medium length crochet.
The number of stitches in the first row for the circular motif in knit knit is 6, while the number of stitches in the double knit knit is twice that, 12 (the numbers here are much neater!).

In this knitting pattern, the positions of the increases in each row are staggered, like in knitting knitting.
This varies depending on the work, so please refer to it.
It may be easier to understand the actual knitting method, such as where to insert the needle in the double crochet stitch and knit the next row, by watching the video.
A video focusing on how to crochet medium-length crochet is "Half double crochet (HDC)"
This is the first time that medium-length crochet stitches have appeared in a beginner's course, so we have provided video explanations for both circular and oval motifs.
Medium-length oval motif (video included)
The following knitting pattern is an oval motif made with medium length stitches.
The oval motif in medium length crochet is also made by dividing the circle motif in half and leaving an area with no increase in stitches in between.
Since this is double crochet, I don't think there are any points that require special explanation, so please watch the video to see how to actually knit it, and check, if necessary, which double crochet stitches are in the previous row, where you should insert your needle, and so on.
中double crochetellipsemotifProjects that can be knitted

Characteristics of works using circular motifs
Round Motif
The round motif appears quite frequently in various designs.
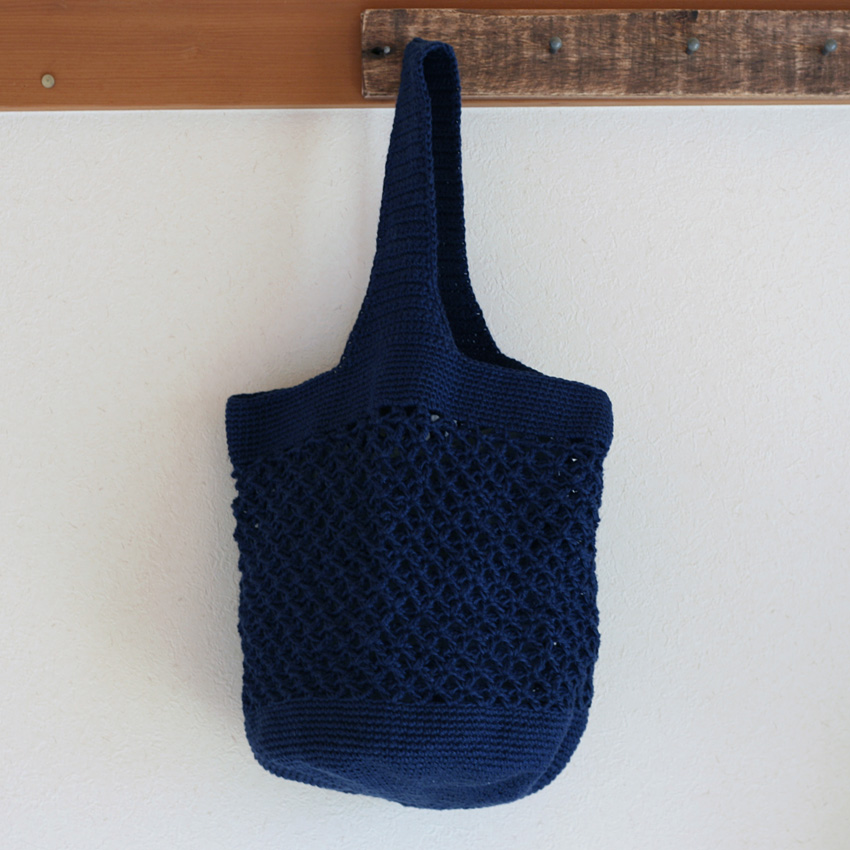
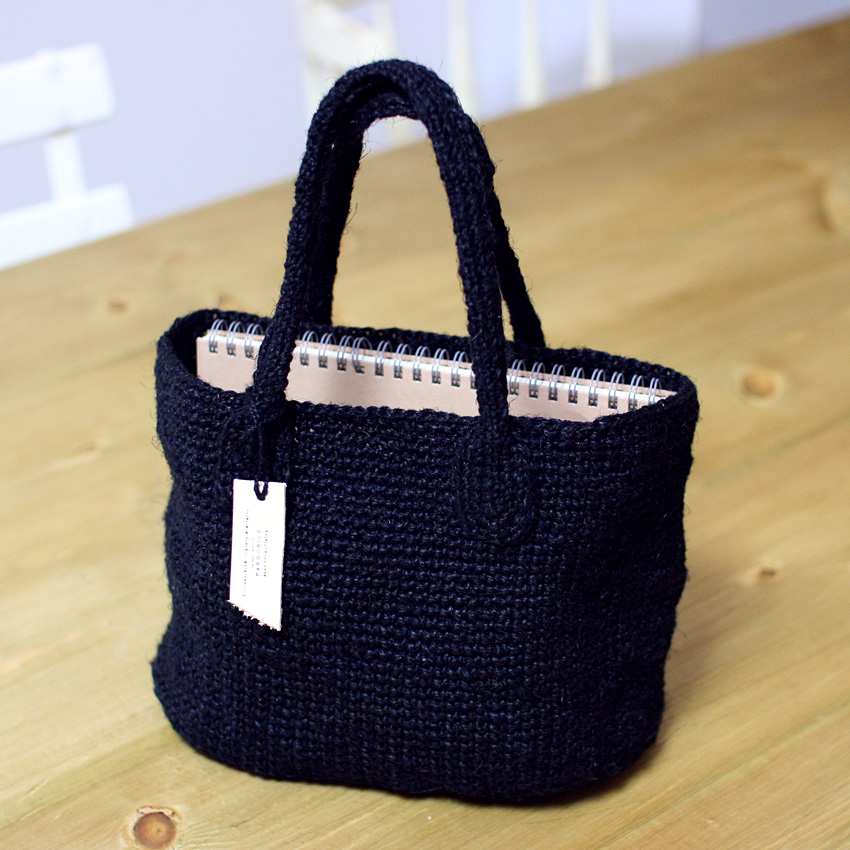
Market bags that begin with a round motif are also a common crochet project.
A round-bottomed bag, which starts with a circular motif, has an appealingly soft silhouette.
From a designer's perspective, shapes without corners are simple to design and are easy to use motifs.
Even in works that don't immediately look like they're made using a circular motif, there are patterns that actually start with "crocheting a circular motif...", so it's one of the crochet techniques you're almost guaranteed to encounter.
Oval Motif
The appeal of the ellipse motif lies in the fact that you can change the balance between the vertical and horizontal aspects of the ellipse.
A variety of bag designs are born from the oval motif.
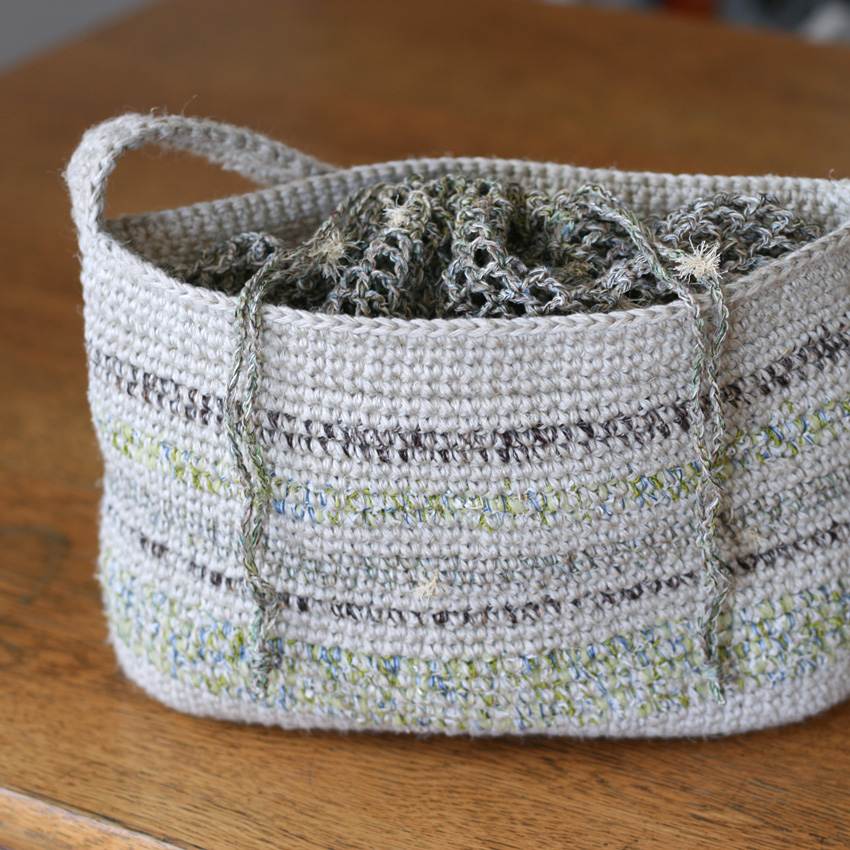
The oval-shaped base of the bag is also great because it's practical and allows you to easily organize your belongings.
Once you become more comfortable with crochet, you'll also find it easier to adjust the design to your liking.
The oval motif is easy to use for the bottom of pouches, so it's a knitting technique you'll often encounter when knitting bags.
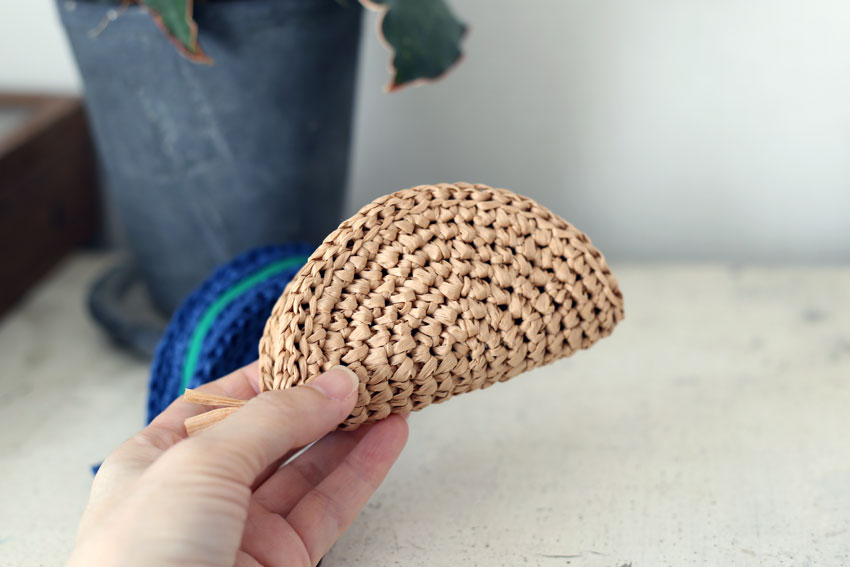
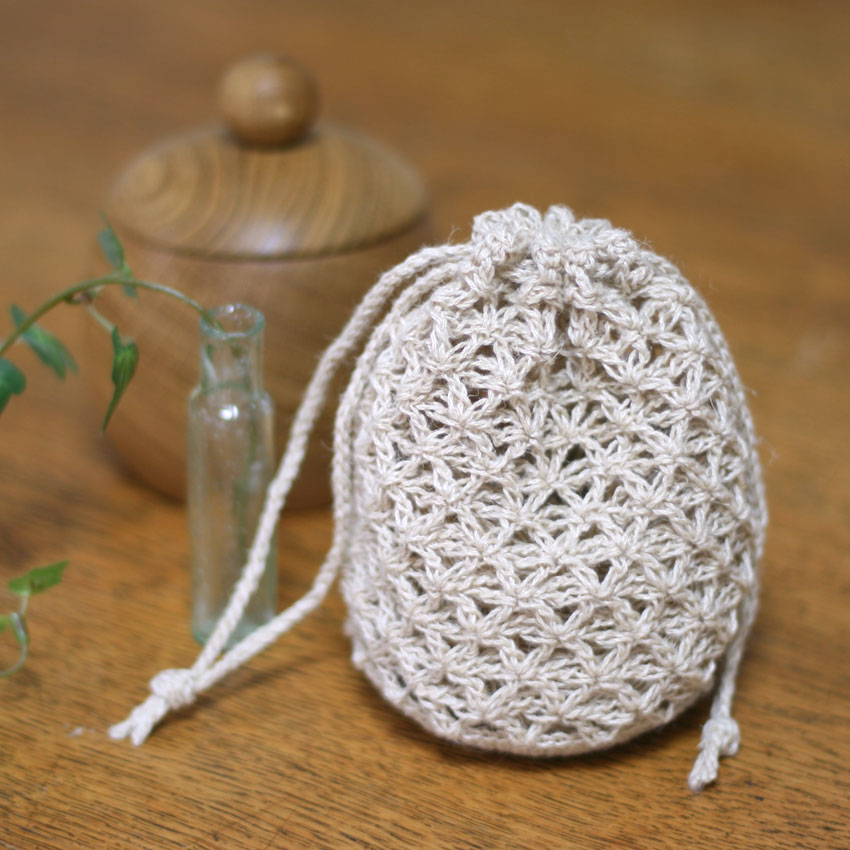
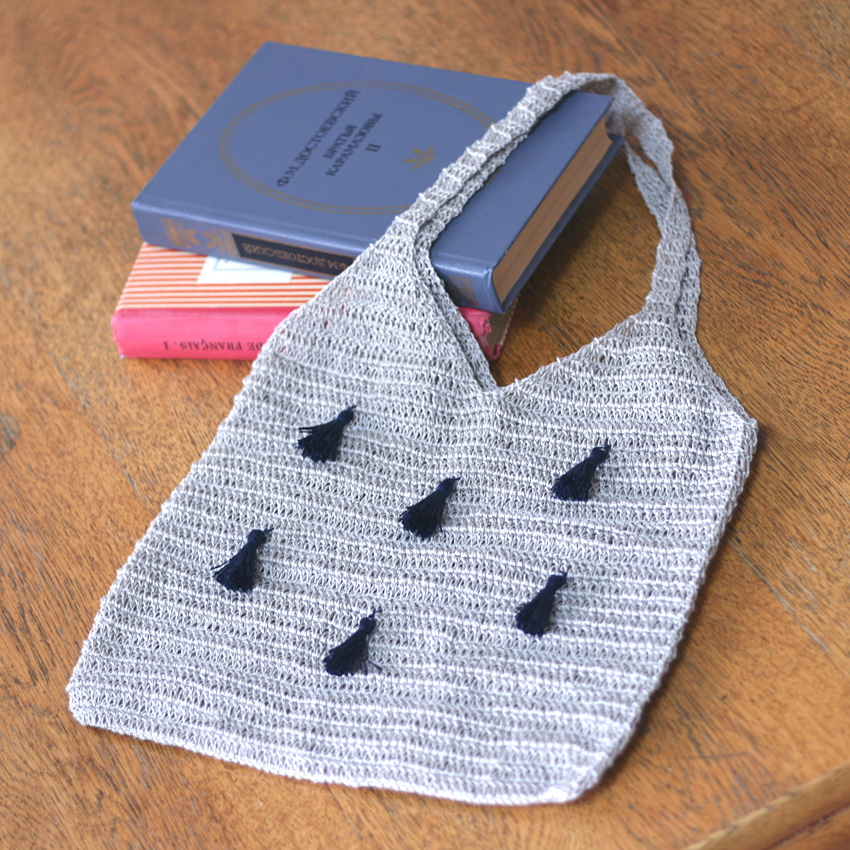
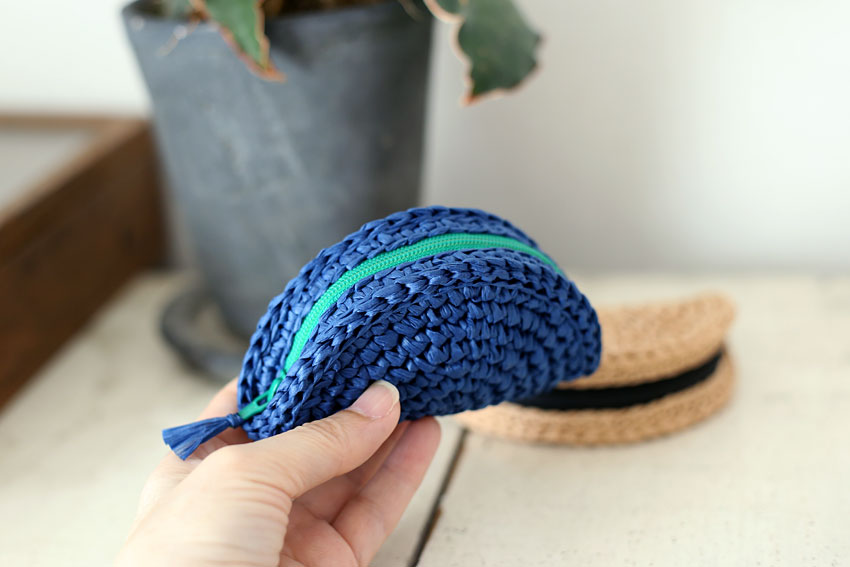
Oval motif practical recipe "Omelette Perspective"
This is the first time we've covered oval motifs in a beginner's course, so we've created a new recipe!
This is an omelet-shaped perspective drawing, as seen in the title image.
I hope you'll take a look at these examples of how the motif can be used in ways other than on the bottom of a bag.
This is a practical recipe without a video, but it is a piece that can be made by utilizing the motif, so please give it a try!
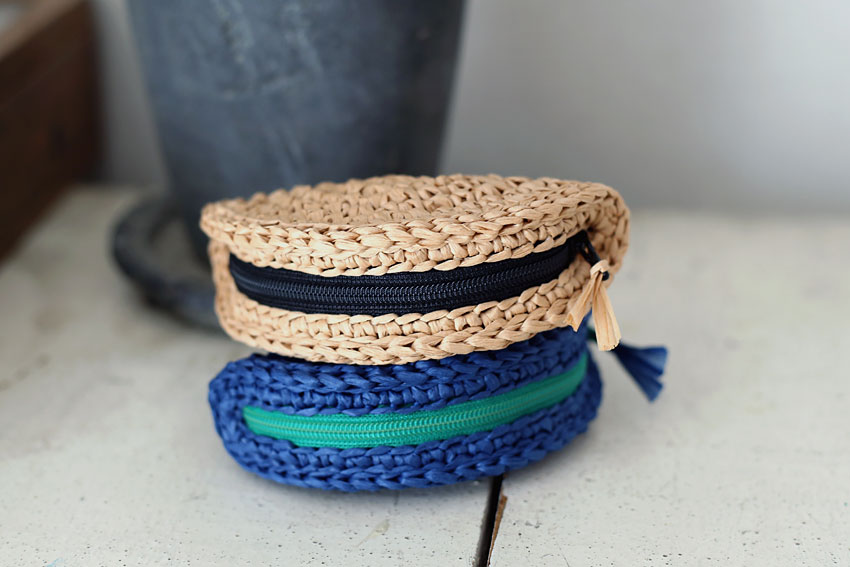
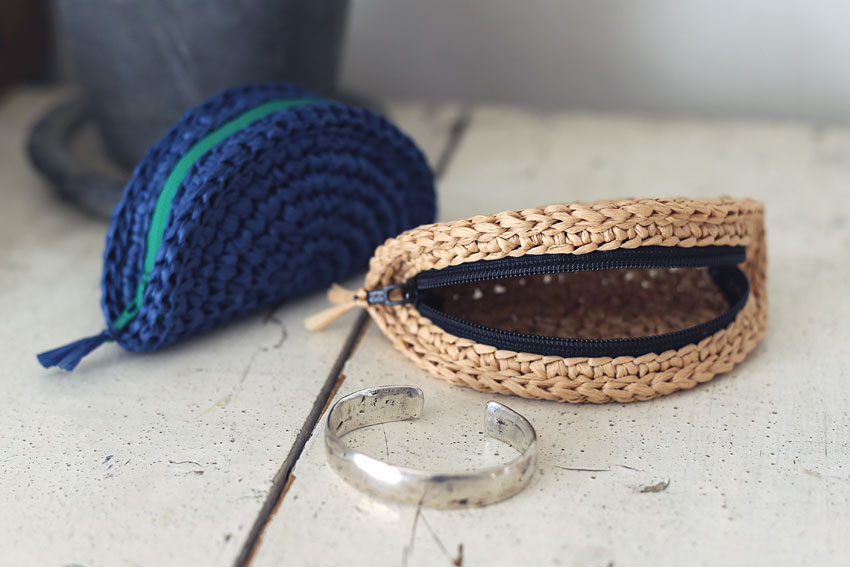
Crochet hook size and materials
Merhen Art Manila Hemp Yarn (20g ball, approx. 50m)...10g
Sample work: Lapis Lazuli (517) and Straw (507)
Needle: No. 7 crochet hook
Zipper / YKK Flat Knit (R) (20cm) ... 1 piece
Sample work: Green (#540) and black (#580)
Needle and thread for sewing on a zipper... as needed
The zipper will need to be cut to fit the knitted fabric, so please use a nylon zipper that can be cut, rather than a metal type.


Finished Size
Height 6cm x Width 11.5cm x Depth 3cm
gauge
2cm square, 3 stitches vertically x 3 stitches horizontally
Crochet Pattern
Omelette Purse Knitting Pattern (PDF)
Instructions
Please refer to the crochet pattern along with these instructions.
①Cast on 6 chain stitches and start knitting the main body of the bag.
For the first half of the knit stitch, you will knit one strand on the other side of the chain and the back of the chain, and for the second half, you will knit one strand that you did not pick up in the first half.
Increasing stitches on both ends of each row, cut the yarn after completing the eighth row.
②Next, knit the gusset.
Start knitting the gusset by casting on a chain. After knitting 52 stitches, carefully pull the chain through the first stitch to make a loop, being careful not to twist it.
To knit a small stitch into the cast-on chain, pick up one strand on the other side of the chain and the back of the chain.
Once you have finished knitting the gusset, you will continue to use the same yarn to sew the stitches, so do not cut the yarn yet.
③ Pin the two knitted pieces to the ironing board and use a steam iron (holding it above the knitted pieces so that only the steam is hitting them) to settle the knitted pieces.
④ Sew a zipper to the gusset.
Position the zipper so that the bottom stop (the stopper that prevents the zipper from opening any further) is on the side where the gusset rises, and sew it to the knitted gusset.
When doing this, try to sew the knitted fabric as flat as possible without bending it, as this will result in a neater finish when sewn together.
Once the sewing is complete, you will need to cut off the excess zipper part, but this will leave no bottom stop.
that's whysurely,Before cutting offに、“Figure out where you would normally want to attach the bottom stop, and sew in that position several times so that the thread acts as a bottom stop.
This will prevent the zipper from opening all the way and causing the slider to slip out.
④ Match the stitches in the paired positions shown in the knitting pattern (the dotted arrows connecting the gusset and the main body), and place the main body and gusset on the “outside” side.
Hold the overlapping knitted fabric in your hand so that the gusset is facing you and the main body is facing away from you.
Line up the final stitches of the gusset and the main body, and from the starting point of the slip stitch, pick up one stitch on the inside of each overlapping stitch (one on the other side of the gusset stitch and one on this side of the main body stitch) and work a slip stitch (slipped stitch).
Once you have completed one revolution, cut the thread.
[reference]Crochet stitching and sewing On this page, there is a video and image explanation on how to do half-stitch pull-out stitching.
⑤If you like, decorate the handle holes and it's finished.