![定番小物からはじめる かぎ針編み初心者コース[第5回]](https://ronique.jp/wp-content/uploads/2022/01/title_beg05.jpg)
In the previous beginner crochet course, we tried knitting in the round.
Have you gotten used to making the loop, starting it up, and finishing it with a slip stitch?
Once you understand this method, I think you'll be able to master even the most complicated step in crocheting.
Before we forget that feeling, let's review it by knitting a market bag using round knitting!
This is a larger size than the previous accessory case, so I think you'll feel a greater sense of accomplishment when it's finished.
Once you've learned how to crochet a bag, even beginners will feel like they're getting closer to graduating from crocheting.
While there are many bag recipes out there, we chose the bold name "Basic Marche Bag" for the following reasons.
1. It's easy to knit
2. The number of stitches and rows is neat and tidy.
3. It can be used as a foundation for arrangements.
Crocheting often requires counting, especially when knitting in circles.
This time too, I am knitting a piece while checking the numbers, so I made the numbers on the knitting pattern that I check at turning points as easy to understand and remember as possible.
And because it's a classic shape, once you've knitted the basic shape, you can easily customize it to your liking by changing the color along the way, changing the depth of the bag, or changing the length of the handles.
Please come back to see the recipes, not only when you are a beginner, but also after you have graduated from being a beginner, whenever you feel like knitting with a different yarn or want to enjoy knitting in a different way!
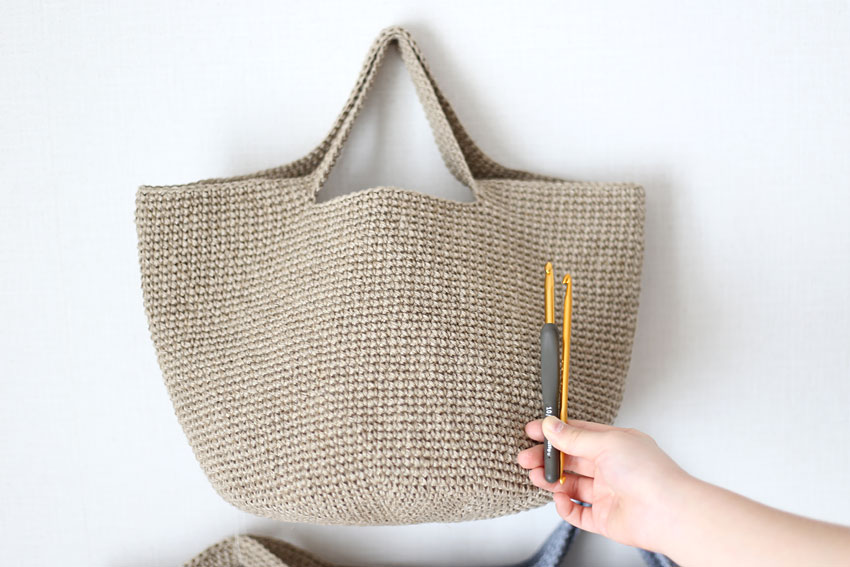
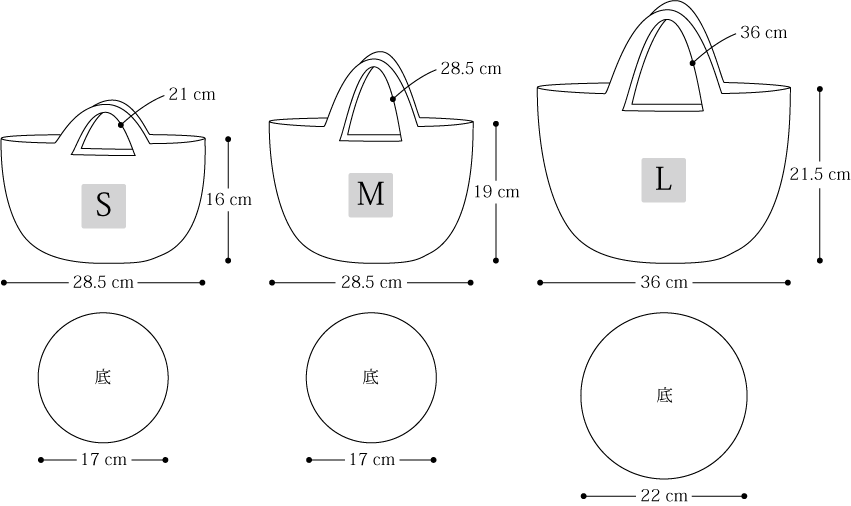
We have prepared three different sizes of market bag knitting patterns that can be knitted using the same method.
The S and M sizes have the same bottom size, but the bag depth and handle length are different.
The L size is larger overall, including the size of the base.
Below is a picture of the crochet hook, so please use it as a reference for the size.
Now let's try making a crocheted market bag together!
Index
First, prepare your tools and yarn.
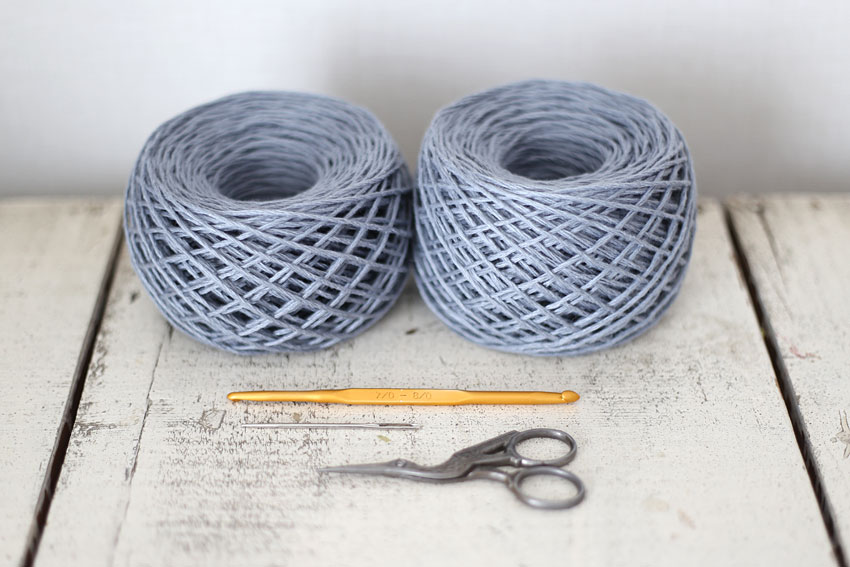
What you will need
Here's what I prepared to knit this piece:
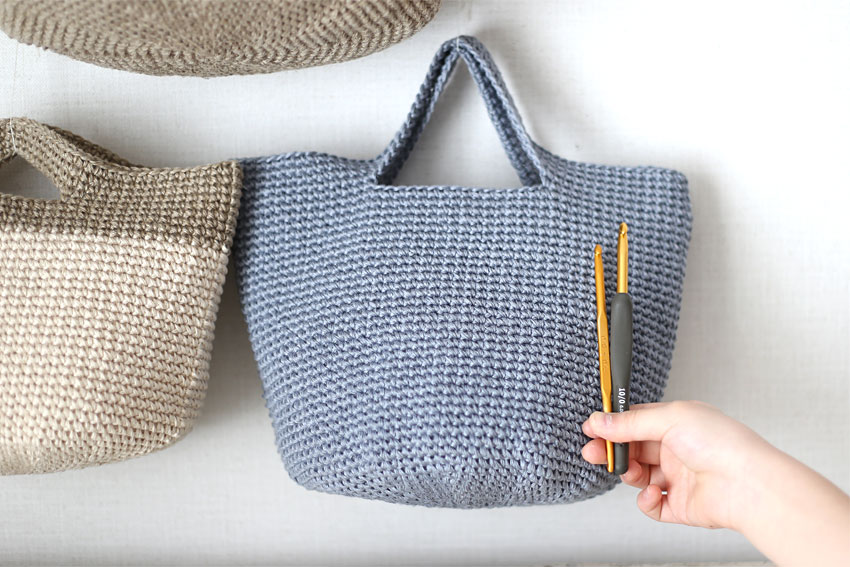
・Hemp string (medium thickness) S: 150g (off-white 100g, hemp color 50g), M: blue 170g, L: hemp color 270g
• Size 7 (4.0mm) crochet hook
• Tapestry needle (yarn needle)
• Scissors
The threads I used this time were stock items that I had had in stock for quite some time, so I'm sorry to say that they seem to have all been discontinued.
The off-white and blue are hemp yarn called "Wildlife" (100g skein, approximately 110m) from Pierrot Yarn (Kosei Sangyo), which gives the impression of being a fairly stiff, average-weight yarn.
The linen-colored yarn is a medium-weight linen yarn called "R106" (100g skein, approximately 200m), also from Pierrot Yarns.
When you look at the meters per 100g, the thickness seems to be quite different, but in reality they were almost the same thickness.
As an alternative thread, Hamanaka's "Eco Andaria" is about the same thickness (medium) as the thread used this time.
The finished size is similar, so please use this as a reference when you want to create a piece that is similar in size to the sample work.
At the end of this page, there is also a picture of a market bag knitted with Eco Andaria.
Which crochet hook do you recommend?
This time I used a strong, stiff thread.
When knitting with this type of hemp yarn, some people may find that their hands hurt while knitting if they use metal single or double crochet hooks.
Grip-type crochet hooks have a wide handle that softens the impact, so if you have one, it's worth trying!
What yarn weight do you recommend?
Unless you are looking to knit something particularly small and delicate, we recommend a thickness of medium to extra thick.
Also, when using a stiff yarn like hemp string, there will be a significant difference in the finished size depending on whether you knit with medium thickness or extra thick thickness.
This is a sample made with medium-weight yarn, but if you knit it with extra-thick yarn, it will turn out to be a thick, rough basket bag, which I think would also be good.
What yarn material do you recommend?
Since it's a bag, the material doesn't matter as long as it's thick enough.
Summer yarns tend to be stiffer and require more strength to knit than winter yarns, so if you want to knit without tiring your hands or if you want to use it in the fall and winter seasons, it might be cute to try knitting with extra thick winter yarn. If you're worried about the strength of mohair yarn on its own, you can also knit it together with extra thick yarn.
What yarn color do you recommend?
Summer yarn is stiff and thick, making it easy to see each stitch, but it's even easier to count stitches with lighter yarn.
Also, since you often hold your bag in your hand, it would be nice to have a color that doesn't show dirt.
Have fun thinking about the colors you can choose depending on your purpose, such as choosing one to add an accent color to your fashion.
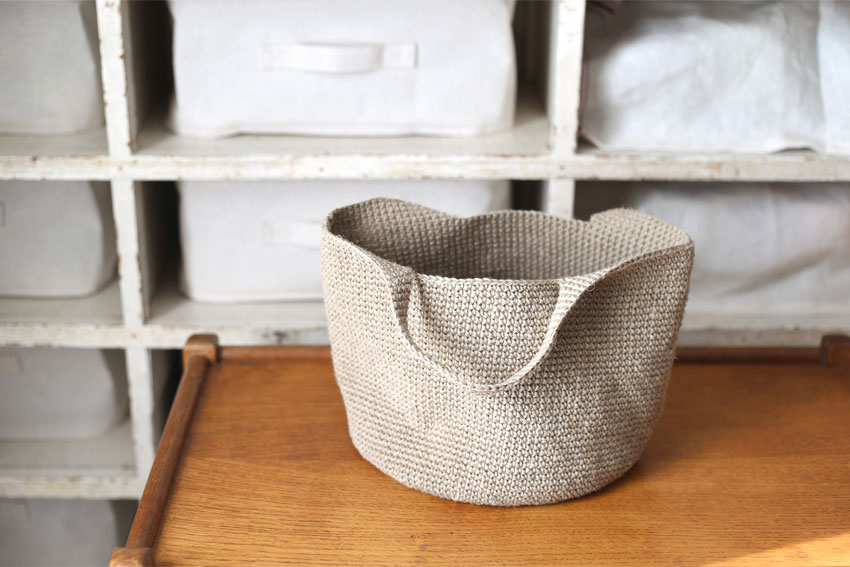
A Closer Look at the Project and How to Make It
Why did we choose market bags for the 5th edition?
Last time, we had you practice knitting in the round and get a feel for it, so next we chose some pieces with the hope that you will get a glimpse into the world that opens up when you knit in the round!
There are no particularly difficult points, and once you can knit the round knit stitch, the rest of the process seems to be smooth, which was a deciding factor for me.
The handle is integrated into the spool, so there is no need to splice the thread unless you run out of thread.
I hope you will be impressed by how simple it is to knit a bag!
What is the size of the work?
This basic market bag comes in three sizes: S, M, and L. The measurement chart is below.
I will also explain how to measure below.
-Measurements are taken with the bag laid flat
・The height of the bag is measured from the side to the last level
・Handle is measured by the inner circumference
The gauge of knitting (10cm square) is as follows:
Linen: 17 stitches wide x 18.5 rows long
Off-white/Blue: 16 stitches wide x 18.5 rows long
How do you knit a market bag?
This market bag is made by starting with a cast-on stitch and then knitting in the round using a knit stitch.
To knit the bottom of the bag, increase the number of stitches so that the circle of knitting gradually gets larger.
For the sides, knit the fabric so that it rises straight and cylindrically without increasing or decreasing the number of stitches.
To attach the handle, make a chain in the middle of the round knit stitch (this chain will become the base of the handle).
Then in the next row, pick up a stitch from the chain and make a quarter stitch, then continue knitting in the round.
Once you reach the handle, you're close to the goal!
To make it a practical size, you will need to knit a fair number of stitches and rows, but the mechanism may be simpler than the small accessory case made in the previous article using circular knitting.
Is it just a knitted piece?
With the exception of the chain stitch on the handle, the entire piece is knitted.
Knit stitches produce a strong knitted fabric, making them perfect for bags.
Since there are no patterned knitting patterns, I wanted the construction of the bag to be memorable, so I made a plain piece using only knitting stitches as the basic market bag.

How to Read the Crochet Chart
▶The knitting pattern is available as a PDF file.
Marche Bag S Knitting Pattern、Marche Bag M Knitting Pattern、Marche Bag L Knitting Pattern
The knitting pattern for the L size is small due to the reduction, so some parts may be difficult to read when printed.
In that case, please enlarge the PDF file to check.
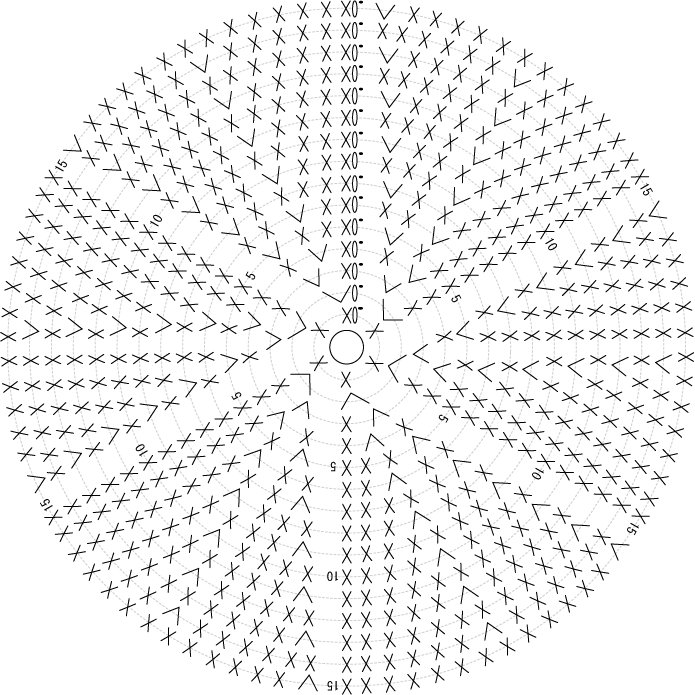
・Marche bag (bottom) knitting pattern
We will explain using the bottom of an S/M size bag as an example.
This is a knitting pattern for a large circle, but just like the bottom of the small item holder from last time,The rules of knitting circles and hexagonsWe will knit up to the 15th row using the rules for increasing the circle explained on the " page.
If you knit 15 rows, adding 6 stitches each time, you will have 90 stitches in one round.
- Marche bag (side and handle) knitting pattern
The image below is small and a little hard to see, but it shows the knitting pattern for the sides and handles of a medium-sized bag.
Continue knitting from the bottom of the bag, then the sides, then the handles.
When actually knitting, the PDF file is easier to read, so please check that.

・What do the crochet chart symbols mean?
The following four symbols appear in this knitting pattern:
Chain

Slip Stitch

Single Crochet

Cutting the thread

As before, the numbers and arrows indicate the row number and knitting direction.
The black triangle at the end of the stitch indicates that the yarn should be cut.
This knitting pattern also has a "circle" mark on both sides of the side.
Although the knitting pattern shows it as flat, the loops at both ends are connected by knitted fabric, and it is actually cylindrical (and bag-like, with a bottom).
• How to make the foundation ring
This bag is knitted starting from the bottom, with a loop cast on.
The circle written in the center of the knitting pattern on the bottom of the bag indicates the cast-on point.
This time too, I will be explaining how to make a loop in a video.
・How to knit the bottom of the bag
In the first row, cast on a loop, start with one chain stitch, and then knit six round stitches.
Up to the sixth row, the knitting method is exactly the same as the previous accessory case.
For this bag, the bottom continues to increase in size from the 7th row onwards.
Regarding the law of increasing yen,The rules of knitting circles and hexagonsPlease see the " page for a detailed explanation.
Continue knitting while checking the number of stitches for each row.
If the number of stitches in the previous row is incorrect, the number will not match when you knit the next row, so if this happens, please check the number of stitches in the previous row.
For S and M sizes, knit the bottom up to the 15th row, and for L size, knit up to the 20th row, increasing the number of stitches.
The final row of the bottom of the bag is 15 rows with 90 stitches around the circumference for S and M sizes, and 20 rows with 120 stitches around the circumference for L size.
・How to knit the sides of the bag
Knit the sides without increasing or decreasing the number of stitches.
Continue knitting with the same number of stitches as in the final row of the bottom, so for S and M sizes you will knit 90 stitches per round, and for L size you will knit 120 stitches per round for the sides.
For the sides, knit the following number of rows for each size.
S size: 16th to 40th rows (25 rows)
M size: 16th to 45th rows (30 rows)
L size: 21st to 36th rows (35 rows)
The number of rows on the side determines the height (depth) of the bag.
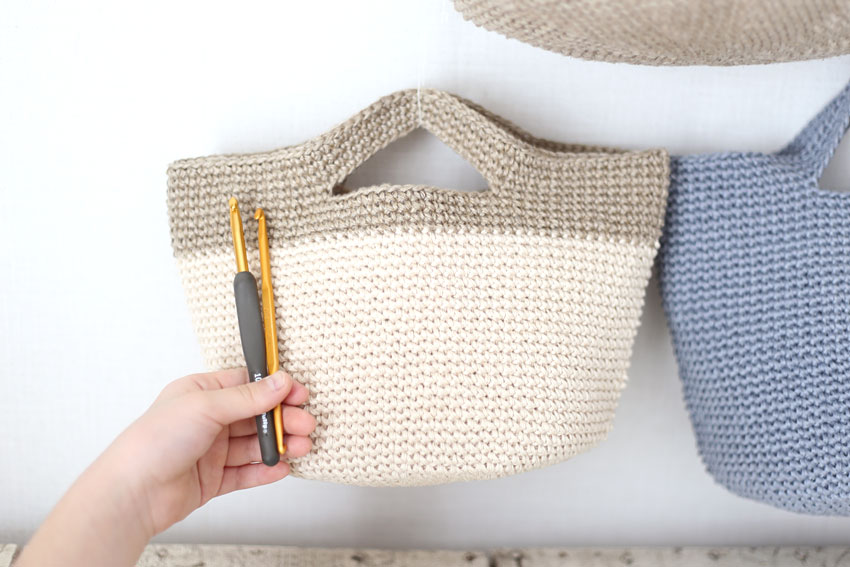
For the small size, the color changes to linen from the 37th row and is continued until completion.
When you finish knitting the 36th row and do the slip stitch, switch from the off-white yarn to the linen yarn and slip it through.
While our "Changing the color for each rowThere is also an explanation on the " page, so please refer to it.
How to knit the handle
For the S size, make a chain on row 41, for the M size on row 46, and for the L size on row 56 to create the handle.
For example, for the medium size, start with one chain stitch and knit 15 small stitches, then knit 30 chain stitches → 30 small stitches → 30 chain stitches → 15 small stitches to complete the 46th row.
For the S size, knit 15 knit stitches → 20 chain stitches → 15 knit stitches → 20 chain stitches → 15 knit stitches to complete the 41st row.
For the L size, knit 20 knit stitches → 40 chain stitches → 40 knit stitches → 40 chain stitches → 20 knit stitches to complete the 56th row.
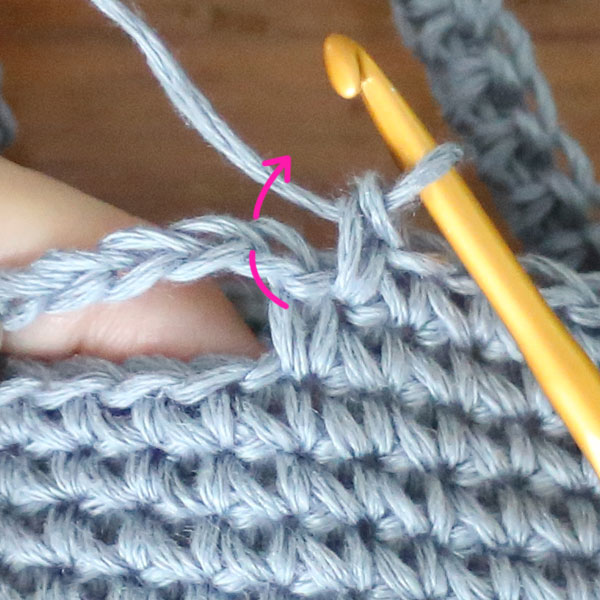
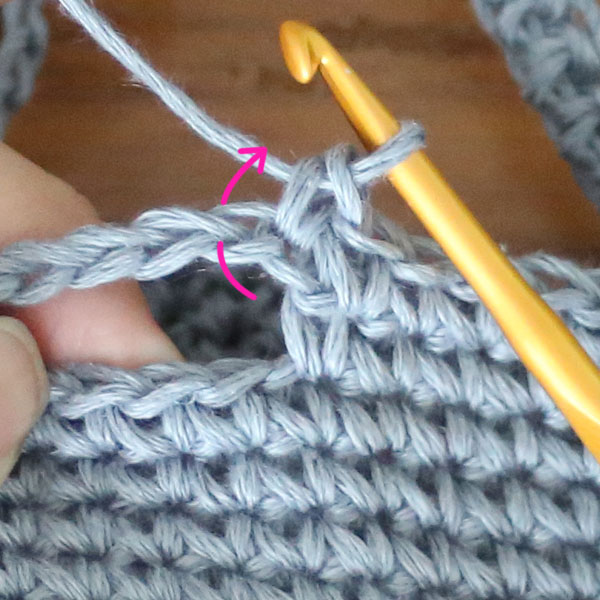
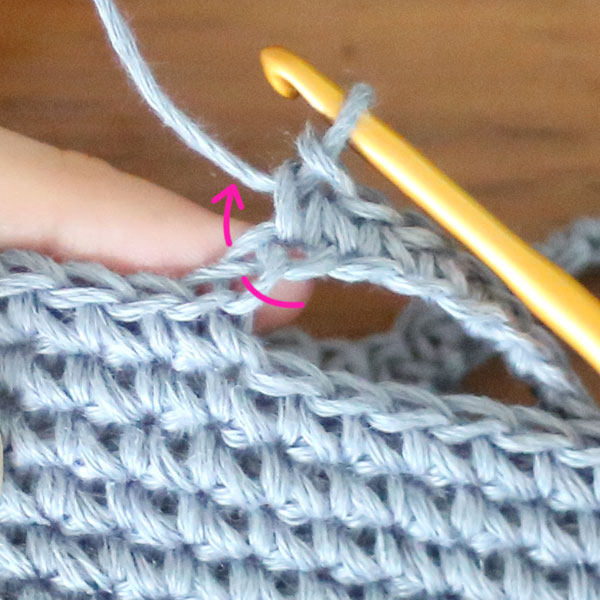
In the next row after you knit the chain for the handle, pick up one stitch on the other side of the chain and the back of the chain and knit one stitch at a time.
Now let's actually get crocheting!
Crochet Video Tutorial
This video explains the steps to complete a basic market bag, from how to cast on the knitting loop to how to attach the handle. This video has subtitles but no audio.
Some of the steps explained in the beginner's course videos from 1 to 4 may not be explained in full, so please be sure to check out the other videos as well.
Also, this explanatory video is quite long at 27 minutes, so you may want to watch the video to check only the parts that are difficult to understand!
Check the number of stitches for the "increased stitches at the bottom" and "handle attachment position"!
The bottom of the bag is made by knitting a larger circle by increasing stitches in the round, so the spacing between stitches increases with each row, from every other stitch, to every second stitch, to every third stitch, etc.
Therefore, be sure to count the stitches as you knit until you finish knitting the bottom.
To attach the handle, count the number of stitches to determine where you will start knitting the chain for the handle.
There are some things to keep in mind when knitting the sides of the bag, which is easy to do!
Once you get to the sides, there are no more stitches to increase, so you can knit without worrying about the number of stitches, just like with the bottom.
It is easy to make a mistake in the number of stitches at the start or end of the knitting, so be careful not to make a mistake there and knit the same number of stitches in each row.
It is important to note that if the number of stitches on the sides changes along the way, such as if a stitch is skipped or an additional stitch is added, it is difficult to notice in the next row.
You may end up knitting the sides with the wrong number of stitches, and then when you try to attach the handle, the number of stitches will not match, and you may only realize your mistake for the first time.
In that case, you'll have to undo and redo many rows, which can be disappointing.
To avoid this, at some point while you are knitting the side, count the number of stitches in one round or look at your knitting to make sure there are no parts that look strange.
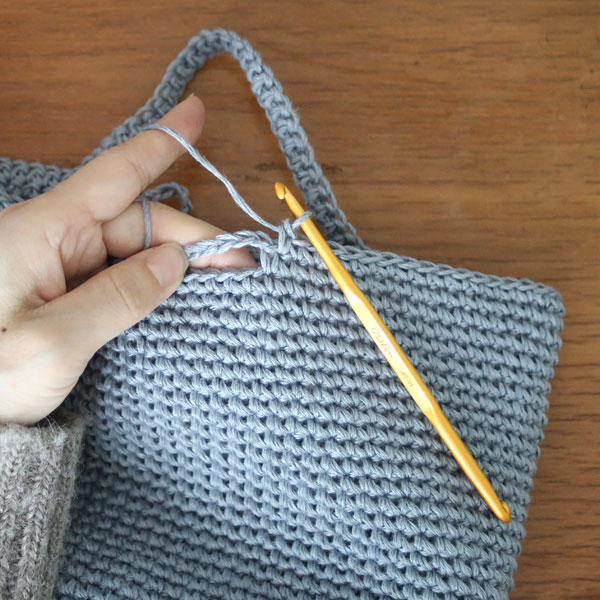
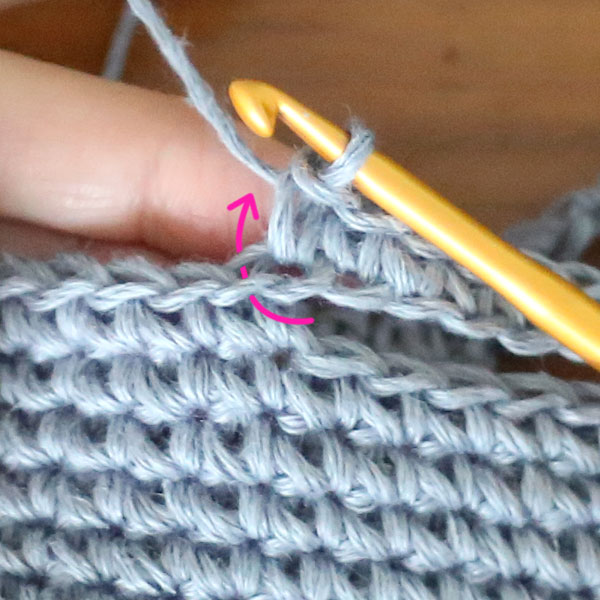
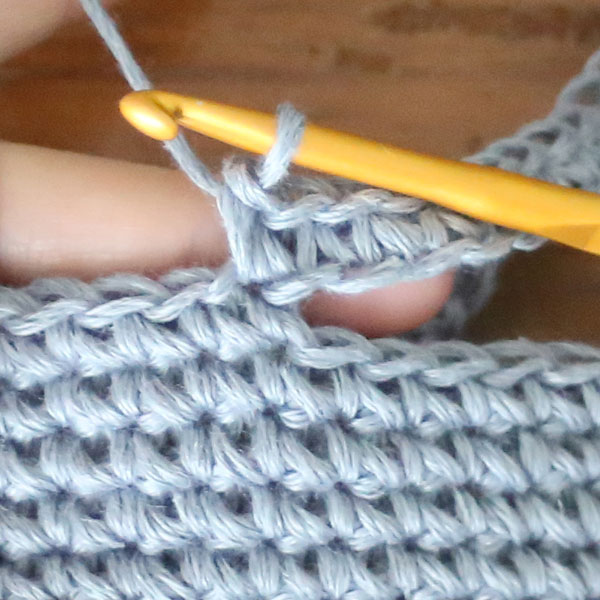
Let's review how to knit an integrated handle!
Once you have finished knitting the side of the bag, make a chain stitch where you will attach the handle, and in the next row, pick up one chain on the other side and the back of the chain and make a double stitch.
This is all you need to attach the bag handle, so it's very easy.
Below, we will explain with images how to pick up stitches from the chain handle and knit them.
Easy arrangements you can make with a basic market bag
How to arrange it into a shallow or deep bag?
A. Adjust it by changing the number of rows on the side of the bag!
If you want to make the silhouette of the basic market bag a little shallower, reduce the number of rows you knit on the sides without increasing or decreasing the number of stitches; if you want to make it a little deeper, increase the number of rows on the sides.
There are no particular issues other than adjusting it to your preferred balance.
How can I adjust the length of the handle to be longer or shorter?
A. Adjust the number of stitches on the chain that forms the base of the handle!
Again, if you want to make the handle longer, just increase the number of stitches in the chain, and if you want to make it shorter, just decrease the number of stitches.
Make sure to check the number of stitches on the chain so that they are the same on both sides.
If you make the handle longer, the twist in the knitted fabric may become stronger, but you can try using a steam iron while holding it above the fabric to reduce the twist.
How to create a two-tone or multi-colored bag?
A. Try changing the color of your yarn at the end of each row!
A simple and classic method is to change the color of the thread for each row.
In this case, at the end of the row before the one you want to change the color, change to the yarn of the next color you want to use and do a slip stitch at the end of the row.
While our "Changing the color for each rowPlease refer to the explanation on the " page.
And the easiest way to change colors is to change them just once, like in the small sample piece.
The next easiest way is to change the color every step.
If you use a thin stripe that changes color every row or every two rows, it won't be too noticeable if the yarn crosses over on the back of the knitted fabric.
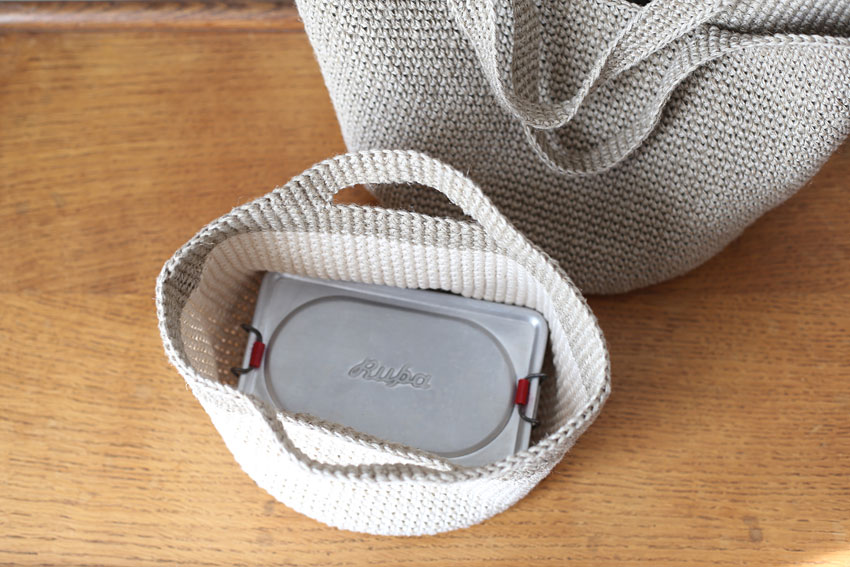
For example, if it is a thicker border, the thread that passes through to the back of the knitted fabric will be long and noticeable (below is an image showing the thread passing through to the back of the knitted fabric).
If you don't want to give away the yarn, you can either cut and reattach the yarn every time you change colors, or you can wrap the unused colored yarn around it as you knit.I think the former is easier for beginners to understand.
Also, especially if you are making a thick border with an even number of rows, try adjusting the number of rows you knit on the sides to match.
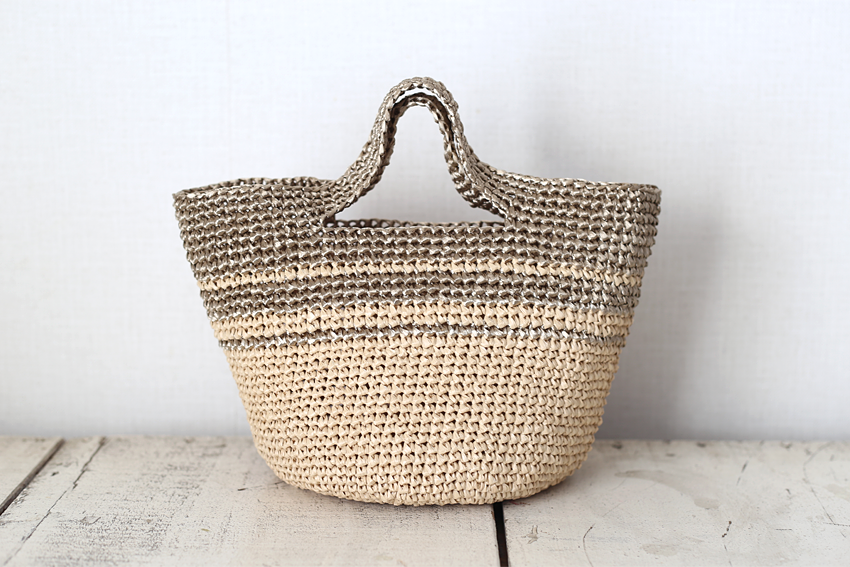
Straw-colored [Col.23] 56g, gold [Col.170] 33g, size 7 crochet hook used.
The bottom and sides of the bag are knitted in size S, and the handle length is size M. Gold is used on rows 31, 34-36, and 38-45.
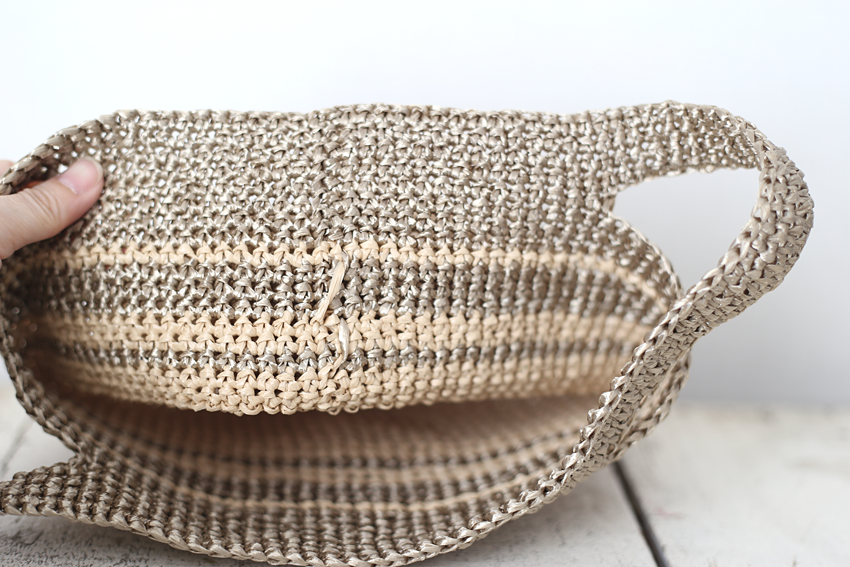
If you change colors in three rows, the thread will end up being quite long.
If you don't want to pass the thread like this, cut the thread each time, change the color, and then deal with the thread later.