![定番小物からはじめる かぎ針編み初心者コース[第4回]](https://ronique.jp/wp-content/uploads/2021/10/beginner_course04.jpg)
This is the main part of the beginner's crochet course, and we will be crocheting a small accessory case using round knit stitches!
The circular knitting technique is also used to make amigurumi, hemp bags, straw hats, etc., so please use it in your future projects.
This is one of the most important crochet basics that everyone should learn, so we've worked hard to select projects and consider designs with the goal of making beginners want to try crocheting.
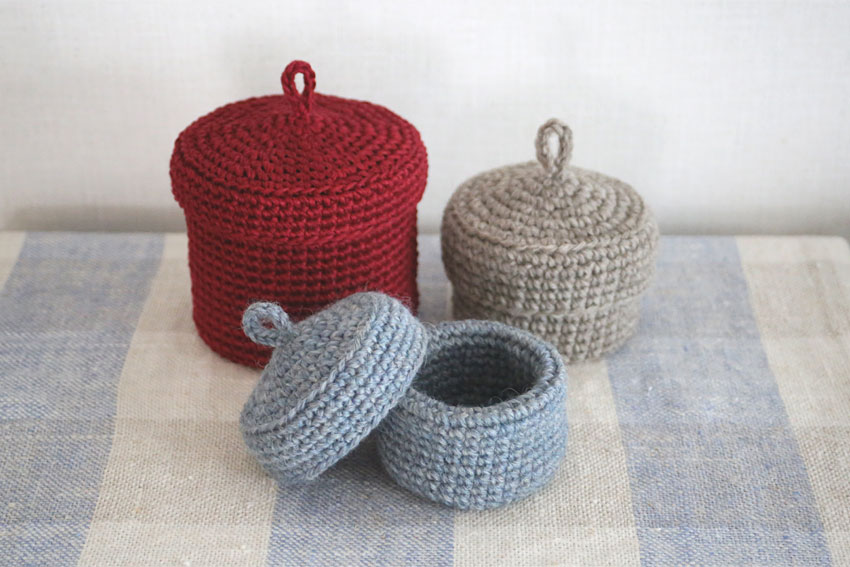
I decided on a trinket box because it's not too complicated, I can learn how to make it, it's practical, and it's a standard accessory.
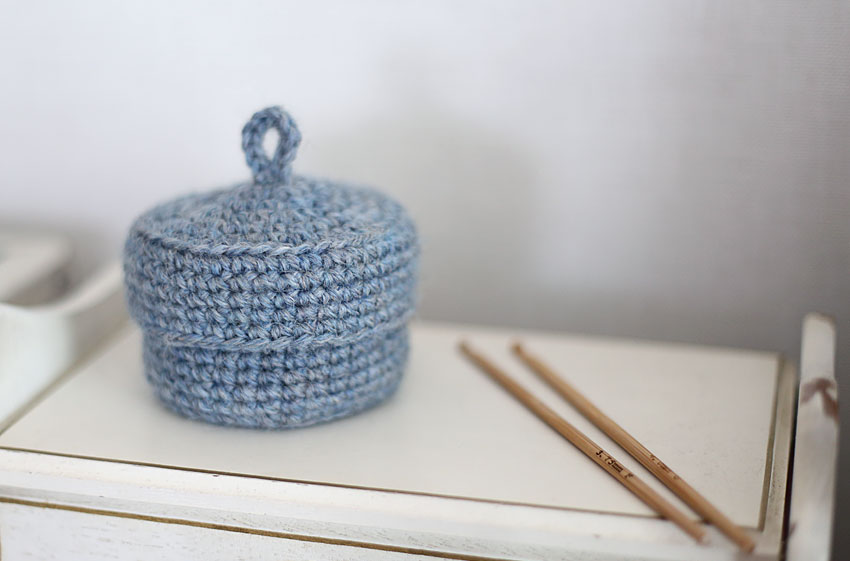
It's simple and cute to have in your room, so I hope you'll like it too.
This time, I will also explain the rules of circular knitting in a separate page, "The rules of knitting circles and hexagons" and explained it in detail.
Of course, it's fine to just knit without thinking about it, but I think it will help you to understand the knitting pattern better and give you an idea of what crocheting is all about.
If you are interested, please take a look.
Once you get through the round knitting process, crocheting will definitely be more fun! (Speaking from experience)
Index
First, prepare your tools and yarn.
What you will need
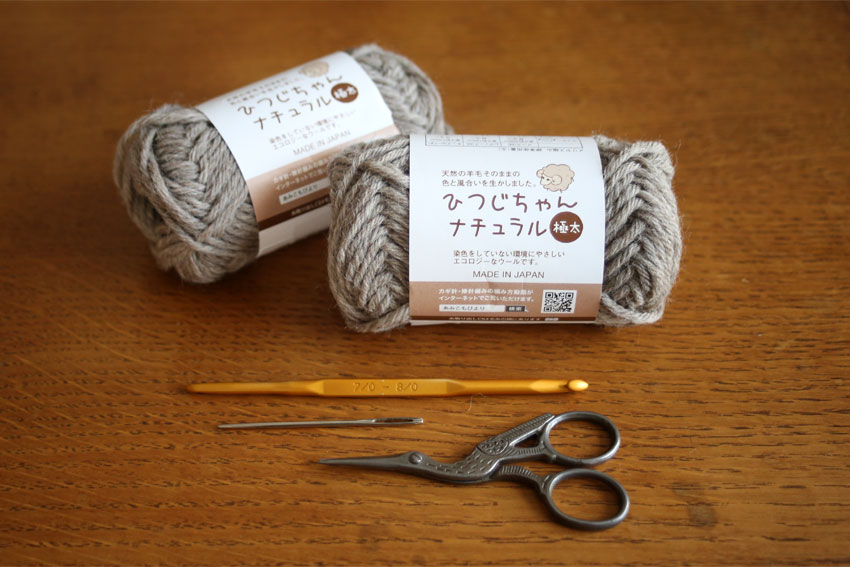
Here's what I prepared to knit this piece:
・"Hitsuji-chan Natural Extra Thick" (extra thick, 25g balls, approx. 35m) [Col.4] 2 balls, 50g
・Size 8 crochet hook
• Tapestry needle (yarn needle)
• Scissors
・Unnecessary clear files, etc.
Now that the autumn/winter season is a fun time to knit, I wanted to try knitting something with 100% wool yarn.
This time, I chose this yarn to try out a yarn that is available at an affordable price!
This yarn is called "Sheep-chan Natural Extra Thick" and is sold at Can★Do by Gosei Sangyo, the company famous for "Yarn Clown."
This 100% wool melange yarn is neither too soft nor too stiff, making it easy to knit with.
I've used this thread before, but I can't remember which 100 yen store I bought it at...I happened to stop by Can★Do to buy something different and then I came across it again!
Which crochet hook do you recommend?
Beginner's Course [Lesson 1]There is a similar explanation on this page, so please refer to it.
The yarn used this time is extra thick wool yarn.
It's easy to crochet with a double-ended crochet hook like the one in the photo, and if you prefer a grip-type hook, that's also a good option!
What yarn weight do you recommend?
This time, I continued to use thicker yarn for the sample pieces.
As in the past, one of the reasons is that thicker yarn is easier to work with and makes it easier to see the stitches, but this time, since it's a small item holder, I also wanted to make it a reasonable size without having to knit a lot of rows.
Once you get used to it, if you want to make it smaller to fit what you'll be putting inside, you can adjust the size quite a bit by simply using thinner thread!
What yarn material do you recommend?
Since this is a small accessory case, you can use any material, so please try knitting it with your favorite material.
You can knit using materials that suit the season, or you can choose materials that can be used as interior decor all year round.
The red piece is made with medium-weight hemp thread, but it is a stiff thread, so it requires a fair amount of strength in the hands.
This gives the finished product a crisp look.
However, even wool can be sturdy enough if you put a core inside (see below), so if you don't want your hands to get tired, a softer one might be better.
What yarn color do you recommend?
Until you get used to counting stitches, it is recommended to use a lighter yarn as it is easier to see.
It's also a good idea to adjust the color by knitting darker colored yarns during the daytime when it's bright.
It would also look cute if you knit two different types of yarn together, but it might be a little hard to see when you tighten the yarn at the beginning of the circular knitting, so I definitely recommend trying this once you get used to knitting in the round!
A Closer Look at the Project and How to Make It
Why did we choose a lidded accessory box for the fourth time?
This time, we'll be doing circular crochet, which I personally think is the most difficult type of crochet.
When it comes to circular knitting in the knitting pattern, it is often accompanied by increases (dispersed increases) that cause the knitted fabric to spread out in concentric circles, so I wanted to create a piece that would allow people to practice this.
However, if I keep increasing the number of stitches too much, I get tired of having to keep an eye on the number of stitches every row as I knit, so I want to increase the number of stitches moderately and create some areas that are easy to knit.
I will explain the details later, but this accessory case has a double-walled base (similar to a double-walled mug).
This recipe allows you to practice both increasing and decreasing stitches by increasing stitches to start knitting a cup shape, and then decreasing stitches symmetrically to where you started to close the knitted piece.
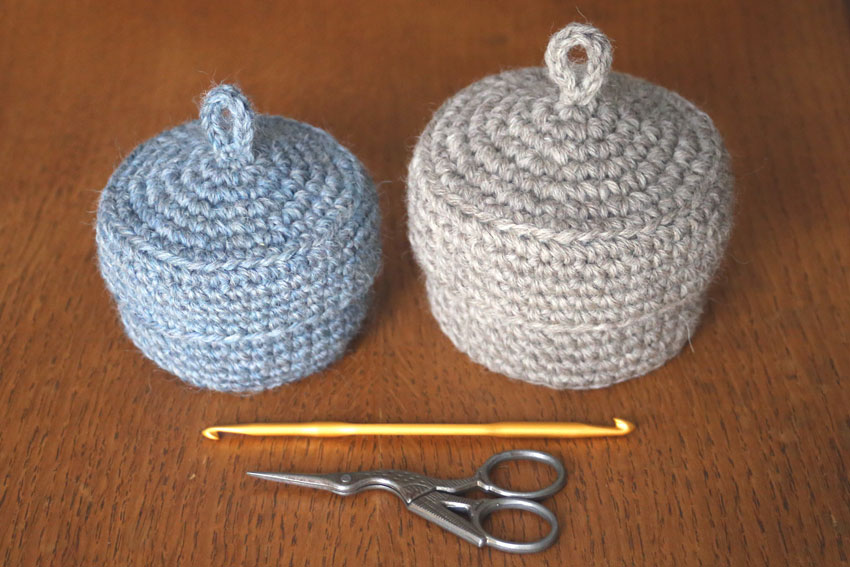
This time, I decided to make a small accessory case with a lid, as it is not too big and is an item that you will not get bored of knitting.
What is the size of the work?
The trinket box I knitted has a lid diameter of 9.5cm and a height of about 6.5cm excluding the loop decoration.
The gauge is 2cm for 3 knit stitches, or 1.8cm for 3 rows. The amount of yarn used is about 48g.
The two balls of 25g yarn I used this time were just right.
If you are worried that you may not have enough yarn, you can knit the lid first and then reduce the number of rows in the main body that do not increase or decrease in the number of stitches (make the height a little lower).
How do you knit a lidded accessory box?
Both the body and lid of the accessory case we will be making this time will be knitted using the circular knitting technique.
To make the main part of the accessory case, start by increasing the number of stitches in a circular motion from the inner bottom, then knit the sides without increasing or decreasing the number of stitches, and finally knit the outer bottom by decreasing the number of stitches.
This will create a double layer of knitted fabric.
Do not double the lid, but knit a circle while increasing the number of stitches, then knit the sides without increasing or decreasing the number of stitches to complete it.
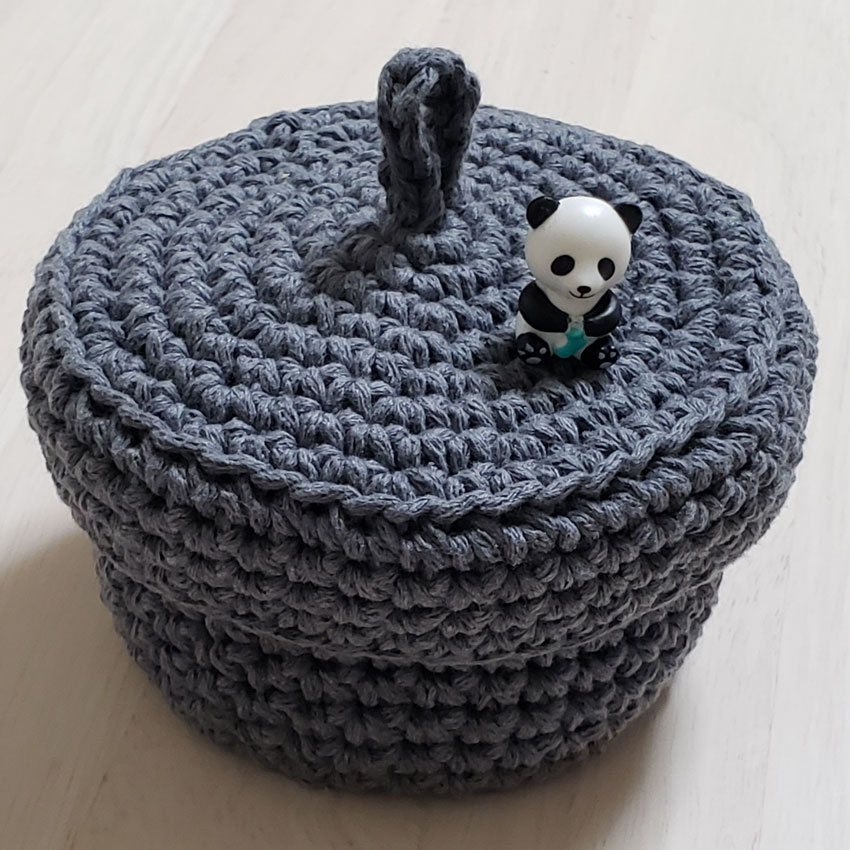
The decoration on the top of the lid is made using a technique called "thread cord." This is the same technique as the drawstring we learned in the second lesson of the beginner's course.
There is a video explanation this time too,Mastering the Thread CordWe have also prepared a page for you to check out, whichever is easier for you.
This time, there are only 10 thread cord stitches, so please try knitting it as a review.
Is it just a knitted piece?
At first glance, it looks like the entire piece is made using knit stitches, but a technique called "suji stitch" is also used in several places.
The straight stitch is a basic crochet technique, and the operation itself is the same as the knit stitch.
The only difference from knitting knitting is whether you pick up one strand of yarn or two strands of yarn when knitting.
So, I think it's fair to say that apart from the thread cord decoration on top, this piece is made entirely of knitting stitches.
This time, we will not change the knitting pattern, but will focus on practicing knitting stitches!
How to Read the Crochet Chart
▶ Knitting pattern PDF fileAlso available!
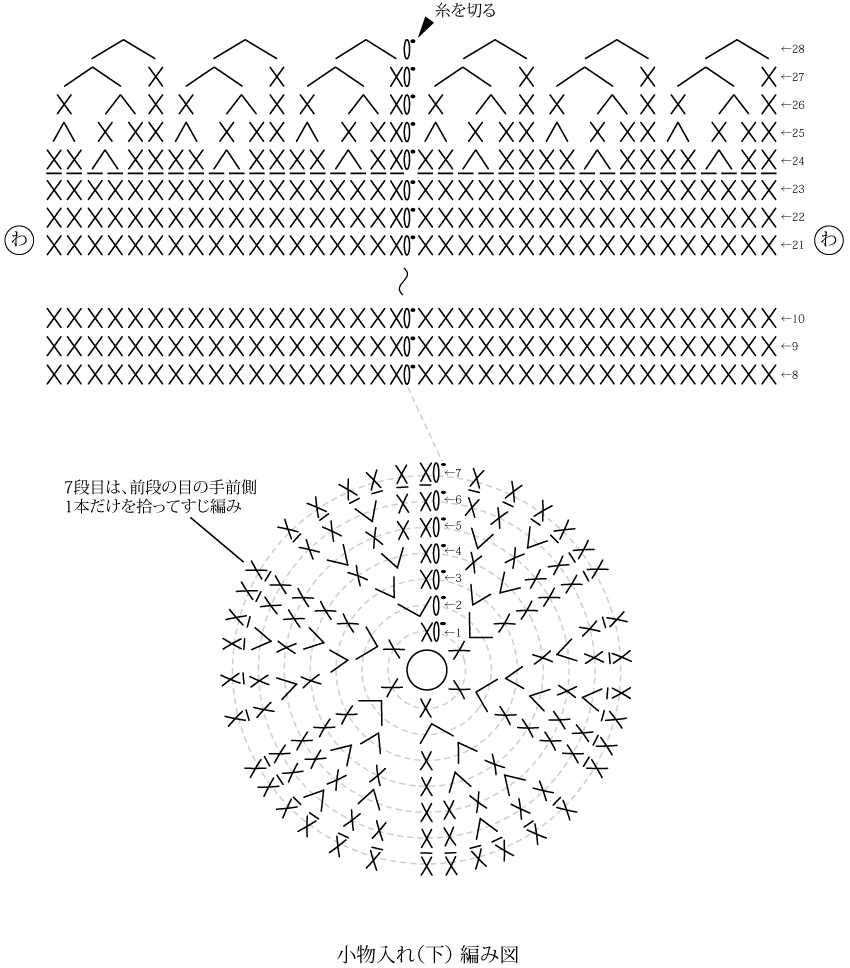
・Knitting pattern for accessory case (bottom)
There are two knitting patterns this time, the first of which is the knitting pattern for the main body of the accessory case.
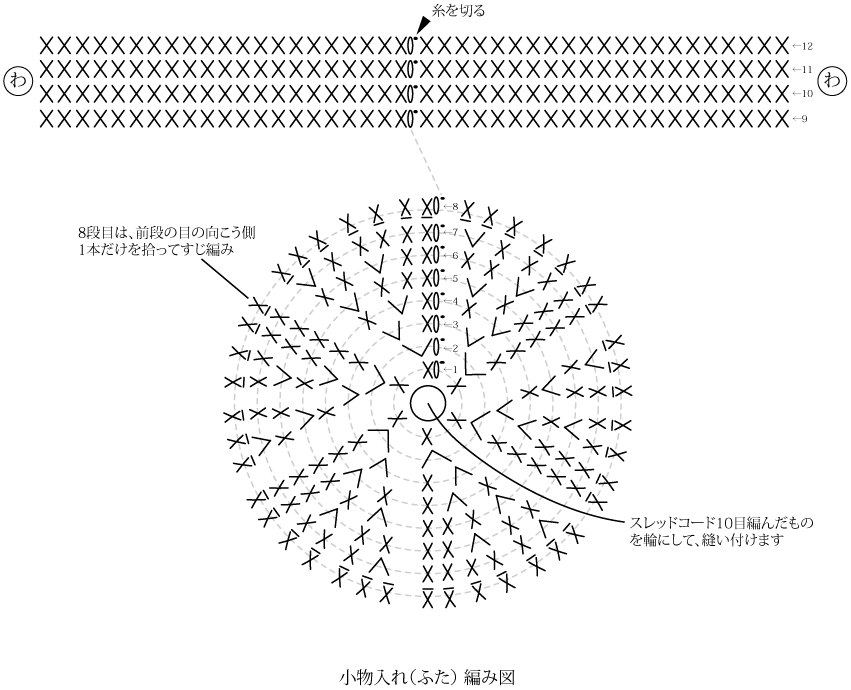
・Knitting pattern for accessory case (lid)
Next is the knitting pattern for the lid.
・What do the crochet chart symbols mean?
The following six symbols appear in this knitting pattern:
Chain

Slip Stitch

Single Crochet

Single Crochet in Back Loop Only in the Round

Knit 2 round stitches

2 stitches at a time

The numbers in each row of the knitting pattern indicate which row it is, and the arrows indicate the direction in which to knit.
A slip stitch symbol is placed at the end of each row.
This means that after you finish knitting the last stitch in a row, you put the needle into the first stitch of that row and knit a slip stitch.
This knitting pattern has a "wa" mark and a "~" mark, which indicates that the row is omitted.
Although the knitting pattern shows it as flat, the loops at both ends are connected by knitted fabric, and it is actually tubular.
• How to make the foundation ring
For this project, both the body and the lid of the accessory case will begin with a loop cast-on.
The ``circle'' written in the center of each circular knitting pattern represents the ``cast-on stitch.''
It's hard to explain how to make a loop in words, so please take a look at the video.
In the first row, cast on a loop, start with one chain stitch, and then knit six round stitches.
Insert the needle into the first knit stitch and make a slip stitch to make a loop of the first row of knitting.
Once you tighten the remaining cast-on thread, the first row will be complete and you will have started knitting the circular cast-on.
・How to knit the inner bottom of a small item case
Start knitting the main part of the accessory case from the inside bottom part.
Up to the sixth row, you will increase stitches (by knitting two quarter stitches) in six places each row, so you will increase by six stitches each row.
When you knit up to the 6th row, there will be 36 stitches in one round.
Regarding the law of increasing yen,The rules of knitting circles and hexagonsPlease see the " page for a detailed explanation.
・How to knit the sides of the accessory case
Rows 7 to 23 (sides) are knitted with the same number of stitches, but for row 7 only, pick up just one stitch in front of the previous row and knit a rhinestone.
The striped knitting creates an angle in the knitting on the bottom and sides, which makes the bottom of the accessory case more stable when it is double-layered (you will understand this later, so you can skip over it for now).
The total number of rows to knit without increasing or decreasing the number of stitches is 17.
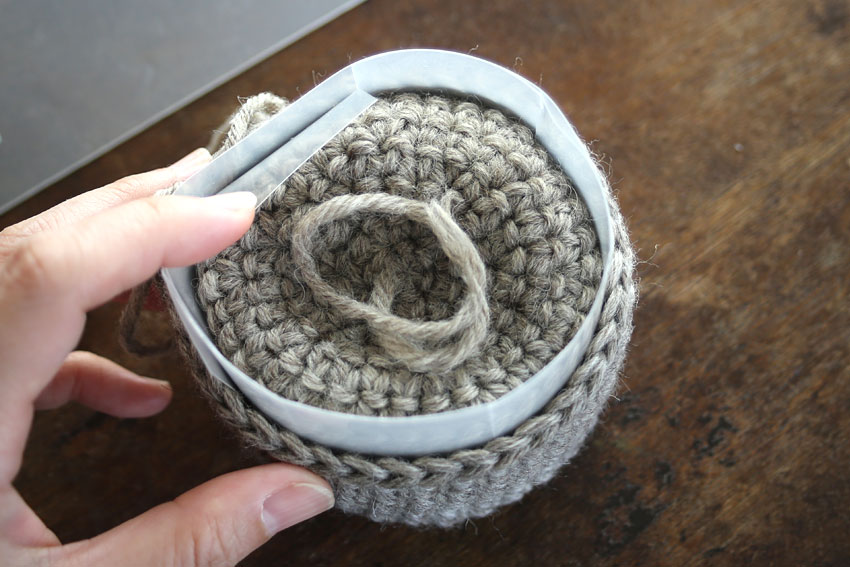
Once you have finished knitting the sides, insert a core into the gap between the double layer (we will explain how to make a core further down the page).
・How to knit the outer sole of a small item case
Rows 24 to 28 will be the bottom outer part, and you will knit in the opposite direction to when you started, decreasing 6 stitches in each row (2 round stitches at a time).
In the 24th row, pick up just one stitch on the other side of the previous row and decrease it while working a slant stitch. The reason is the same as in the 7th row.
Once you have completed the 28th row, there will be 6 stitches per round.
After cutting the thread, thread the end of the thread through the darning needle and pass the needle through the sixth stitch of the final row, then tighten the thread and finish it (tighten the thread).
One thing I would like to add here is that the decrease in the outer sole is symmetrical with the increase in the inner sole.
I continued increasing the inner sole stitches until I reached the point where I was increasing every fourth stitch, so when I decreased the outer sole stitches I started by decreasing every fourth stitch.
Knowing that they come in pairs will be helpful when arranging sizes, so keep this in mind.
How to knit the lid
The lid should be slightly larger in circumference than the main body of the accessory case, making it a slip-on lid.
Therefore, we increased the number of stitches by one at the beginning of knitting the main body compared to the bottom knitted piece.
Increase the number of stitches by 6 each row until you reach the 7th row, and when you finish knitting the 7th row, you will have completed 42 stitches in one round.
Knit rows 8 to 12 without increasing or decreasing the number of stitches.
For the 8th row only, to create an angle on the side of the lid, pick up just one stitch on the other side of the previous row and make a crisscross stitch.
・How to knit the top decoration
The decoration on top is made by knitting 10 stitches of "thread cord."
The thread cord is the second lesson in the beginner's course on how to knit a drawstring bag, so there is also a video explanation there, butMastering the Thread Cord" page, so please check whichever is easier for you to see.
Once you have knitted 10 stitches of the thread cord, make a loop and sew it to the top of the lid.
Now let's actually get crocheting!
Crochet Video Tutorial
This video explains the steps to complete a lidded accessory case, including how to cast on a knitted loop, increase and decrease stitches, and make a streak. This video has subtitles but no audio.
Some of the steps explained in the beginner's course videos from 1 to 3 may not be explained in full, so please be sure to check out the other videos as well.
Also, this explanatory video is quite long at 33 minutes, so I hope you will watch it when you have some free time!
Try your hand at circular knitting!
In the second installment, we knitted a drawstring bag using double crochet in the round, but this time we will knit using small knit crochet in the round.
The method for casting on is the same as for double crochet, but with knit stitch, the starting chain may only have one stitch and the stitch may be smaller, so it may be a little harder to see than with double crochet.
Please remember how to read the stitches in the third Eco-Scrubbing tutorial, and now we will knit in the round while looking closely at the stitches.
Don't forget to check the number of stitches in each row, especially when you are increasing or decreasing stitches!
Increasing and decreasing stitches are knitted according to a set rule, so if you make a mistake in the number of stitches in one row, the number of stitches will not be correct when you knit the next row, which will often leave you wondering, ``Huh?'' However, there are cases where you cannot notice this, so in each row where you are increasing or decreasing the number of stitches, make sure you are increasing or decreasing stitches according to the rule.
It may be a bit of a hassle, but it will help you understand how to read the stitches in knitting stitches, so please give it a try.
Once you've finished knitting the lid
There are several ways to dispose of the end of knitting, but for this accessory case lid, I simply pulled out the yarn and disposed of it so that the end of knitting would not be noticeable.
For more information on this method, seeThe Ultimate Guide to Finishing Crochet: 3 Methods & Seamless Weaving in EndsPlease refer to the page for more detailed information.
Be sure to treat the ends of the yarn so that they are not visible on the back of the knitted fabric.
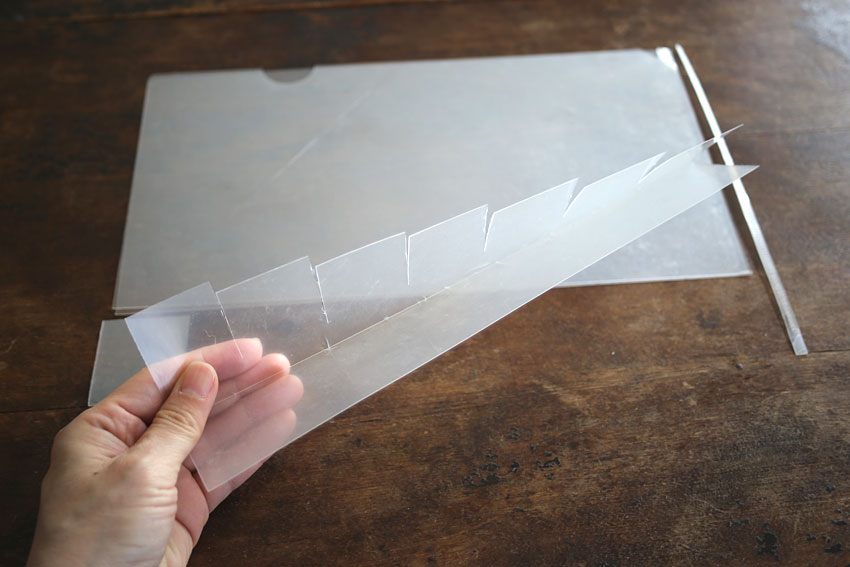
How to make the core
A core has been placed inside the accessory case to reinforce the sides.
It's not absolutely necessary, so it's up to you whether you want to use a core or not.
Here, I will briefly explain how to make the core used this time.
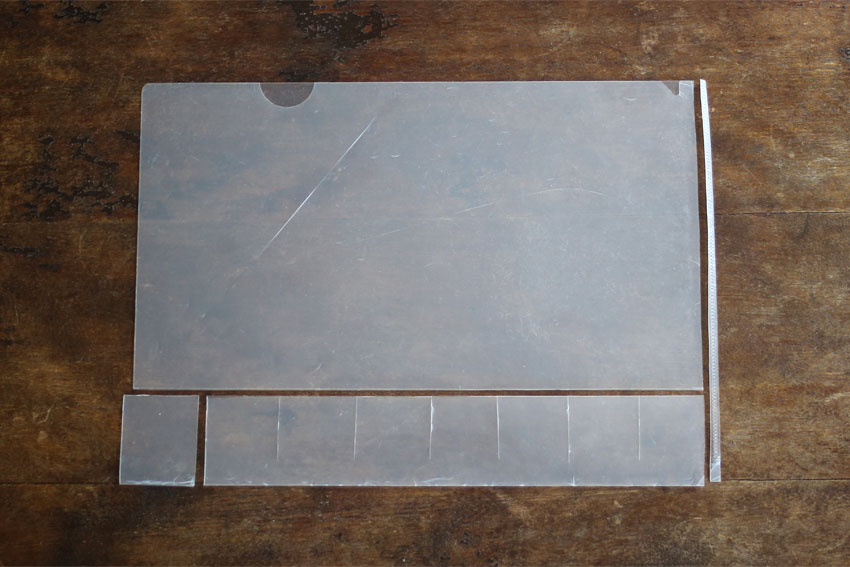
Cut it to fit the height and width of your trinket box.

Have you ever tried knitting and found something like this?
The size of the lid does not fit the size of the container!
A. Try adjusting the size of the lid.
For this piece, the lid is one level larger than the body so that it will be slightly larger than the body.
However, depending on how carefully you knit, the lid may be too tight to put on, or conversely, it may be too loose.
If you think you can make it work with just a little adjustment, try adjusting the size by using a different size crochet hook when knitting the lid.
If you cannot adjust the size of the crochet hook alone, try increasing the number of rows if the lid is small.
The increase in this lid is "The rules of knitting circles and hexagonsThis is the same rule as explained in "," so try increasing the number of layers in this way.
If the lid is too big, try adding one less row.
Another reason why the lid size may not fit is that you made a mistake in one row and the number of stitches is incorrect, so please check the number of stitches just to be sure.
I would like to try knitting at different depths.
A. It can be deep or shallow.
Adjusting the height of the storage compartment is very easy.
The number of rows you knit on the side, without increasing or decreasing the number of stitches, will determine the height of the accessory case, so if you want it deeper, try increasing the number of rows.
If you want to make it shallower, just reduce the number of steps.
By the way, the recipe calls for 17 rows on the sides, but in the red piece, I knit 33 rows on the sides to create more height.
The lid has one step less on the side, making it shallower.
I would like to knit it in a larger size.
A. It is possible to increase the size of both the accessory compartment and the lid!
The quickest way to adjust the size is to use thicker thread.
If you want to increase the size of the body without changing the thickness of the thread, you can increase the number of rows of increase on the inner sole (the number of rows of decrease on the outer sole will also increase by the same amount).
While our "The rules of knitting circles and hexagonsIf you continue to increase the number of stitches in accordance with the rules for increasing the number of stitches for a circle, explained on the " page, the diameter will increase and you will be able to knit a large accessory case.
In that case, make sure the lid has more rows of stitches than the main body of the accessory case so that the lid has more rows of stitches than the main body of the accessory case.
The red piece is knit larger than the recipe calls for, with the inner bottom of the body increased to the 8th row (increasing a stitch every 6 stitches) and the lid increased to the 9th row (increasing a stitch every 7 stitches).
Since the inner bottom of the main body has been knitted up to the point where it increases every 6 stitches, the outer bottom of the main body will start decreasing by decreasing every 6 stitches.
Your work
"Accessory box with lid" by coharu
I knitted it with macrame thread I had at home, so the stitches are a bit uneven, but even without using a batting, I was able to create something sturdy and solid. I'm looking forward to thinking about what to put in it. I love Ronique's work ♡ I'd like to try making something big someday.