When crocheting, there are quite a few situations where you need to sew or patch, such as when connecting motifs or finishing a piece.
Here we have summarized the differences between binding and seaming, the types of binding and seaming, and how to actually bind and seam.
As for the techniques, I picked out some binding and seaming techniques that I often see and use myself.
There are many other methods of binding and seaming, so if you're interested, please look into them.
Index
What is the difference between "togi" and "hagi"?
These are knitting terms that we use casually in our daily lives, so you may not have a chance to think about them in depth, but knowing the definitions of the words can make things a little easier.
What is the difference between the usage of these similar two-letter words, toji and hagi?
First, there is the "stitch," which is the joining of rows of knitted fabric that are lined up vertically.
It may be easier to understand if you imagine joining the edges of the front and back of a garment knitted using round knitting and then "sewing" the sides.
In the case of circular knitting, the knitted fabric is connected in a cylindrical shape, so there is almost no need to stitch.
Next, the "sewing" method involves joining the eyes together.
When joining crochet motifs, the motifs are knitted in a circle (all edges are "eyes"), so you "seam" them together by matching the stitches together.
When knitting back and forth, you can sometimes join the stitches in the last row to create a "seam."
As an aside, I personally find the operation of picking up the eyes to be clearer and prefer it, so many of Ronique's recipes are made using "hagi" stitches.
As the number of recipes for clothing increases, "tie" may become more common.
Pulling out
Pull-out stitching is a common technique used in works that connect motifs.
With slip stitching, each and every stitch in a row is stitched together, allowing the knitted fabric to be joined firmly together.
It is also suitable for seams of bags that are subject to stress.
The pieces can be joined together with clean lines and no gaps, so the joining itself can be used as an accent in the piece.
There are two types of nikihigashi: "full-eye nikihigashi," which picks up the two eyelashes at the top of the eye, and "half-eye nikihigashi," which picks up only one of the two eyelashes at the top.These techniques are used depending on the design of the piece.
There seems to be a method called "pull-through stitching," but as far as I know, it doesn't appear very often in crochet, so I'll skip over it.
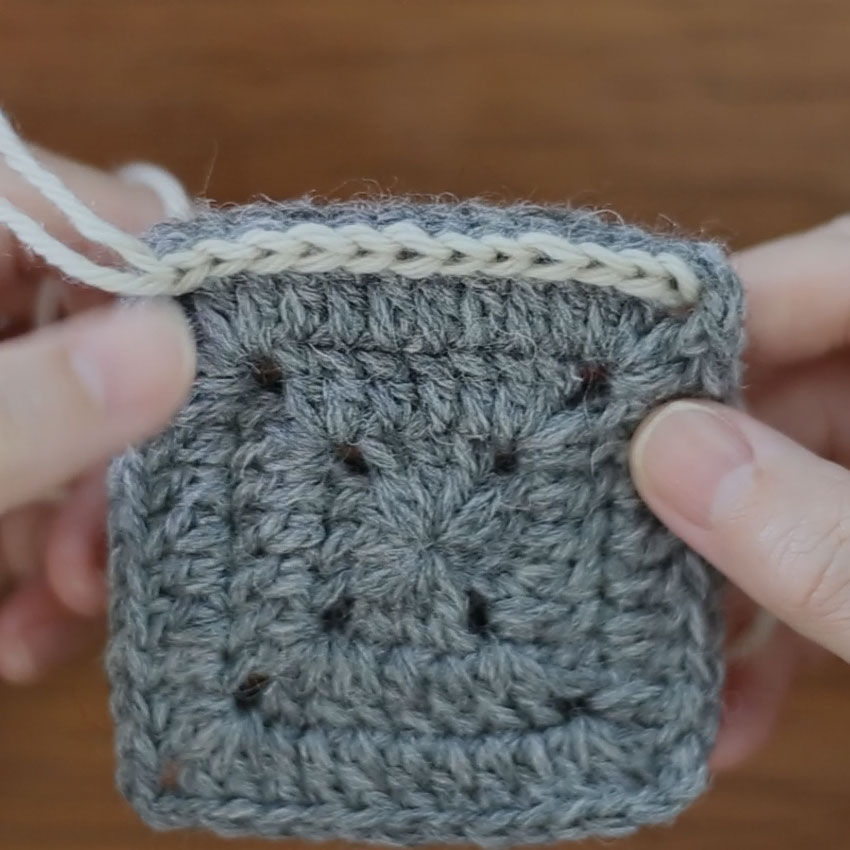
Full stitch and half stitch pull-out seams
When we talk about pull-out stitching, I think it basically means ``pull-out stitching of the entire eye.''
Pick up the two stitches at the top of the joined stitches in turn and make a slip stitch. The stitches will adhere tightly together, creating a very strong stitch.
In areas where half of the stitches are to be pulled out, there will often be a note to that effect.
Of the two stitches at the head of the joined stitches, pick up one strand each, either the inside or the outside, and knit through them.
In half-stitch slip stitches, the stitches are slightly further apart than in full-stitch slip stitches, so the stitched area is slightly thinner.
Video explanation of pulling out the whole eye
Full eye removal and patching Image explanation
![全目の引き抜きはぎ[1]角から糸を引き出す](https://ronique.jp/wp-content/uploads/2022/01/seam_slst01.jpg)
![全目の引き抜きはぎ[2]手前→向こうと目を拾う](https://ronique.jp/wp-content/uploads/2022/01/seam_slst02.jpg)
![全目の引き抜きはぎ[3]引き抜いたところ](https://ronique.jp/wp-content/uploads/2022/01/seam_slst04.jpg)
![全目の引き抜きはぎ[4]手前→向こうの順で拾う](https://ronique.jp/wp-content/uploads/2022/01/seam_slst05.jpg)
![全目の引き抜きはぎ[5]糸をかけて引き抜く](https://ronique.jp/wp-content/uploads/2022/01/seam_slst06.jpg)
![全目の引き抜きはぎ[6]角は2枚分を束にすくう](https://ronique.jp/wp-content/uploads/2022/01/seam_slst08.jpg)
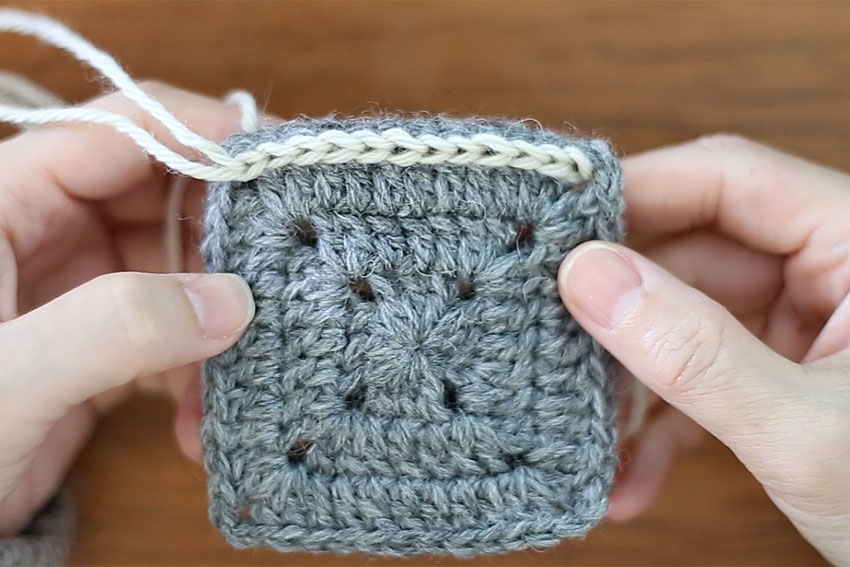
![全目の引き抜きはぎ[7]後ろ側の様子](https://ronique.jp/wp-content/uploads/2022/01/seam_slst10.jpg)
![全目の引き抜きはぎ[8]内側の様子](https://ronique.jp/wp-content/uploads/2022/01/seam_slst11.jpg)
Half-eye pull-out stitching video explanation
Half-eye pull-out stitching image explanation
![半目の引き抜きはぎ[1]角から糸を引き出す](https://ronique.jp/wp-content/uploads/2022/01/seam_slst2_01.jpg)
![半目の引き抜きはぎ[2]内側の1本ずつを拾う](https://ronique.jp/wp-content/uploads/2022/01/seam_slst2_02.jpg)
![半目の引き抜きはぎ[3]糸をかけて引き抜く](https://ronique.jp/wp-content/uploads/2022/01/seam_slst2_03.jpg)
![半目の引き抜きはぎ[4]以降同様に半目を拾う](https://ronique.jp/wp-content/uploads/2022/01/seam_slst2_04.jpg)
![半目の引き抜きはぎ[5]編み進めたらこうなります](https://ronique.jp/wp-content/uploads/2022/01/seam_slst2_06.jpg)
![半目の引き抜きはぎ[6]角のくさりは束にすくう](https://ronique.jp/wp-content/uploads/2022/01/seam_slst2_07.jpg)
![半目の引き抜きはぎ[7]後ろ側の様子](https://ronique.jp/wp-content/uploads/2022/01/seam_slst2_08.jpg)
![半目の引き抜きはぎ[8]全目の引き抜きはぎより薄手の仕上がり](https://ronique.jp/wp-content/uploads/2022/01/seam_slst2_09.jpg)
Crochet stitches and stitches
The advantage of stitching and sewing with knit knitting is that it is easy to operate. In normal knit knitting, you only pick up the stitches from the previous row, but when stitching and sewing, the only difference is that you pick up both stitches you want to join and knit knit together.
As long as you can get a crochet hook in and pick it up, you can stitch it together anywhere.
It can also be used to securely join knitted fabrics together when stitching or seaming knitted pieces.
Because it is knitted in a circular pattern, it is possible to stitch and sew while decreasing stitches.
You can even gather the knitted fabric while sewing and stitching it, so depending on how you use it, you can create some interesting pieces.
Because knitting creates height, the seam is noticeable when viewed from the joined side.
Therefore, you may need to sew or stitch the knitted fabric from the back, or deliberately design the stitched areas to be visible on the front.
This video explains how to crochet knitting using the example of piecing together crocheted motifs.
Knit stitch video explanation
Knit stitch image explanation
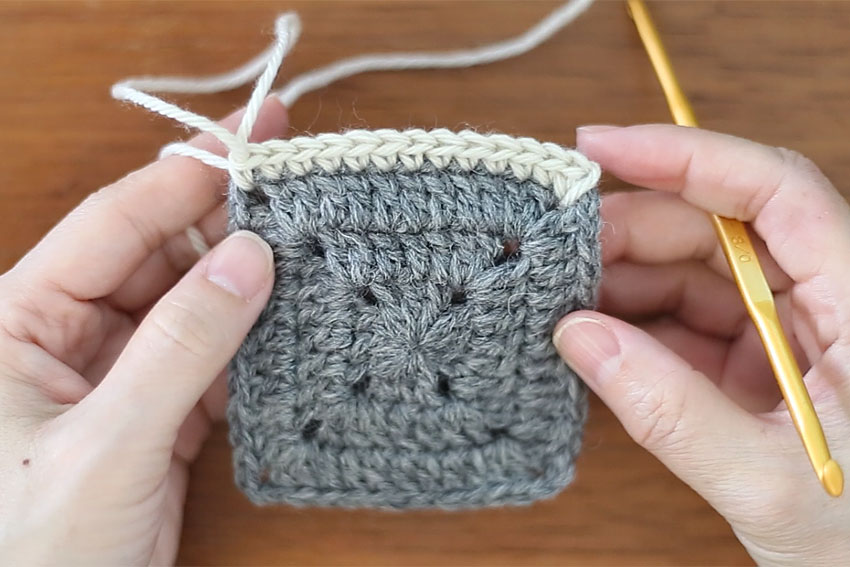
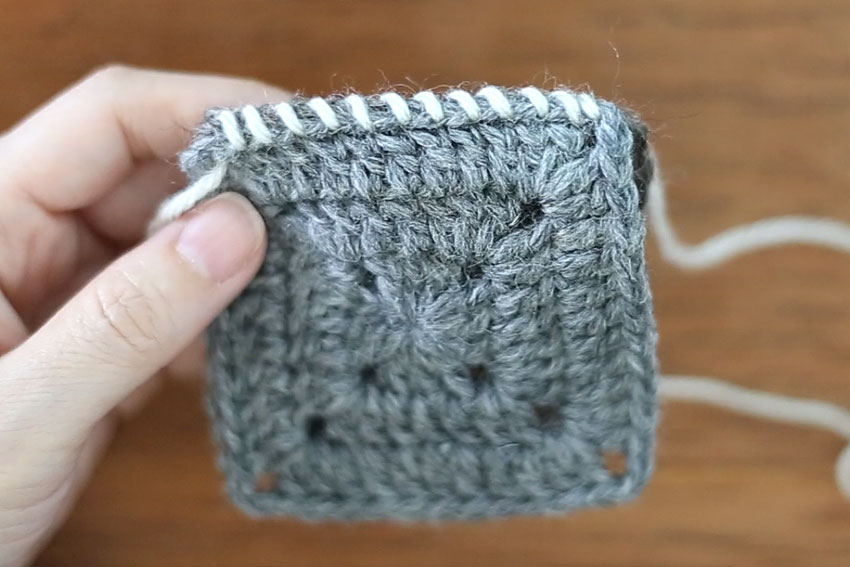
![こま編みはぎ[1]角に針を入れる](https://ronique.jp/wp-content/uploads/2022/01/sc_hagi01.jpg)
![こま編みはぎ[2]立ち上がりのくさりを編む](https://ronique.jp/wp-content/uploads/2022/01/sc_hagi02.jpg)
![こま編みはぎ[3]くさりを束にすくってこま編み](https://ronique.jp/wp-content/uploads/2022/01/sc_hagi03.jpg)
![こま編みはぎ[4]編み地2枚の目を拾ってこま編み](https://ronique.jp/wp-content/uploads/2022/01/sc_hagi04.jpg)
![こま編みはぎ[5]最後の目までこま編み](https://ronique.jp/wp-content/uploads/2022/01/sc_hagi05.jpg)
![こま編みはぎ[6]最後の角も束にすくってこま編み](https://ronique.jp/wp-content/uploads/2022/01/sc_hagi07.jpg)
![こま編みはぎ[7] 後ろ側の様子](https://ronique.jp/wp-content/uploads/2022/01/sc_hagi08.jpg)
![こま編みはぎ[8] 内側の様子](https://ronique.jp/wp-content/uploads/2022/01/sc_hagi09.jpg)
Chain binding and chain stitching
This method combines chain stitches and slip stitches to stitch and sew knitted fabric.
Chain stitching is often used when sewing the sides of slightly sheer knitted garments.
In the video explanation, the motif is chain stitched with the right sides facing outwards to make it easier to understand, but in the case of clothing, the knitted fabric is usually chain stitched with the right sides facing outwards, and then the knitted fabric is turned inside out so that the chain stitch stitches are not visible.
Recipes often include notes such as "Chain stitch with three stitches."
In this case, the knitted fabric is layered with the right sides facing each other and then stitched from the back by repeatedly stitching three chain stitches followed by one slip stitch, so the knitted fabric does not show much on the front and the finished product is neat.
There are gaps between the knitted pieces, so the stitching is a bit delicate, but if you think of it as being similar to net knitting, it may not be something to worry about.
Kusarihagi video explanation
Kusarihagi image explanation
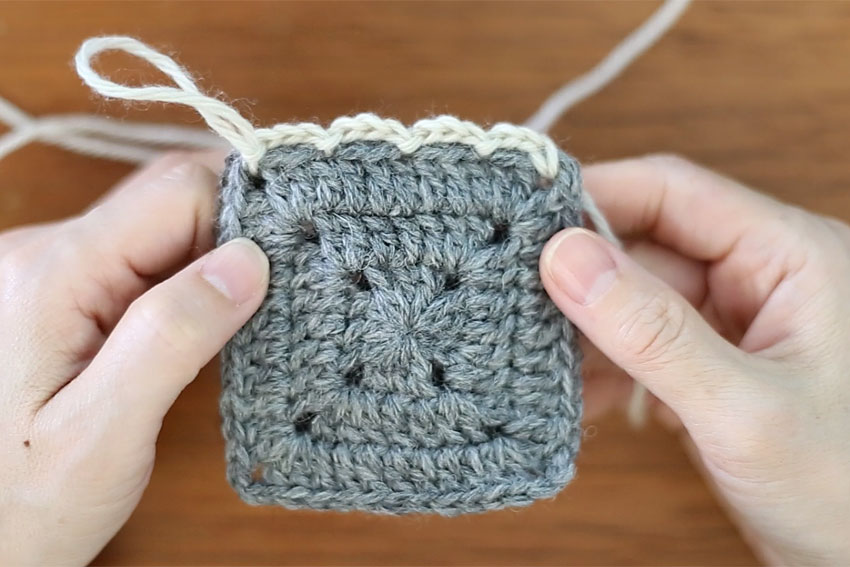
![鎖3目の鎖はぎ[1]角から糸を引き出す](https://ronique.jp/wp-content/uploads/2022/01/seam_ch01.jpg)
![鎖3目の鎖はぎ[2]鎖3目を編む](https://ronique.jp/wp-content/uploads/2022/01/seam_ch02.jpg)
![鎖3目の鎖はぎ[3]2目とばしたところに針を入れる](https://ronique.jp/wp-content/uploads/2022/01/seam_ch03.jpg)
![鎖3目の鎖はぎ[4]糸をかけて引き抜く](https://ronique.jp/wp-content/uploads/2022/01/seam_ch04.jpg)
![鎖3目の鎖はぎ[5]鎖3目を編み、同様に繰り返す](https://ronique.jp/wp-content/uploads/2022/01/seam_ch05.jpg)
![鎖3目の鎖はぎ[6]角のくさりは束にすくって引き抜く](https://ronique.jp/wp-content/uploads/2022/01/seam_ch07.jpg)
![鎖3目の鎖はぎ[7]後ろの様子](https://ronique.jp/wp-content/uploads/2022/01/seam_ch09.jpg)
![鎖3目の鎖はぎ[8]内側の様子。華奢な仕上がり](https://ronique.jp/wp-content/uploads/2022/01/seam_ch10.jpg)
Rolling stitch
When you sew a stitch, you use a darning needle instead of a crochet hook. The end of the thread is no longer attached to the ball of thread, but is cut off so that it is long enough to sew a stitch.
In the video explanation, a different yarn is threaded through the darning needle to create a sewn stitch, but you can also leave the end of the yarn at the end of the knitting long, cut it, and thread it through the darning needle to create a sewn stitch.
Overlock stitching is a widely used method when stitching motifs or joining knitted fabrics together, but because it involves the operation of sewing, splicing may also be necessary for long sections.
This is the same easiest way to sew together pieces when making old-fashioned felt mascots.
Personally, I think this is a convenient stitching and seaming method for joining shorter pieces together in knitting.
Video explanation of stitching
Image explanation of the stitching
![巻きかがり[1]向こう側のモチーフに針を入れる](https://ronique.jp/wp-content/uploads/2022/01/seam_rolled01.jpg)
![巻きかがり[2]糸端は少し残す](https://ronique.jp/wp-content/uploads/2022/01/seam_rolled01_2.jpg)
![巻きかがり[3]手前のモチーフにも針を入れる](https://ronique.jp/wp-content/uploads/2022/01/seam_rolled02.jpg)
![巻きかがり[4]針を通したところ](https://ronique.jp/wp-content/uploads/2022/01/seam_rolled02_2.jpg)
![巻きかがり[5]向こう→手前の順に針を入れる](https://ronique.jp/wp-content/uploads/2022/01/seam_rolled03.jpg)
![巻きかがり[6]となりの目も同様に針を通す](https://ronique.jp/wp-content/uploads/2022/01/seam_rolled04.jpg)
![巻きかがり[7]巻きかがりができました](https://ronique.jp/wp-content/uploads/2022/01/seam_rolled05.jpg)
![巻きかがり[8]内側の様子。](https://ronique.jp/wp-content/uploads/2022/01/seam_rolled06.jpg)