![定番小物からはじめる かぎ針編み初心者コース[第2回]。長編みの丸底巾着。ブルー、ピンク、グレーの3色が明るい白背景で並んでいる様子。](https://ronique.jp/wp-content/uploads/2021/06/crochet-round-bottom-drawstring-bag.jpg)
This is the second coaster event following the first one.
This project is designed for beginners who want to try crocheting for the first time!
This time too, we have prepared a video explanation to make it easy for beginners to understand, so please give it a try!
Now, in the second installment, we will be looking at another classic bag, a drawstring pouch, which is fun to think of ways to use.
We have previously uploaded recipes for drawstring bags as free patterns on this site, and many people knit them as gifts.
It's a simple knitting method, takes just the right amount of time, and ends up being a practical size, so you'll feel a sense of accomplishment when you finish it.
Although this series will be a slow-paced one, I will continue to think about how to create content that will make you say, "After completing the Beginner's Course, I was able to crochet!", so I hope you will continue to follow along.
Index
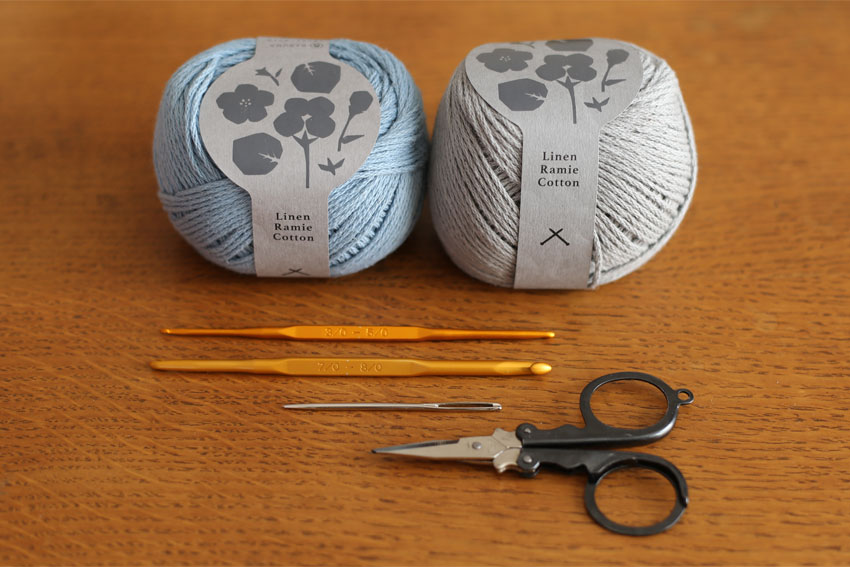
First, prepare your tools and yarn.
What you will need
Here is everything you need to crochet this project:
• 1 ball of worsted-weight yarn (medium)
• Size 7 (4.0mm) crochet hook
• Tapestry needle (yarn needle)
• Scissors
The only difference from the first one is the thread used.
The photo below also shows a size 5 crochet hook, which I used to knit the string for the light blue drawstring bag.
I used a smaller size needle to make the string thinner, but you can also use a size 7 crochet hook.
The thread I used this time was "Daruma Linen Ramie Cotton" (50g ball, approximately 102m).
The recommended crochet hook to use is size 7, so I tried knitting this piece using a size 7 crochet hook.
Even if you use a different yarn, if you look for a medium-weight yarn that can be crocheted with a size 7 crochet hook, the finished size should be close.
Which crochet hook do you recommend?
Beginner's Course [Lesson 1]There is a similar explanation on this page, so please refer to it.
The yarn used this time is cotton-linen, so it feels a little stiffer than wool yarn.
Some people may find that using a grip-type crochet hook is easier on the hands when using stiffer yarn and putting too much strain on the hands, so if you have one of those types of crochet hooks, it might be worth giving it a try.
What yarn weight do you recommend?
In the beginner's course [Lesson 1], we recommended that beginners to crocheting find it easier to crochet with thicker yarn, and recommended thicker yarn ranging from medium to extra thick.
It is true that medium-weight yarn is easy to knit with and the stitches are easy to see, but if you have knitted a few times and are used to it, you might want to try knitting with a slightly thinner yarn to suit your taste. Thinner yarn will make the knitted fabric a little thinner, which will change the overall impression.
This time it's a drawstring bag, so changing the thickness of the thread changes the size, which I think is also one of the fun parts.
What yarn material do you recommend?
The design of this drawstring bag is simple, so it would be fun to knit it using different yarn materials.
Depending on the season, you can try knitting with your favorite yarn material, such as cotton or linen yarn in the spring and summer, and wool yarn in the fall and winter.
When it comes to cotton and linen, yarn that is tightly twisted and less likely to split is easier to knit with, while when it comes to winter yarns such as wool, yarn that is not too soft and has a certain amount of tension is easier to use as it will be less likely to lose its shape after completion.
What yarn color do you recommend?
Again, especially when knitting the bottom, you will be counting the number of stitches in each row as you go along, so I recommend using lighter colors as they are easier to see. If you are knitting with darker colors, I think it will be easier to knit in the daytime rather than at night.
Once you get used to seeing and counting the stitches, try it in your favorite color!
It would also look interesting if you knit two different colors of yarn together (two different yarns together) or if you knit with a fancy yarn.
A Closer Look at the Project and How to Make It
Why did we choose a drawstring pouch for the second time?
The coasters from the previous project were items that could be completed in a short amount of time, but for this second project, we chose an item that would take a little more time and give a sense of accomplishment.
It's fun to think about what to put in the finished product while knitting.
The size and time required make this a perfect little gift for family and friends, complete with a handmade piece. You can share the joy of knitting with them, and I'm sure many people will be delighted to receive it!
This time I chose a drawstring pouch because it is an item that is fun to knit, use and give as a gift.
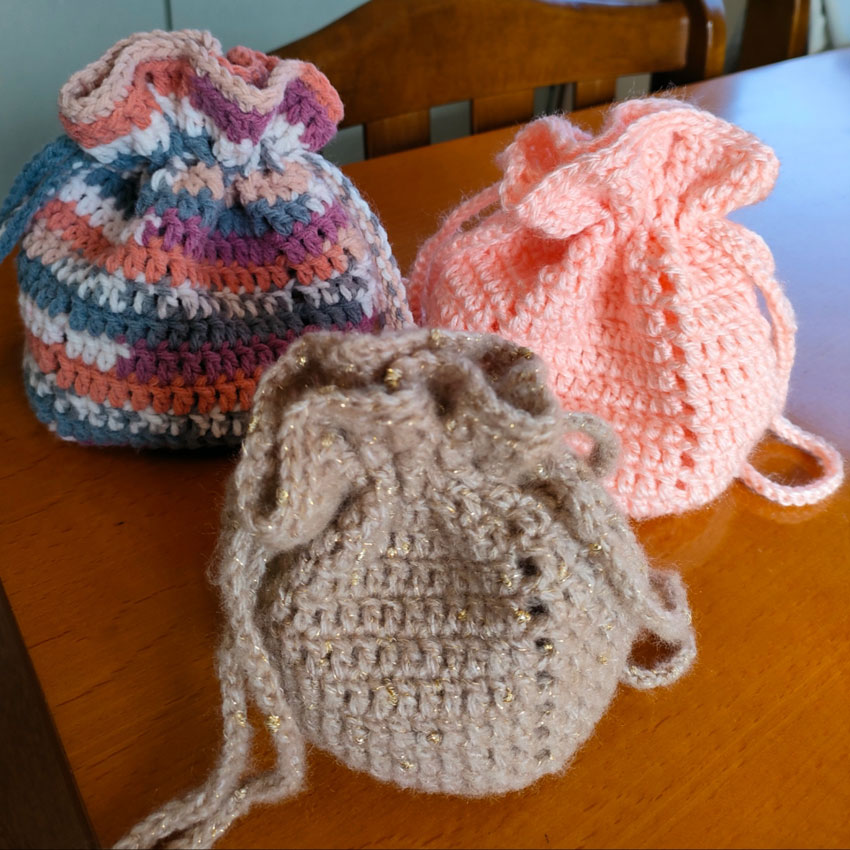
What is the size of the work?
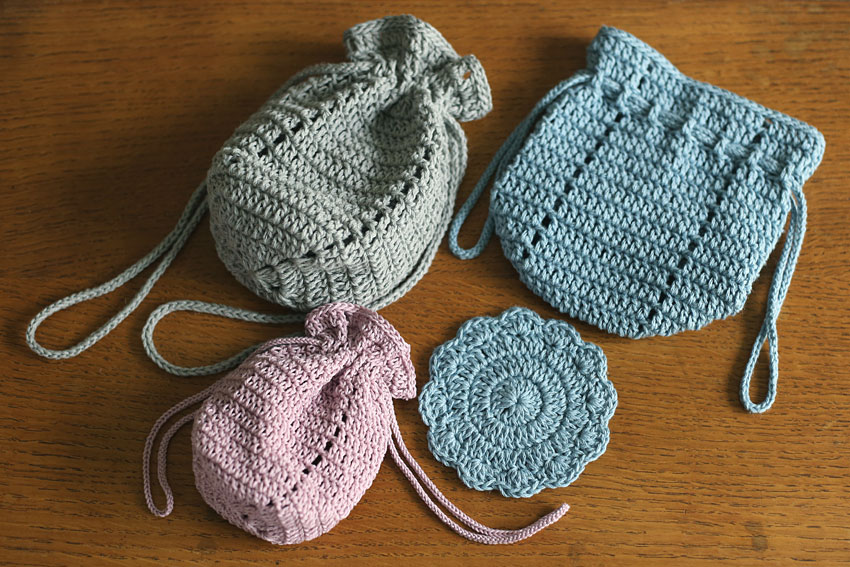
The drawstring bag I knitted is 16-17cm tall and about 15cm wide when measured flat at the opening.
The height of one double stitch is about 1.1cm. The amount of yarn used is about 43g.
With the 50g ball of yarn I used this time, I had a little bit of yarn left over after I finished knitting, and the remaining yarn was enough to knit one coaster for the first project.
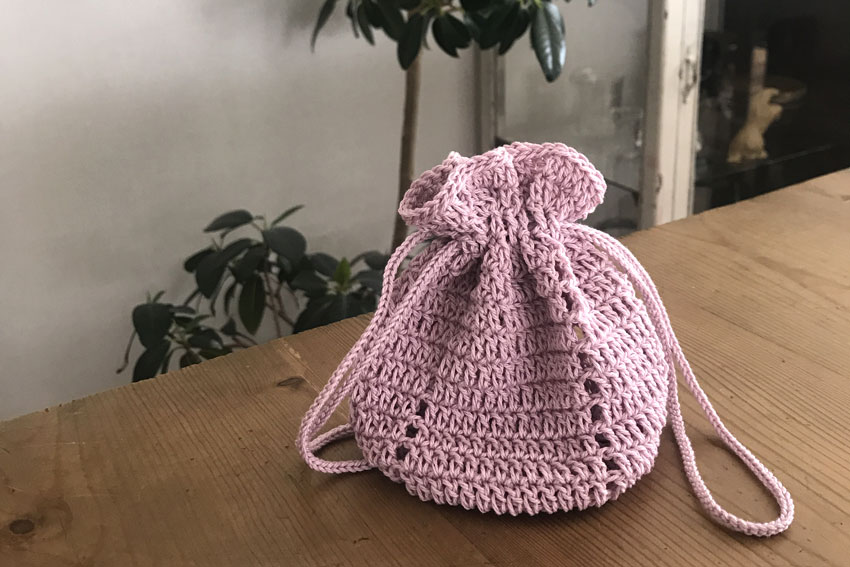
By the way, the small pink drawstring bag is a sample made with medium-fine cotton thread, which is a little thinner than the regular weight thread used this time. Please use this as a reference for the size.
How do you knit a drawstring pouch?
This time we will be making a circular knitting drawstring pouch.
Start knitting from the bottom, increasing the number of stitches in a circular motion, and once the bottom has reached a certain size, continue knitting the sides without changing the number of stitches.
The main body is knitted entirely using double stitches and chain stitches, except for the edge of the drawstring opening.
Once the edge is knitted, cut the yarn, process it and complete the main body.
Drawstrings are made using a knitting technique called "thread cord," which is a fairly commonly used technique so it's useful to remember.
-Why did you choose a long knit piece this time too?
In the first article, I wrote that double crochet makes it easy to see each stitch, so it's easy to count the number of stitches.
This time we will be knitting by making a loop, but this loop cast-on is much easier to understand if you use double crochet rather than knit stitch.
Knit stitches, which involve casting a loop first, are a very common knitting technique that can also be seen in amigurumi, but it can be difficult to know where to insert the needle and knit, and which stitch to count as one.
So, when it comes to making a loop, which is the basic technique of crocheting, try it with a double stitch first!
How to Read the Crochet Chart
▶ Knitting pattern PDF fileAlso available!
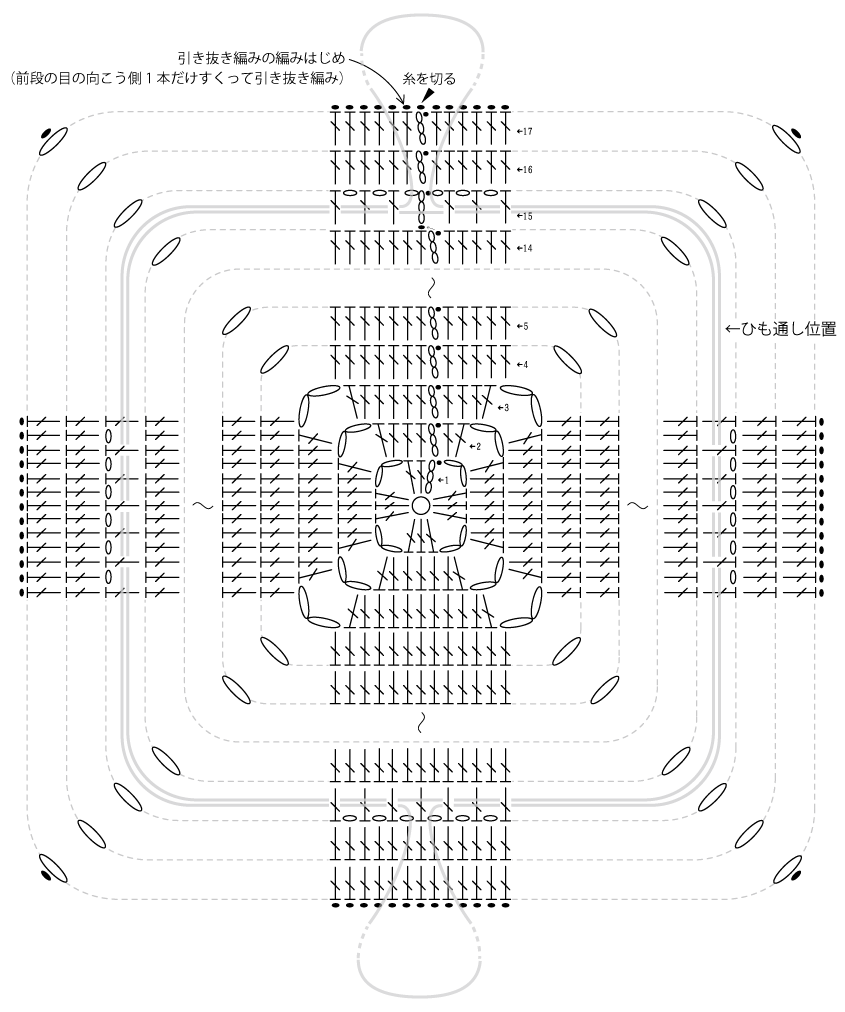
Here is the knitting pattern for this time.
This is a flat knitting pattern, but if you knit it exactly as shown in the pattern, you will end up with a three-dimensional drawstring pouch.
Now, let me explain how to interpret the symbols.
・What do the crochet chart symbols mean?
The three symbols that appear in the knitting pattern above are:
The numbers in each row indicate which row it is, and the arrows indicate the direction to knit.
The slip stitch symbol is placed at the end of each row. This means that after you finish the last stitch of the row, you should insert your needle into the first stitch of that row and make a slip stitch.
There is also another place on the outside of the knitting pattern where there are slip stitches. This will be the opening of the drawstring bag that you will knit last.
The edges are reinforced using a slip stitch to prevent them from stretching.
Chain

Slip Stitch

Double Crochet

• How to make the foundation ring
The circle written in the center of the knitting pattern represents the cast-on stitch.
It may be difficult to understand how to make a loop through verbal instructions, so please take a look at the video.
For the first row, cast on a loop, stand up with 3 chain stitches, crochet 2 double crochets, then crochet 2 chain stitches. Then crochet 3 → chain 2 → double crochet 3 → chain 2 → crochet 3 → chain 2 → slip stitch through the chain you started with, and crochet the first row in this order.
・How to knit the bottom of a drawstring bag
The bottom of the drawstring bag is made using double crochets and chain stitches, increasing stitches in all four corners in each row.
Gather the two chain stitches from the previous row at the corner (this is called gathering them into a bundle), then crochet 2, chain 2, then crochet 2 to increase the corner stitches. Continue in this manner for rows 2 and 3.
In the corner of the fourth row, gather the two chain stitches from the previous row together and crochet 1 double crochet, then chain 1, then crochet 1 double crochet.
・How to knit the sides of the drawstring bag
For rows 5 to 14, do not increase or decrease the number of stitches at the corners.
As you knit, imagine that the single chain stitch at the corner is a focal point in the knitted fabric.
・How to create a string threading position
The 15th row is knitted to a size that allows you to thread the drawstring through. Change the knitting method slightly and make a double crochet and a chain crochet every other stitch to complete one round.
In row 15, the start of knitting is shifted by one stitch to match the position of the chain stitch at the corner and the pattern. To explain in detail how to read the knitting pattern, after making the last slip stitch in row 14, make a slip stitch in the stitch to the left, then start up with three chain stitches and start knitting row 15.
When you make the 16th double crochet, gather all the chains from the previous row together.
Even after you finish knitting the 17th row, please leave the yarn on and do not cut it.
• How to crochet the edging
Once you have completed the 17th row, continue knitting the edge using the same yarn.
Although it is called edge knitting, it is simple; just go around the 17th row by knitting a slip stitch in each stitch and you'll finish it.
At this time, pick up just one stitch on the other side of the top of the stitch in the previous row (row 17) and make a slip stitch.
Go around once and cut the yarn when you have finished the last slip stitch.
・How to knit a drawstring
Although it is a departure from the knitting pattern, the drawstring is made using a knitting technique called "thread cord." I will explain how to knit it in the video.
The grey drawstring is made with 130 stitches using a size 7 crochet hook, and the light blue drawstring is made with 150 stitches using a size 5 crochet hook. Feel free to adjust the number of stitches.
Knit two identical strands and leave about 20cm of yarn at the end.
Thread each end through the stringing hole, put a sewing needle through the end of the thread and sew together to secure the ends, then tie and cut the thread.
There are no rules for how to tie the string, so it's fine as long as it stays firmly in place. You can also tie each end of the string in a tight knot so that it's not noticeable, and then thread it through the thread cord to finish the thread.
Now let's actually get crocheting!
Crochet Video Tutorial
This video explains the steps to complete a drawstring pouch, from casting the loop to threading the cord. This video has subtitles but no audio.
The steps explained in the first video will not be explained here, so please start by watching from the first video.
This video is about 22 minutes long, so please take your time to watch it when you have time.
Try making a loop!
Once you learn how to cast on a loop, the range of works you can create will be greatly expanded.
The video explains things slowly, but it's a good idea to rewind and check your hand movements several times until you get used to them.
If the loop of thread you make by putting it on your finger at first is too big or too small, it will be difficult to work with, so try to find a size that is comfortable for you.
The feeling of knitting into the loop of yarn is the same whether you're crocheting double stitches or knitting single stitches.
Don't forget to check the stitch count on each row, especially rows 1 to 4!
The first to fourth rows have four corners that add stitches, so the number of stitches per round changes for each row.
So, be sure to check the stitch count after each row you finish.
If the number of stitches is not according to the knitting pattern, the number will not match when you knit the next row. It would be a shock if you continued knitting without getting the number of stitches correct, and then when you got to the 15th row where you made the string threading hole, the number of stitches did not match! So be sure to check that the number of stitches is correct when you finish knitting the 4th row.
Once you have finished knitting the pouch body
There are several ways to finish the end of your knitting, but for this drawstring pouch, we tightened the end of the yarn by passing it through a loop to prevent it from coming loose.
For more information on this method, seeThe Ultimate Guide to Finishing Crochet: 3 Methods & Seamless Weaving in EndsPlease refer to the page for more detailed information.
Be sure to treat the ends of the yarn so that they are not visible on the back of the knitted fabric.
Make a drawstring with thread cord
We explain this in more detail in the video, but when knitting a thread cord, first pull out yarn that is three times the length you want to make.
The total length of the drawstring for this drawstring is about 55cm, so pull out about 165cm of thread.
We will knit the thread cord using both the pulled-out thread and the thread connected to the ball of thread at the same time.
・How to knit thread cord
The thread on the thumb side is connected to a piece of thread that is three times the length you want to knit, which you prepared at the beginning.
The other thread, on the index finger side, is connected to a ball of thread.
![スレッドコードの編み方[1]くさりの作り目のときのように、針を1回転させてループを作ります。](https://ronique.jp/wp-content/uploads/2021/06/thred01.jpg)
![スレッドコードの編み方[2]ループの根元を押さえ、針に糸をかけてループにくぐらせます。](https://ronique.jp/wp-content/uploads/2021/06/thred02.jpg)
![スレッドコードの編み方[3]糸を引き出したあと、ループを軽く引き締めます。](https://ronique.jp/wp-content/uploads/2021/06/thred03.jpg)
![スレッドコードの編み方[4]親指側の糸を、手前から向こうに向かって、針にかけます。](https://ronique.jp/wp-content/uploads/2021/06/thred04.jpg)
![スレッドコードの編み方[5]ループを指で押さえ、針に糸をかけて2つのループをくぐらせます。](https://ronique.jp/wp-content/uploads/2021/06/thred05.jpg)
![スレッドコードの編み方[6]スレッドコードが1目編めました。](https://ronique.jp/wp-content/uploads/2021/06/thred06.jpg)
![スレッドコードの編み方[7]また、親指側の糸を針にかけます。](https://ronique.jp/wp-content/uploads/2021/06/thred07.jpg)
![スレッドコードの編み方[8]針に糸をかけ、2つのループをくぐらせます。](https://ronique.jp/wp-content/uploads/2021/06/thred08.jpg)
![スレッドコードの編み方[9]2目めが編めました。同じ要領で必要な目数を編みます。](https://ronique.jp/wp-content/uploads/2021/06/thred09.jpg)
After trying it out, don't you want to try making some arrangements like this?
I would like to knit it in a larger size.
A. It is possible to make the drawstring bag larger!
If you only need to adjust the size slightly, you can do so by using a larger crochet hook or thicker yarn.
If you want to make the size larger, you can change the size by increasing the number of rows you increase when knitting the bottom of the drawstring bag. By continuing to increase the bottom to make it larger, the number of stitches on the sides will also increase, making the overall size larger.
In the original knitting pattern, in the corners of rows 2 and 3 where you increase the bottom stitches, you knit 2 double crochets, then 2 chains, then 2 double crochets. Using the same method, you can increase the number of rows you increase at the bottom by increasing stitches in the same way in the corners of rows 4 and beyond. Then, in the row after you finish increasing the bottom stitches, knit 1 double crochet, then 1 chain, then 1 double crochet, just like in the corners of row 4 of the original knitting pattern (if you don't do this, the number of stitches won't match at the stringing point). From then on, knit the same number of stitches as in row 5 and beyond in the original knitting pattern.
You can adjust the length of the drawstring by increasing the number of stitches in the thread cord, so please feel free to adjust it as needed.
I would like to knit it in a smaller size.
A. I recommend using thinner thread.
On the other hand, if you want to make the size smaller, it is recommended to keep the knitting pattern the same but use thinner yarn.
In this example, we used medium-weight yarn, but you can make the drawstring bag smaller by changing the yarn to medium-weight, synthetic, extra-fine, lace yarn, etc. and using a smaller crochet hook size.
The original knitting pattern has few rows to increase at the bottom, so I think this method is a good way to make the size smaller without changing the silhouette. Knitting with thin yarn results in a delicate finish, which is also cute.
The pink drawstring bag I knitted as a sample was made using medium-fine yarn and ended up being small enough to fit in the palm of my hand.
Your work
Marotan's "Drawstring Pouch"
I had fun knitting this cute, round drawstring bag with easy-to-understand instructions, even for beginners. Even with the same knitting technique, using raw silk creates a different feel, and I had so much fun that I ended up knitting it over and over again. Thank you for the wonderful recipe.
Marotan's "Drawstring Pouch"
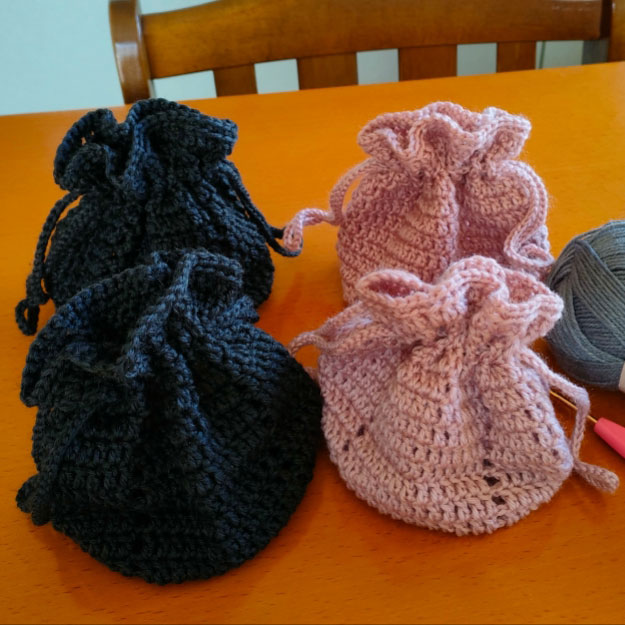
This is my second post. It's so much fun I can't stop (lol). I made two pouches using one ball of recycled yarn from Daiso. I put some sweets in them and give them to people as a small thank you gift. Thank you for the wonderful recipe.